
Quick Answer
A septic tank cross-section diagram reveals the internal anatomy of a residential septic tank — the inlet baffle, three liquid layers (scum, effluent, and sludge), outlet baffle or tee, access risers, and tank lid. Most standard 1,000–1,500-gallon concrete tanks measure approximately 8 ft long × 4 ft wide × 5 ft deep and are designed to separate solids from liquid effluent before it flows to the drain field.
Key Takeaways
- A standard residential septic tank has three distinct internal layers: scum (top ~12 in), effluent/clear zone (middle ~60–70% of volume), and sludge (bottom ~12–16 in).
- The inlet pipe sits 2–3 inches higher than the outlet pipe — that elevation difference is what drives flow through the tank.
- The outlet baffle or tee extends 12–16 inches below the liquid surface to prevent scum from leaving the tank.
- Two-compartment tanks split volume roughly ⅔ (first compartment) to ⅓ (second), providing better solids separation.
- Most 1,000-gallon tanks serving a 3–4 bedroom home need pumping every 3–5 years, per EPA guidelines.
What Are the Main Parts of a Septic Tank?
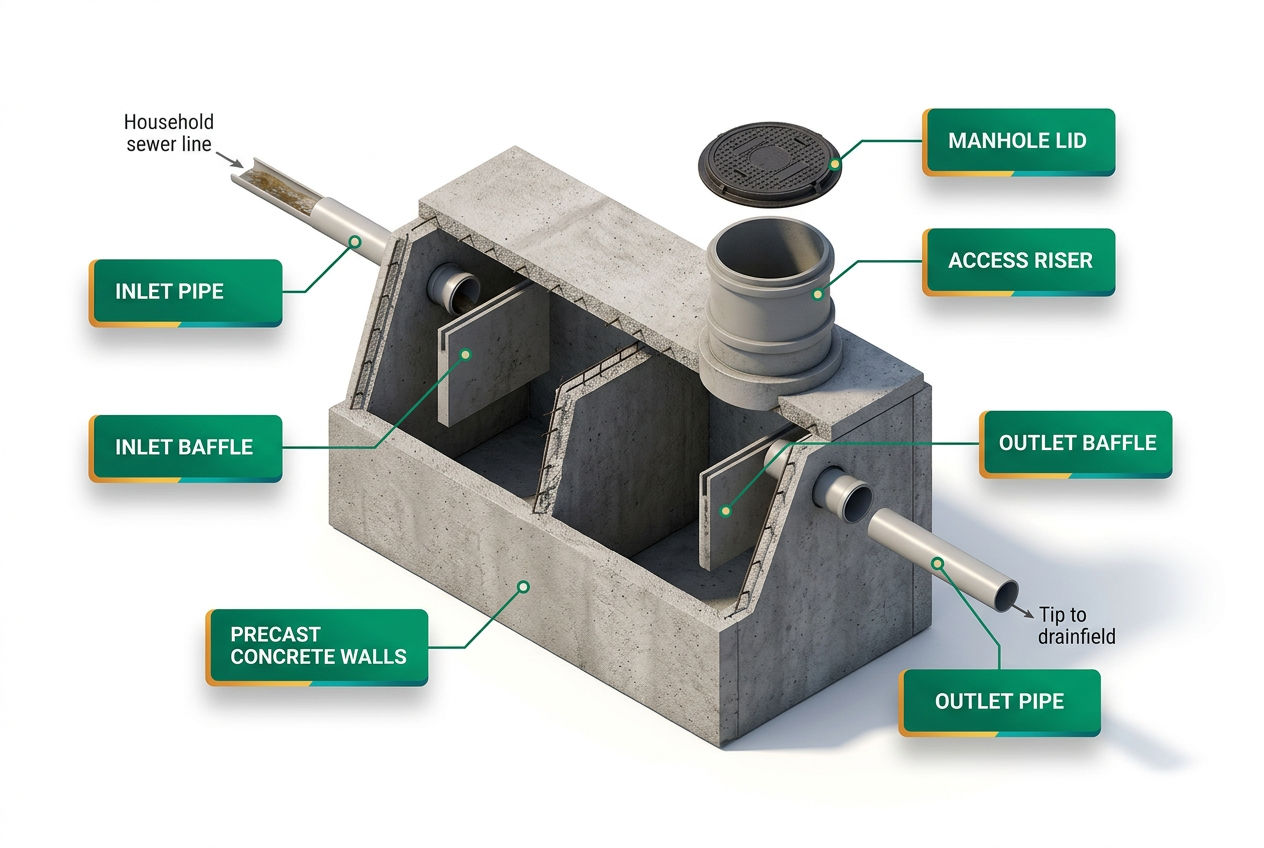
The main parts of a septic tank are the tank body, inlet pipe, inlet baffle, three liquid layers (scum, effluent, sludge), outlet baffle or tee, effluent filter (in many states), access risers, and lid or cover. Each component has a specific job. Remove any one of them — or let one fail — and the whole system suffers.
Here's what you're looking at when a cross-section cuts right through the middle of a buried tank.
The Tank Body
Most residential tanks hold 1,000, 1,250, or 1,500 gallons. A standard 1,000-gallon concrete tank runs about 8 ft long × 4 ft wide × 5 ft deep on the exterior. Inside, it's a sealed chamber with one entry point and one exit point — deliberately simple by design.
Concrete dominates in the Northeast and Midwest. In the Southeast and rural South, you'll find more fiberglass and polyethylene tanks. The cross-section looks similar, but concrete tanks develop hairline cracks over decades, while plastic and fiberglass tanks resist corrosion but can shift in saturated soil. The material choice doesn't change the internal component layout — just the durability profile.
The top of the tank typically sits 4 inches to 4 feet below the ground surface. In northern states like Minnesota, tanks must be buried below the frost line — sometimes 42–60 inches deep — to prevent freezing. In Florida or Texas, a tank might be just 6–12 inches underground.
The Inlet Pipe and Inlet Baffle
Wastewater leaves your house through a 4-inch diameter PVC (or cast iron, in older homes) pipe and enters the tank at the inlet. That pipe doesn't just dump straight in — it connects to an inlet baffle, a deflector wall or T-shaped fitting that redirects incoming flow downward.
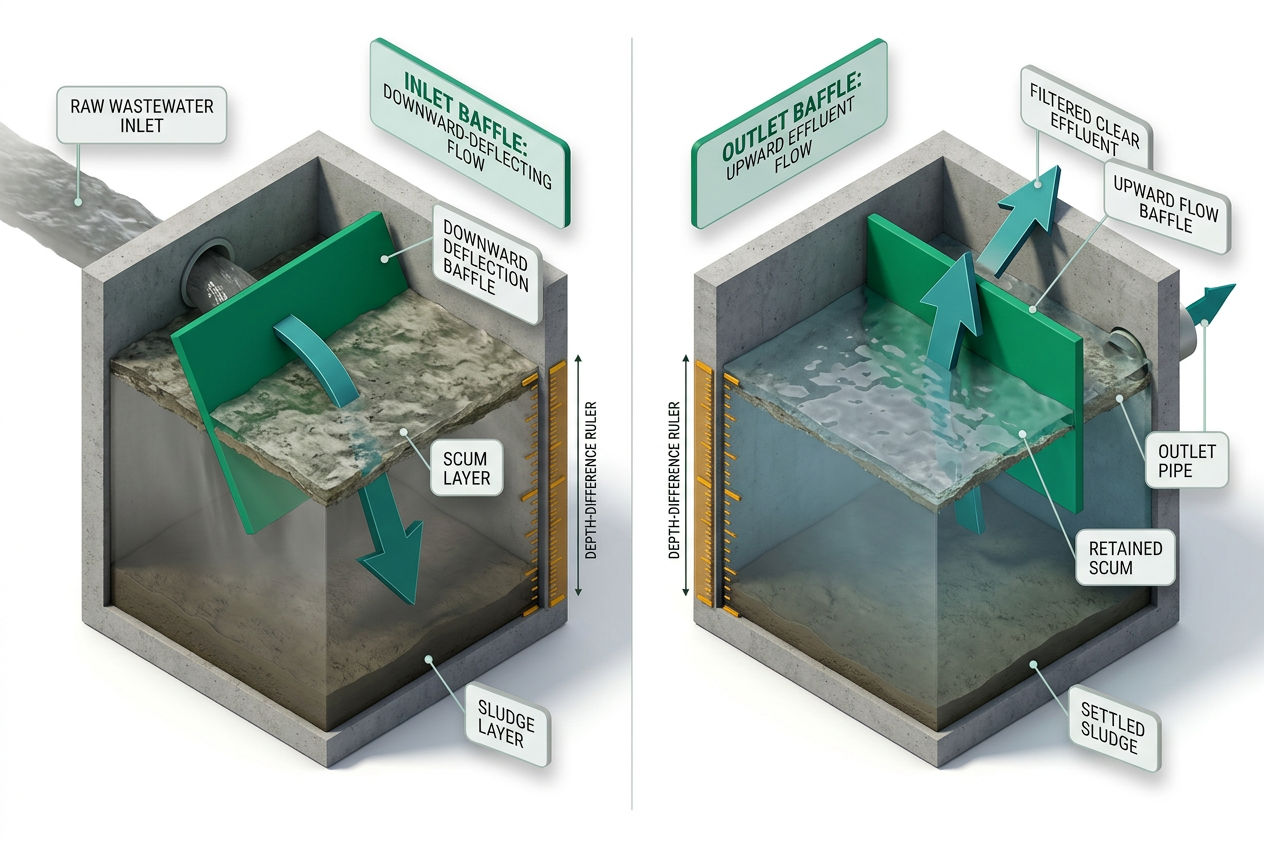
Why does that matter? Without the baffle, raw sewage would shoot straight across the tank and disturb the settled layers. The baffle forces flow downward into the middle effluent zone, protecting the scum layer on top from being disrupted. Think of it like a shower curtain — it keeps the mess contained where it belongs.
The inlet pipe enters the tank 2–3 inches higher than the outlet pipe exits. That small elevation difference is the entire driving force behind flow. Gravity does the work. No electricity, no pumps (in a conventional gravity system).
The inlet baffle itself typically extends 6–8 inches below the liquid surface. A failed inlet baffle is more common than people realize. Concrete baffles in older tanks corrode from hydrogen sulfide gas. If yours is a pre-1980s system, there's a good chance the baffle is gone or compromised. A septic inspector will check this. Baffle repair is one of the more affordable fixes — typically $150–$500 — before it becomes a $5,000 drain field problem.
What Are the Three Layers Inside a Septic Tank?
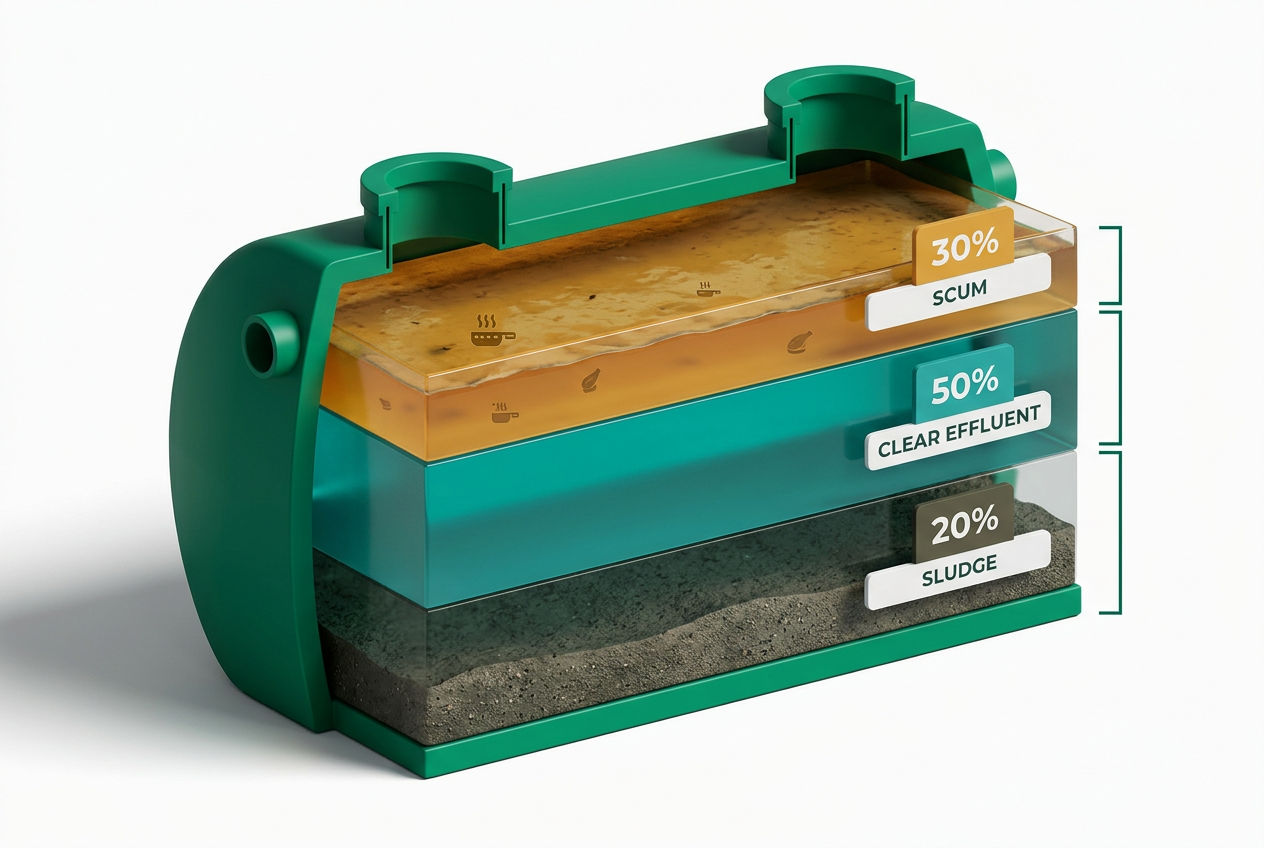
The three layers inside a septic tank are the scum layer at the top, the clear effluent zone in the middle, and the sludge layer at the bottom. Together, these layers represent the tank's passive treatment process — called anaerobic digestion — where bacteria break down organic waste without oxygen.
Scum Layer (Top — approximately 12 inches) Fats, oils, grease, and lightweight solids float. They form a crust across the surface called the scum layer. Healthy scum is semi-solid and around 12 inches thick in a properly functioning tank. If you've ever wondered why cooking grease shouldn't go down the drain, this is why — it accelerates scum accumulation and can eventually clog the outlet baffle.
Effluent Layer / Clear Zone (Middle — 60–70% of tank volume) This is the liquid heart of the tank. Partially clarified wastewater — called effluent — occupies the bulk of the interior. It's not clean water by any stretch. It still contains dissolved nutrients, pathogens, and fine particles. But the solids have largely settled or floated, leaving a clearer liquid zone that exits through the outlet. Wastewater spends an average of 24–48 hours in the tank, giving bacteria time to break down organic matter.
Sludge Layer (Bottom — approximately 12–16 inches) Heavy solids sink. Bacteria partially digest them, but not completely. The remainder — called sludge — accumulates on the tank floor at a rate of roughly 70–80 gallons per person per year. A family of four generates 280–320 gallons of sludge annually. Do the math on a 1,000-gallon tank and you'll see why the EPA recommends pumping every 3–5 years. When sludge builds to within 12 inches of the outlet, it's time to call a pumper. A technician uses a sludge judge — a clear tube lowered into the tank — to measure depth before deciding whether pumping is needed.
The Outlet Baffle and Effluent Tee
The outlet baffle (or outlet tee, in modern installs) is the last line of defense before effluent leaves the tank. It extends 12–16 inches below the liquid surface, deliberately submerged. That depth keeps floating scum from flowing out with the effluent. Only the clear middle zone — sitting below the scum and above the sludge — exits through this fitting.
Outlet baffles are more critical than inlet baffles. A failed outlet baffle lets scum and solids flow directly to your drain field, where they clog the soil and trigger field failure. Replacing a drain field runs $5,000–$20,000+. An outlet baffle replacement costs $150–$400. The math is obvious.
Many states now require an effluent filter attached to the outlet tee — essentially a screened cartridge that catches fine particles. Ohio, North Carolina, and several other states mandate these at the outlet. Common models include the Polylok PL-122 and the Zabel/Sim-Tech A100 filter. These filters need cleaning every 1–3 years, but they dramatically extend drain field life. If your state requires one and yours is missing, that'll come up in any inspection.
Access Risers and Tank Lid
Buried tanks need a way in. Access risers are vertical extensions — typically 20–24 inches in diameter — that run from the tank's access ports up to or near the ground surface. Older tanks have cast concrete lids buried 1–4 feet down. You might not know where they are until a pumper probes the yard with a rod.
Modern installs use polyethylene risers that bring access to grade level, making pumping faster and cheaper. Some states — including Washington and parts of Texas — now require risers to grade for all new installations and system upgrades.
A septic tank lid replacement typically costs $100–$350 for the cover itself. If you're adding risers to bring an old buried system to grade, budget $200–$500 per riser installed.
Most tanks have two access ports — one over the inlet baffle and one over the outlet baffle. Some older single-compartment tanks have only one central access port, which limits inspection capability. Two-compartment tanks typically have three access points.
How Does a Two-Compartment Septic Tank Work?
A two-compartment septic tank divides the tank interior with a solid or perforated baffle wall, creating a primary treatment chamber (approximately ⅔ of total volume) and a secondary clarification chamber (approximately ⅓ of total volume). Effluent passes through an opening near the bottom or through perforations in the dividing wall before exiting through the outlet baffle.
The advantage is significant. By the time effluent crosses into the second compartment, most of the heavy solids have already settled in the first. The second compartment provides a quieter zone for finer particles to drop out. The effluent leaving a two-compartment tank is measurably clearer than what exits a single-compartment design.
Minnesota, Massachusetts, Washington, and several other states now require two-compartment tanks by code for all new installations. If you're in one of these states and your older home has a single-compartment tank, it may be grandfathered — but you'll want to know that before purchasing or upgrading.
How Deep Is a Typical Residential Septic Tank?
A typical residential septic tank is buried with its top surface 4 inches to 4 feet below grade, depending on climate, local code, and site conditions. The depth of burial is one of the most regionally variable specifications in the entire septic system parts diagram — and one of the most consequential.
Cold-climate installations (Minnesota, Wisconsin, Maine, upstate New York): Tank tops often sit 24–48 inches below grade, with the inlet pipe buried even deeper. The vulnerable point is the inlet pipe — the first 10 feet between your house and the tank. Insulating that run with rigid foam board can prevent a $1,500–$2,500 emergency thaw service call in a brutal January.
Moderate climates (Ohio, Tennessee, the Carolinas): Tanks typically sit 12–24 inches down. Frost isn't the design driver here — the bigger concern is traffic loading. Never park vehicles over a buried tank. Concrete tanks crack under repeated load cycles; fiberglass and polyethylene tanks can deform.
Warm-climate installations (Florida, Louisiana, coastal Texas): Shallow burial is the norm — sometimes just 6–12 inches to the top of the tank. High groundwater tables in these regions are the real engineering challenge. At high water table sites, tanks are sometimes installed with ballast anchors to prevent them from floating during wet seasons.
The access risers above the tank are a reliable indicator of depth. If you see tall risers rising 18–24 inches above grade, the tank is buried deep. If the lid is nearly flush with the lawn, you're in a warm-climate shallow install.
What's the Difference Between the Inlet and Outlet on a Septic Tank?
The inlet is where wastewater enters from the house; the outlet is where clarified effluent exits toward the drain field. The key physical difference is elevation: the inlet pipe sits 2–3 inches higher than the outlet pipe, and that drop is what moves liquid through the tank by gravity alone.
Beyond elevation, the two ends are mirror images in purpose but opposites in design priority:
| Feature | Inlet Side | Outlet Side |
|---|---|---|
| Baffle depth below liquid | 6–8 inches | 12–16 inches |
| Primary job | Redirect flow downward; protect layer separation | Block scum; allow only clear effluent to exit |
| Filter required? | No | Yes, in many states |
| Failure consequence | Disrupted layers, faster sludge buildup | Scum to drain field, field failure |
| Repair cost | $150–$400 | $150–$500 (+ filter) |
The outlet baffle's extra submersion depth is intentional. It needs to be well below the scum layer (which sits at the surface) and above the sludge layer (on the floor) to skim only from the clean effluent zone in the middle. A 12–16 inch extension achieves this in a full tank.
What's the difference between a baffle and a tee? Functionally, nothing in a gravity system. A baffle is a fixed wall with a slot; a tee is a pipe fitting shaped like the letter T. Modern installs almost universally use outlet tees because they're easier to fit with an effluent filter. Pre-1980s tanks often have concrete baffles instead.
The Full System: Beyond the Tank
Free download
Free: the Septic Fridge Card — what to flush, what never to.
The Do / Don’t card the whole family can see, plus the Survival Kit: emergency flowchart, warning-sign decoder and pump-schedule card. One printable PDF.
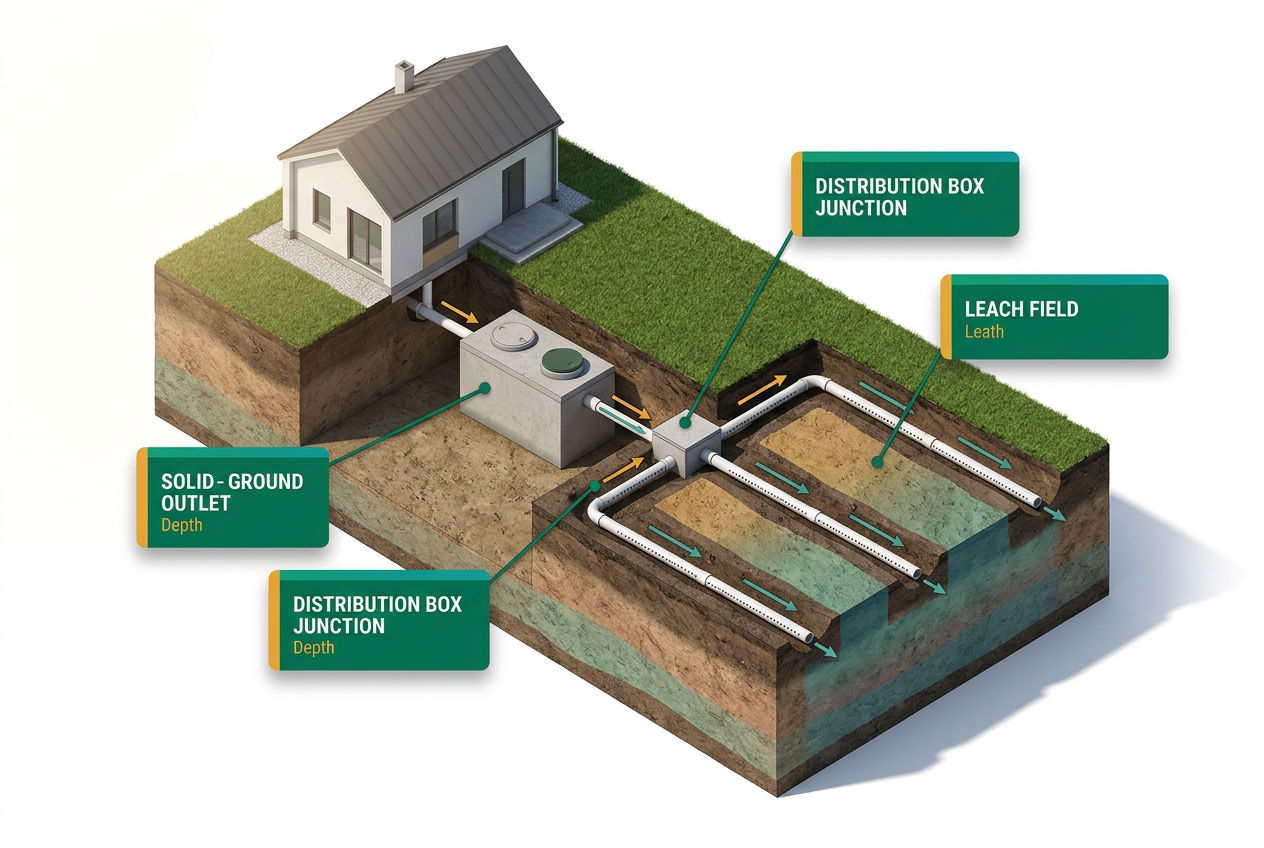
The septic tank is only the first stage. Understanding the full septic system cross-section diagram means following effluent from the house all the way to the soil.
The Sewer Line (House to Tank) A 4-inch PVC pipe runs from your home's main drain cleanout to the tank inlet. It should maintain a slope of ¼ inch per foot — shallow enough to maintain flow velocity without outrunning the liquid. Too steep, and solids separate from the liquid before reaching the tank.
The Distribution Box (D-Box) After leaving the tank outlet, effluent flows to a distribution box (d-box) — a small concrete or plastic junction box that splits flow equally among the drain field laterals. A level d-box is critical. If it tilts even half an inch, one lateral gets overloaded while the others starve. Uneven distribution is one of the most common causes of premature drain field failure.
The Drain Field (Leach Field) Effluent flows from the d-box into perforated pipes laid in gravel-filled trenches, typically 18–36 inches deep and spaced 6 feet apart. Effluent seeps out through the perforations and into the surrounding soil, where the final treatment happens — pathogens are filtered and nutrients are absorbed before the water reaches groundwater.
Pressure Distribution and Pump Systems On lots with limited space or challenging topography, a septic system diagram with pump replaces gravity flow with a pump chamber. Effluent is dosed in timed intervals to distribute loading more evenly across the field. These systems add a pump, float switches, and a control panel to the standard cross-section.
When to Call a Pro (And What They're Looking At)
Picture this: a home inspector pulls up the septic records during a real estate transaction and finds no pump-out in 11 years. The house has four bedrooms. That's a red flag — and it's exactly what a licensed home inspection for septic systems is designed to catch.
Here's what a certified NAWT (National Association of Wastewater Technicians) inspector evaluates during a full system inspection:
- Sludge and scum levels — measured with a sludge judge and a scum stick. If combined they occupy more than ⅓ of tank volume, pumping is overdue.
- Baffle condition — inlet and outlet baffles are visually inspected through the access ports. Corroded or missing baffles are noted as deficiencies.
- Effluent filter — if present, pulled and inspected. If absent where required by state code, flagged.
- Tank structural integrity — inspectors look for cracks, evidence of root intrusion, and lid condition.
- D-box level and flow — a technician checks whether the distribution box is level and whether all laterals are accepting flow.
- Drain field condition — surface ponding, wet spots, or sewage odors above the field indicate failure or imminent failure.
What does this cost? For a standard 1,000-gallon pump-out, expect to pay $275–$400 in the Southeast and $350–$500 in rural Midwest or New England markets where drive times are longer. A full inspection (pump-out + evaluation report) runs $400–$700 in most markets. For a full breakdown of what pumping costs by region and tank size, see our cost guide.
Once the tank has been pumped and inspected — and only then — is the right moment to think about ongoing maintenance. If you plan to use a bacterial treatment between pump-outs, the product we recommend is Septifix. Each tablet releases oxygen along with 14 strains of aerobic bacteria (roughly 10 billion CFU) directly into the tank, targeting odor and sludge buildup at the source. Dosing is simple: one tablet flushed down the toilet, at around $3–$4 per treatment. It's non-toxic, made in the USA, and backed by a 60-day money-back guarantee. That said, no additive replaces scheduled pumping — the EPA's position on that hasn't changed, and neither has ours.
Ready to schedule an inspection or pump-out? Find a certified septic professional near you.
Sources & Methodology
- U.S. Environmental Protection Agency (EPA) — "How Your Septic System Works." https://www.epa.gov/septic/how-your-septic-system-works. Referenced for pumping frequency guidelines (3–5 years) and general system function descriptions.
- National Association of Wastewater Technicians (NAWT) — Inspector certification standards and inspection protocol descriptions referenced for the "When to Call a Pro" section.
- University of Minnesota Extension — "Septic System Owner's Guide." Referenced for cold-climate burial depth requirements and frost line specifications for northern states.
- North Carolina State Extension — "Septic System Operation and Maintenance." Referenced for effluent filter mandate details and outlet baffle requirements in NC.
- Washington State Department of Health — "On-Site Sewage System Design Standards." Referenced for two-compartment tank requirements and riser-to-grade installation mandates.
Dimensions, layer depths, and cost figures are based on manufacturer specifications, state design standards, and regional contractor pricing data current as of publication date.
Related Rid-X & Septic Treatment Guides
- The Best Rid-X Alternatives
- The Best Septic Tank Smell Removers
- Septic Smell When It Rains? Why It Happens & How to Fix It
- Can You Use Rid-X in an RV Black Tank? What to Know First
- Is Rid-X Safe for Septic Tanks, Toilets & Pipes?
- How Often Should You Use Rid-X? Directions, Dosing & Timing
- What's Actually in Rid-X? Ingredients Explained
- Does Rid-X Unclog Drains or Toilets?
- Rid-X vs. Green Gobbler: Which Septic Treatment Wins?
- Green Gobbler Septic Treatment Review: Pods, Packets & Results
- Where to Buy SeptiFix
- Bio-Clean Septic Treatment Review: Does It Work?
- Cabin Obsession Septic Tank Treatment Review
- Camco Septic Tank Treatment Review
- Septic Tank Treatments at Walmart vs. Home Depot vs. Online
- Septic Smell Coming From Toilet? Causes & How to Fix It
- Septic Smell From Shower Drain? Causes & How to Fix It
- Septic Tank Smell After Pumping? Causes & How to Fix It
- Septic Smell From Roof Vent? Causes & How to Fix It
- Is Septic Tank Smell Dangerous? Gases, Risks & When to Worry
- Septic Tank Diagram With Dimensions
- Septic System Diagram With a Pump
- Septic Tank Plumbing Diagram: From House to Drain Field
- Aerobic Septic System Diagram: How Each Part Works
- Are Septic Tank Treatments Necessary?
- How to Handle How Often to Use Septic Tank Treatment: Step by Step
- Septic Treatment Tablets vs. Powder vs. Liquid: Which Is Best?
- Best Septic Tank Treatment for Slow Drains
- Yeast, Baking Soda & Milk in Your Septic Tank: Myths Tested
Frequently Asked Questions
What Does a Septic Tank Cross Section Diagram Show?
A septic tank cross section diagram shows the complete internal layout of a buried septic tank — every component labeled and positioned as it sits underground. The diagram reveals the inlet pipe entering at a slightly elevated angle, the inlet baffle redirecting flow downward, the three distinct liquid layers (scum at top, clear effluent in the middle, sludge at the bottom), the outlet baffle or tee extending 12–16 inches below the liquid surface, and the access risers running up to grade level. A well-drawn cross section also shows dimensional relationships: the 2–3 inch elevation drop between inlet and outlet, the relative thickness of each layer in a properly functioning tank, and the position of the effluent filter at the outlet tee. For homeowners, the diagram is the fastest way to understand why each component exists and what happens when one fails. It turns an invisible buried system into something you can actually picture and maintain.
What Is a Septic Tank Parts Diagram Used For?
A septic tank parts diagram is used to identify, inspect, and maintain every component of an on-site wastewater system. Homeowners use it to understand what a pumper or inspector is referencing during a service call — terms like "outlet tee," "scum layer," or "effluent filter" make immediate sense once you've seen where each part sits in the cross section. Inspectors use parts diagrams as a checklist: inlet baffle present and intact, outlet baffle submerged to the correct depth, access risers at or near grade, effluent filter installed where required by state code. Real estate agents and buyers use labeled diagrams during property transactions to evaluate system condition reports. Contractors use them during installation to confirm component placement meets local code requirements. In short, the septic tank parts diagram is the shared visual language between homeowners, service professionals, inspectors, and regulators — a reference that makes the invisible visible and the technical accessible.
How Does a Septic System Cross Section Diagram Differ From a Full System Diagram?
A septic system cross section diagram differs from a full system diagram in scope: the cross section focuses on the interior of the tank itself, while the full system diagram shows every component from the house connection to the drain field. A tank cross section reveals the internal layers, baffles, and fittings in detail. A full septic system diagram adds the sewer line running from the house, the distribution box splitting flow to multiple laterals, the perforated drain field pipes in their gravel-filled trenches, and — in pressure systems — the pump chamber, float switches, and dosing controls. If you're troubleshooting a problem inside the tank (baffle failure, sludge buildup, effluent filter clogging), the cross section diagram gives you what you need. If you're diagnosing a system-wide issue — uneven drain field loading, pump failure, a tilted d-box — you need the full system diagram to see how the components interact across the entire property.
What Is a Septic Tank Diagram With Labels Called?
A septic tank diagram with labels is most commonly called a "labeled cross-section diagram" or a "septic tank anatomy diagram" in industry and extension literature. Some state health departments call it a "component identification diagram" in their permitting and inspection forms. The key feature of a labeled diagram — as opposed to a schematic or site plan — is that it identifies each internal part by name and often includes dimensions: the 6–8 inch inlet baffle depth, the 12–16 inch outlet tee extension, the approximate thickness of each liquid layer. For homeowners filing a maintenance log or preparing for an inspection, requesting a "labeled septic tank cross section" ensures you receive a diagram that names every part rather than just showing the tank's external shape or footprint. Most state cooperative extension services publish labeled diagrams at no cost, and the EPA's SepticSmart resources include printable versions suitable for home records.
How Does a Septic Tank Work, Step by Step?
A septic tank works by receiving all household wastewater, separating solids from liquid through gravity and bacterial digestion, and releasing clarified effluent to the drain field. Here is the step-by-step process: (1) Wastewater flows by gravity from the house through a 4-inch pipe to the tank inlet. (2) The inlet baffle deflects incoming flow downward, protecting the settled layers from disruption. (3) Inside the tank, materials separate by density — fats and grease float to form the scum layer, heavy solids sink to form the sludge layer, and partially clarified liquid occupies the middle effluent zone. (4) Anaerobic bacteria digest organic matter in both the scum and sludge layers, reducing volume over time. (5) After 24–48 hours of retention, clarified effluent passes through the outlet baffle or tee — which blocks scum from exiting — and flows to the drain field. (6) In the drain field, soil provides final treatment, filtering pathogens before water reaches groundwater. The system requires no electricity in a conventional gravity installation.
What Is a Septic System Parts Diagram and What Should It Include?
A septic system parts diagram is a technical illustration showing every component of an on-site wastewater system, from the house connection through the tank and into the drain field. A complete diagram should include: the main sewer line with its correct slope (¼ inch per foot), the inlet pipe and inlet baffle with submersion depth labeled, the three internal tank layers (scum, effluent, sludge) with approximate thicknesses, the outlet baffle or tee with its 12–16 inch submersion depth, the effluent filter at the outlet, access risers and lids at grade, the distribution box with equal-flow outlets to each lateral, the drain field trench cross section showing perforated pipe, gravel bed, and geotextile fabric, and — in pressure systems — the pump chamber with float switch positions. State health departments typically require a site-specific parts diagram as part of the permit application for new system installation. Homeowners should keep a copy of their system's as-built diagram with their property records, as it is often required during real estate transactions and permits future service technicians to locate components without probing the yard.
Was this article helpful?
Frequently Asked Questions
Recommended Resources
📖 Related Articles
- What Is a Drain Field? (And How Does It Work?)
- Concrete vs Plastic Septic Tanks: Which Is Better?
- Septic Tank Baffle Repair & Replacement: Costs, Signs of Failure, and DIY vs Pro
- How to Handle Septic Tank Lid Replacement: Step by Step
- Septic Tank Diagram With Dimensions (Sizes, Depths & Layout)
- High Water Table and Septic Systems: What You Need to Know
- What Is a Distribution Box in a Septic System?
- Septic System Diagram With a Pump (How Pumped Systems Work)
- Septic Inspection for Home Buyers: Complete Checklist
💰 Cost Guides
🔧 Services
Find Septic Professionals Near You
Compare licensed, verified septic companies by area — top county markets and cities below, or browse all 50 states.
County markets
Popular cities
