

Quick Answer
Septic tank lid replacement involves removing a damaged or deteriorated tank access cover and installing a correctly sized replacement — either concrete or plastic — to restore safe, code-compliant access to your septic system. Concrete lids run $30–$150 in materials; plastic alternatives cost $20–$80. Most homeowners complete a straightforward swap in 1–3 hours.
Key Takeaways
- A cracked or missing septic tank lid is a genuine safety hazard — hydrogen sulfide (H₂S) gas can accumulate, and an open tank is a collapse risk for children, pets, and adults
- Concrete lids weigh 50–100+ lbs; plastic riser lids weigh 5–15 lbs — know what you're lifting before you start
- Standard lid diameters are 12", 16", 20", and 24" — measure before you order anything
- Lids are not universal; matching your tank manufacturer's specs matters more than buying whatever fits roughly
- If the lid is buried more than 12 inches deep, a riser installation is worth doing at the same time
⚠️ Safety First: Read This Before You Touch the Lid
This is not a boilerplate disclaimer. Septic tanks produce hydrogen sulfide gas — the same compound that smells like rotten eggs and is toxic at concentrations above 100 ppm. At higher concentrations, it paralyzes your sense of smell before you realize you're in danger. According to the EPA's guidelines on septic systems, confined-space entry into an open tank without proper equipment has caused fatalities.

Do not lean over an open tank. Do not enter a septic tank under any circumstances. Keep children and pets away from the work area.
Beyond gas exposure, a structurally compromised concrete tank lid can collapse under foot traffic. If the surrounding concrete collar or riser is also cracked, the opening could be larger than expected once the lid is removed.
Work with a partner. Have your phone on you. Ventilate the area by removing the lid and stepping back for 2–3 minutes before doing any close inspection of the opening.
How Do You Know If Your Septic Tank Lid Needs Replacing?
A septic tank lid needs replacement when it shows visible cracking, crumbling edges, missing sections, a broken locking mechanism, or when it no longer seats flush on the access opening. Some lids don't fail dramatically — they slowly deteriorate from freeze-thaw cycles, UV exposure, or decades of soil pressure until one day they simply aren't safe anymore.
Here are the most common warning signs:
Visible cracks. A hairline crack in a concrete septic tank lid can let in roots, soil, and surface water — all of which disrupt the anaerobic digestion process inside the tank. If you can see daylight through it or fit a finger in it, replace it.
Sunken or tilted lid. This may signal that the tank walls or collar have shifted. Don't just replace the lid; have the tank inspected before you assume it's a surface-level fix.
Rust-through on metal lids. Older homes sometimes have steel access covers. Once they rust, they go fast. Replace immediately.
Failed locking mechanism. Some jurisdictions require locking lids as a code-compliance matter. Florida and California both have regulations around secure septic access covers — check with your county health department to confirm what's required in your area.
Smell near the access point. If you're catching sulfur odors at ground level near the lid, the seal has likely failed or the lid has cracked through.
How Do You Find a Buried Septic Tank Lid?
Before you can replace a septic tank cover, you have to find it. If you don't already know where your tank is, start with your property's as-built septic diagram — usually filed with your county health department when the system was installed.
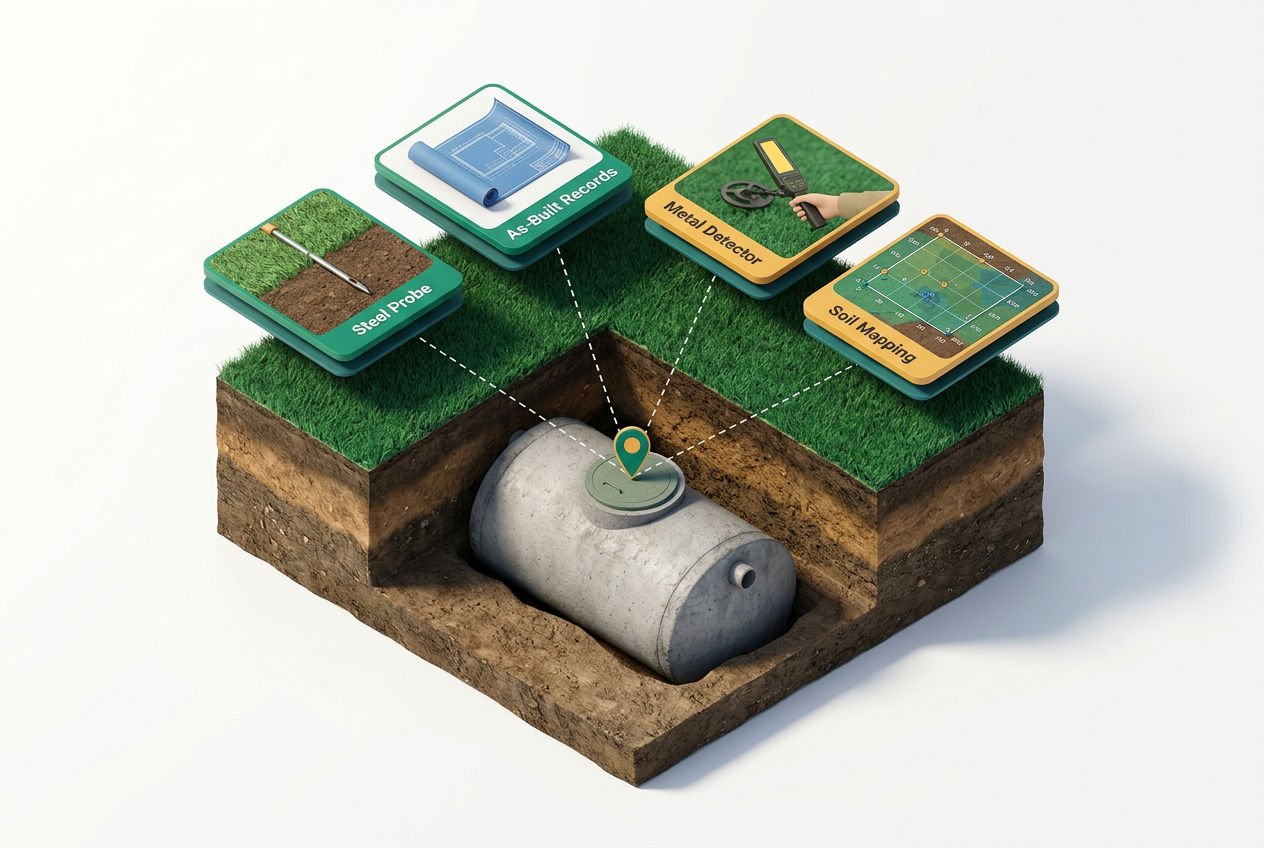
Our guide on how to find your septic tank walks through the full process, including probing the yard with a thin metal rod, using a soil probe after following your main sewer line out from the house, and requesting records from your local permitting office.
Most tanks have two access points: one over the inlet baffle (closer to the house) and one over the outlet baffle (toward the drain field). Both need functional lids.
Once you've found the lid, check burial depth. If the top of the lid sits more than 6–12 inches below grade, a riser installation makes sense here. Digging it up again in three years for pumping costs money and effort. More on risers below.
What Size Is a Septic Tank Lid?
Standard septic tank lid diameters are 12 inches, 16 inches, 20 inches, and 24 inches. The 20" and 24" sizes are most common on residential tanks installed after the 1980s. Older concrete tanks from the 1960s–70s may have non-standard openings.
Measure the opening — not the old lid. Lids are designed to overlap the collar, so measuring the old lid often gives you a number that's 2–4 inches larger than the actual opening diameter. Measure the inner diameter of the concrete collar, then confirm with the outer dimension.
Are septic tank lids universal? No. Lid compatibility depends on your tank manufacturer, the collar style (flat-top vs. tapered), and whether you have a riser installed. An Infiltrator Water Technologies tank uses different lid specs than an older poured-concrete tank. If you're buying a replacement lid, bring the measurements and photos to the supplier — or contact your tank manufacturer directly.
Step-by-Step: Septic Tank Lid Replacement
What You'll Need
- Flat pry bar or lid removal tool
- Work gloves (heavy-duty)
- Safety glasses
- Measuring tape
- Camera or phone for photos
- Replacement lid (correct size and material)
- Hydraulic concrete caulk or foam sealant (for concrete lids)
- Assistant (mandatory for concrete lids)
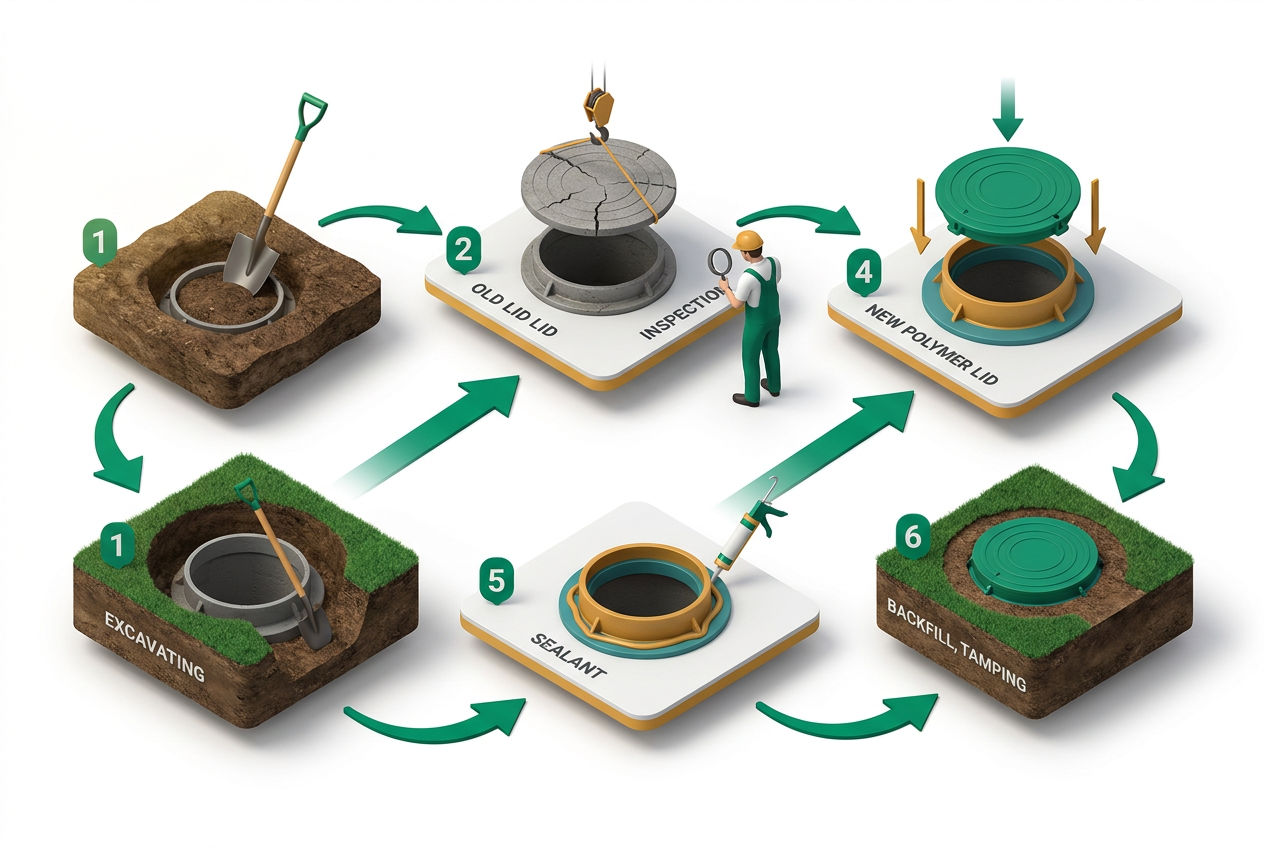
Step 1: Locate and Expose the Lid
Dig down to expose the full lid surface. Remove loose soil around the perimeter — you need clearance to get the pry bar under the lip.
Photograph the lid before removal. This documents existing damage for permit records or HOA files.
If the lid is completely buried and you're not sure where it is, see the how to find your septic tank guide before going further.
Step 2: Mark Your Safety Zone and Step Back
Once you've exposed the lid, don't pry it up yet. Mark a perimeter with stakes or cones if you have them. Tell anyone nearby to stay back at least 10 feet. This isn't overcautious — it's the right move.
Step 3: Remove the Old Lid
For concrete lids, slide the flat end of a pry bar into the gap between the lid and the collar. Work around the perimeter to break the seal evenly. Concrete lids weigh 50–100+ lbs depending on thickness (typically 4–6 inches for structural integrity). Do not attempt to lift a concrete lid alone. Use a two-person lift, or rent a lid lifter from your local equipment rental shop.
Once lifted, set it on solid, flat ground away from the tank opening. Do not drop it — concrete lids that fall and crack on the collar can damage the tank collar itself, turning a $75 lid replacement into a $500+ repair.
For plastic riser lids, most use a bayonet-style quarter-turn lock or a bolt ring. Unlock, twist, and lift. These weigh 5–15 lbs and are a one-person job.
Step 4: Inspect the Opening Before Installing the New Lid
Now that the lid is off, take 2–3 minutes back from the opening. Then take photos of the collar, the visible baffle, and the tank interior from a distance. Don't lean in.
Check the collar for:
- Cracking or crumbling concrete
- Offset or settled tank sections
- Root intrusion
- Water line marks indicating high groundwater infiltration
While you're here, this is a smart time to schedule a septic tank pump-out if it's been more than 3 years. The EPA recommends pumping every 3–5 years for most households. A 1,000-gallon tank serving a 4-person household typically needs pumping every 3–4 years. If you have a garbage disposal, knock that down to every 2 years.
You can also look at the outlet baffle to make sure it's intact. A deteriorating septic tank baffle lets solids pass into the drain field — a much more expensive problem than a cracked lid.
Step 5: Measure and Confirm Your Replacement Lid
Measure the inner collar diameter now that you have clear access. Confirm the collar style — is it flat, tapered, or threaded? Write down the tank manufacturer name if it's stamped on the tank wall.
Then buy the right lid. Concrete lids typically run $30–$150 depending on size and source (concrete suppliers, precast companies, some big-box stores). Plastic poly lids run $20–$80. If you're upgrading to a locking septic tank lid, budget $50–$200 depending on the locking mechanism.
Step 6: Install the Replacement Lid
For concrete lids: apply a bead of hydraulic concrete caulk around the collar lip. Set the lid with two people, centering it evenly. Press down firmly to seat it into the caulk. Wipe away excess. Allow to cure per the manufacturer's instructions before backfilling.
For plastic riser lids: align the tabs or threads, press down, and rotate or bolt into place. Most plastic lids have a gasket built in — no sealant needed. Confirm the lock engages fully.
For locking lids in regulated areas: Florida requires that lids be secured to prevent unauthorized access. Confirm the locking mechanism is engaged and document installation for your permit file.
Step 7: Backfill and Document
Backfill with the excavated soil. Tamp lightly — don't compact heavily directly over the lid. Mark the access point with a stake, landscape pin, or GPS waypoint so you can find it again at the next pumping.
A new lid is a good reset point for your system records. Note the installation date, lid material, size, and source. Add this to your septic tank maintenance schedule file.
Should You Consider a Riser at the Same Time?
If the lid you're replacing sits more than 6–12 inches below grade, this is the right moment to add a septic tank riser. A riser brings the access point to grade level, eliminating the need to dig at every pump-out. Our septic tank risers guide covers the full installation process, material options, and cost.
The incremental cost of adding a riser while you already have the lid off is substantially lower than scheduling a separate excavation later. If you're already spending $50–$150 on a lid, adding a riser for $100–$300 in materials is worth the calculation.
When Should You Call a Professional Instead?

The Septic Owner's Handbook
Own a septic system? Get the manual nobody gave you.
How it works, the golden rules, the maintenance calendar, and a warning-signs decoder for every gurgle, smell, and wet spot — so small issues never become $15,000 ones.
Get the Handbook — $27 →Instant download · 250+ pages, 17 chapters + printable toolkit · Yours to keep foreverDIY lid replacement is reasonable when: the tank is shallow, you can locate both access points, the collar is intact, and you can get a helper for the lift. That describes maybe half of the calls we see.
Call a licensed professional when:
- The collar is cracked, settled, or offset — this is a structural issue beyond a lid swap
- You can't locate the tank or confirm the lid position
- The area around the lid shows signs of sewage surfacing (soft wet spots, odor, unusual grass growth)
- You're in a jurisdiction with permit requirements for septic work (Florida requires septic contractors to hold a Registered Septic Tank Contractor (RSTC) license through the Department of Health — unlicensed septic work can void your system permit)
- The tank is in a drivable area requiring an H-10 or H-20 rated load-bearing cover (ASTM C478 standards apply)
Find a licensed septic professional in your area if any of these conditions apply.
How Much Does Septic Tank Lid Replacement Cost?
Septic tank lid replacement costs $50–$500+ depending on lid material, size, whether labor is involved, and regional contractor rates.

Material costs only:
- Concrete septic tank lid: $30–$150
- Plastic/poly lid: $20–$80
- Locking septic lid: $50–$200
- Riser lid upgrade (lid + riser): $100–$400 in materials
With professional labor:
- Basic septic lid replacement (labor + lid): $150–$350
- Lid + riser installation: $300–$600
- Lid replacement with collar repair: $400–$900+
A real-world example: a homeowner in central Ohio with a cracked 24" concrete lid on a 1,500-gallon tank pays roughly $80 for the replacement lid and $175 in labor if they hire a local contractor — total around $255. The same job in rural Montana might run $350–$425 because of travel time and limited contractor availability.
For a full breakdown of repair scenarios, see our septic repair cost guide and septic pumping cost guide.
Regional and Seasonal Notes
Michigan and upper Midwest: Freeze-thaw cycling accelerates concrete lid deterioration faster than in Southern states. If you're replacing a lid in late fall, plan to complete the job before the ground freezes — setting concrete caulk in sub-freezing temperatures compromises the seal. Don't start this project if overnight temps are forecast below 35°F.
Phoenix and desert Southwest: UV radiation degrades poly lids faster than in northern climates. A plastic septic tank lid that lasts 20 years in Minnesota may show significant brittleness after 10 years in Phoenix. If you're in a high-UV area, budget for more frequent lid inspection and consider UV-stabilized poly products specifically rated for sun exposure.
Pacific Northwest: High groundwater and saturated soils put upward pressure on lids from below during wet seasons. If you're finding lids that have shifted or cracked without obvious surface cause, groundwater infiltration may be the culprit — not just age.
Florida: Beyond the RSTC licensing requirement, Florida's sandy soils mean lids can shift significantly over time. The state's warm, humid climate also accelerates concrete degradation. Inspect concrete lids annually in coastal counties.
Maintenance After Septic Lid Replacement
Once the new lid is in place:
- Inspect annually. Walk the lid during your regular yard maintenance. Look for settling, cracking, or shifting.
- Keep heavy equipment off. Unless the lid is rated for vehicular load (H-10 or H-20), keep vehicles, ATVs, and heavy machinery away from the access point.
- Mark it clearly. Buried lids get forgotten. A riser, a landscape marker, or a GPS pin in your phone all work.
- Schedule pumping. Per EPA recommendations, most residential tanks need pumping every 3–5 years. Your new lid is a natural reminder to set that schedule. Track it in your septic tank maintenance schedule.
- Check the seal after the first freeze-thaw cycle. Concrete caulk can crack slightly during the first significant temperature swing. Touch up any gaps before spring.
Frequently Asked Questions
How do I replace a septic tank lid myself?
To replace a septic tank lid yourself, start by locating and fully exposing the lid, then remove it using a flat pry bar — working around the perimeter to break the seal evenly. Before removing a concrete lid, have a second person present, since these weigh 50–100+ lbs. Once the lid is off, step back for 2–3 minutes to allow hydrogen sulfide gas to dissipate before inspecting the collar. Measure the inner collar diameter and confirm the collar style (flat, tapered, or threaded). Purchase a replacement lid that matches your tank manufacturer's specs — not just the rough diameter. For concrete lids, apply hydraulic caulk to the collar lip before setting the new lid. For plastic riser lids, align tabs and rotate or bolt into place. Backfill the excavation, tamp lightly, and document the installation date and lid specs in your system records. The full process takes 1–3 hours for most homeowners on a straightforward swap.
What is the cost to replace a septic tank cover?
Septic tank cover replacement costs range from $50–$500+ depending on material, size, and whether you hire a contractor. If you're doing the work yourself, a concrete septic tank lid runs $30–$150 in materials and a plastic poly lid runs $20–$80. A locking septic lid — required in some jurisdictions — adds $50–$200. If you hire a licensed contractor, expect to pay $150–$350 for a basic lid swap including labor, or $300–$600 if a riser installation is included at the same time. Regional rates vary significantly: a central Ohio homeowner might pay $255 all-in for a 24" concrete lid plus labor, while the same job in rural Montana can run $350–$425 due to contractor availability and travel time. Jobs involving collar repair or vehicular-rated load covers push costs to $400–$900+. See the full breakdown in our septic repair cost guide.
What is the difference between a concrete septic tank lid and a plastic one?
A concrete septic tank lid is the traditional choice for tanks without risers — it's heavy (50–100+ lbs), durable under soil load, and typically costs $30–$150. The main downsides are weight (requiring two people to handle), susceptibility to freeze-thaw cracking over decades, and the fact that once it's buried, it's difficult to access without digging. A plastic septic tank lid — typically high-density polyethylene (HDPE) — is most common on modern riser systems. These weigh 5–15 lbs, are a one-person lift, and cost $20–$80. Plastic lids with locking mechanisms are easier to make code-compliant in jurisdictions that require secured access. The tradeoff is UV degradation in high-sun climates: a poly lid that lasts 20 years in Minnesota may show brittleness after 10 years in Phoenix. For buried applications without risers, concrete remains the standard. For grade-level riser installations, plastic is the practical choice for most homeowners.
How do I find my buried septic tank lid for replacement?
To find a buried septic tank lid, start with your property's as-built septic diagram, which is typically on file with your county health department from the original installation permit. If records aren't available, follow the main sewer line out from your house foundation — tanks are usually 10–25 feet from the structure. Use a thin metal soil probe to locate the tank edges once you're in the approximate area; you'll feel resistance change when you hit concrete or fiberglass. Most residential tanks have two access points: one over the inlet baffle (closer to the house) and one over the outlet baffle (toward the drain field). Both need functional lids. Once you've identified the location, use a spade to carefully expose the lid without damaging it. If the lid is more than 6–12 inches below grade, consider installing a riser at the same time as the septic lid replacement to avoid repeated excavation at every pump-out. See our how to find your septic tank guide for the full process.
When should you call a pro for septic tank cover replacement instead of doing it yourself?
Call a licensed professional for septic tank cover replacement when the collar is cracked, offset, or showing structural damage — this goes beyond a simple lid swap and requires assessment of the tank itself. Also call a pro if you can't locate the tank or confirm both access points, if there are signs of sewage surfacing near the lid (soft wet ground, odor, unusual grass growth), or if your jurisdiction requires a licensed contractor for septic work. Florida, for example, requires a Registered Septic Tank Contractor (RSTC) license for septic work — unlicensed work can void your system permit. If the tank is in a drivable area requiring an H-10 or H-20 load-rated cover meeting ASTM C478 standards, that's also a job for a professional. DIY septic lid replacement is appropriate for straightforward swaps: shallow burial, intact collar, confirmed lid location, and a helper available for the lift. Find a licensed septic professional if any of the above conditions apply to your situation.
Should I replace a septic lid with a riser at the same time?
Yes — if your existing septic tank lid sits more than 6–12 inches below grade, installing a riser at the same time as the lid replacement is strongly worth considering. A septic tank riser brings the access point to grade level, so future pump-outs and inspections don't require digging. The incremental cost of adding a riser while you already have the lid exposed is much lower than scheduling a separate excavation later. Riser materials typically run $100–$300 depending on diameter and depth, and the full riser-plus-lid upgrade usually costs $300–$600 with professional installation. The alternative — burying a new lid again without a riser — means another excavation every 3–5 years at pump-out time, which adds up quickly. If you're already spending $50–$150 on a replacement lid, the math usually favors the riser upgrade. Our septic tank risers guide covers the full installation process, material options, and cost breakdown for different tank configurations.
Sources & Methodology
EPA Septic System Guidelines — https://www.epa.gov/septic. Referenced for H₂S confined-space hazard data, pumping frequency recommendations (3–5 years), and national septic system prevalence figures (21 million homes / 1 in 5).
National Association of Wastewater Technicians (NAWT) — https://www.nawt.org. Referenced for professional installer standards and maintenance frequency guidance.
Florida Department of Health — Septic Contractor Licensing — https://www.floridahealth.gov/environmental-health/onsite-sewage/. Referenced for RSTC licensing requirement and Florida-specific code compliance standards.
ASTM C478 Standard Specification for Precast Reinforced Concrete Manhole Sections — Referenced for H-10/H-20 load-rated cover standards applicable to drivable-area installations.
Infiltrator Water Technologies — https://www.infiltratorwater.com. Referenced as a named tank manufacturer with specific lid compatibility requirements distinct from poured-concrete tanks.
Was this article helpful?
Frequently Asked Questions
Recommended Resources
📖 Related Articles
💰 Cost Guides
🔧 Services
Find Septic Professionals Near You
Connect with licensed, verified septic companies in your area.