

Quick Answer
Septic tank riser installation is a straightforward upgrade that brings your tank's access port from underground to ground level using a sealed pipe - usually polyethylene - that stacks in 6" or 12" increments until it reaches grade.
Key Takeaways
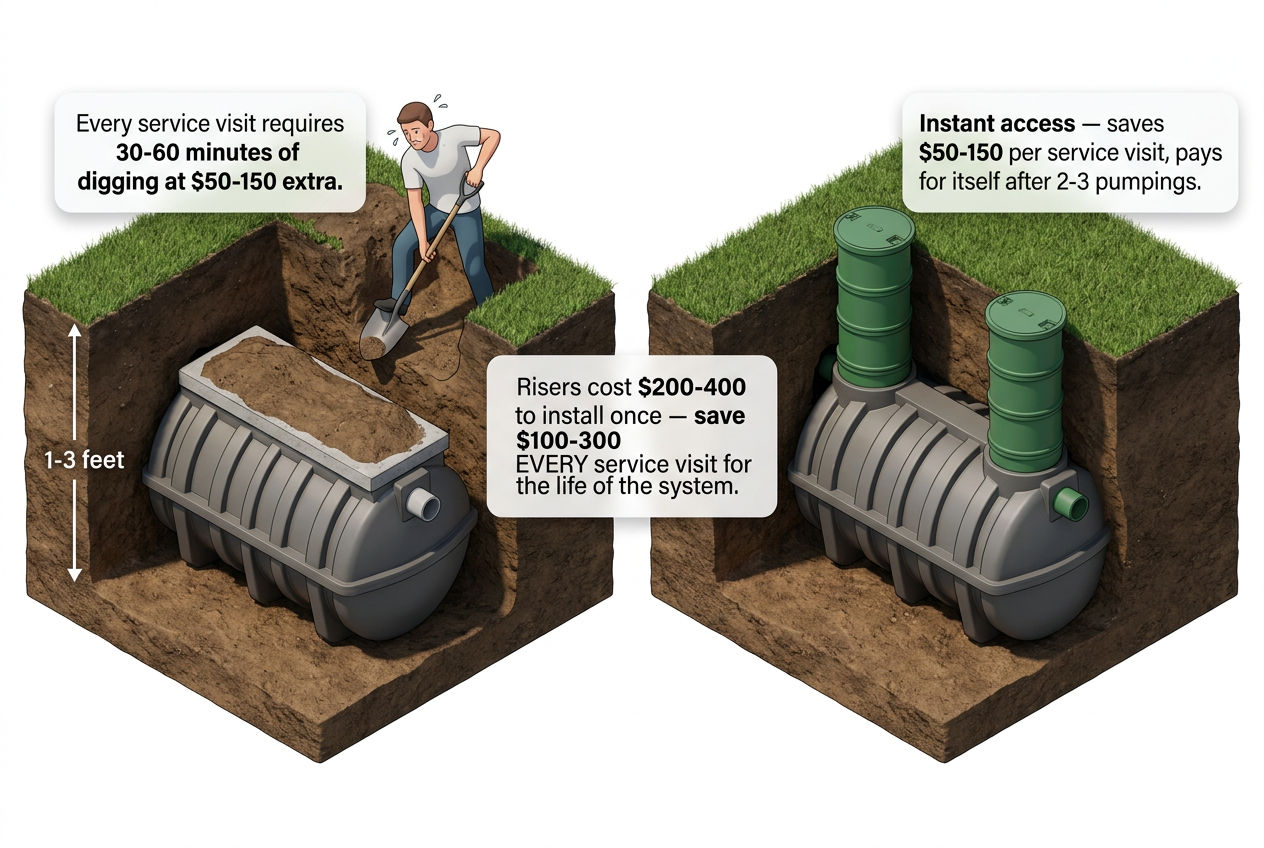
- Risers eliminate digging before every pump-out, saving $50–$150 per service visit
- A complete riser kit costs $100–$300; professional installation runs $300–$600 per riser
- Standard residential risers are 24" in diameter; most residential tanks need 1–2 risers
- Plastic polyethylene risers weigh 10–30 lbs versus 75–200 lbs for concrete - a meaningful difference when you're working alone
- Some states now require risers to grade on new installations or at point of property transfer
What Are Septic Tank Risers, and Why Do They Matter?
A septic tank riser is a vertical pipe extension that connects your buried tank lid to the surface. Without one, the only way to access your tank for septic tank pumping or inspection is to dig. Every. Single. Time.
That gets old fast.
Most septic tanks are buried anywhere from 4 inches to 4 feet below grade. If yours sits 2 feet down, your pumper spends 20–30 minutes digging before they can even open the lid. You're paying for that time - typically an extra $50–$150 per pump-out. Over a 20-year period with pumping every 3–5 years, that's $200–$1,000 in unnecessary excavation costs.
💡 Key Takeaway: Risers typically pay for themselves after just 2–3 service visits by eliminating excavation charges.
Why Inspections Demand Easy Access
Risers are also critical for inspections. A septic system inspection requires visual access to the inlet and outlet baffles. No riser means no quick inspection - just a shovel and a guess about where the lid is.
If you're selling your home, that's a problem. Washington, Oregon, and Minnesota, among others, require a passing septic inspection at point of property transfer. Buried lids slow that process and add cost.
For a broader look at how your system works and what its components do, see our guide on what a septic system is.

Are Plastic or Concrete Septic Risers Better?
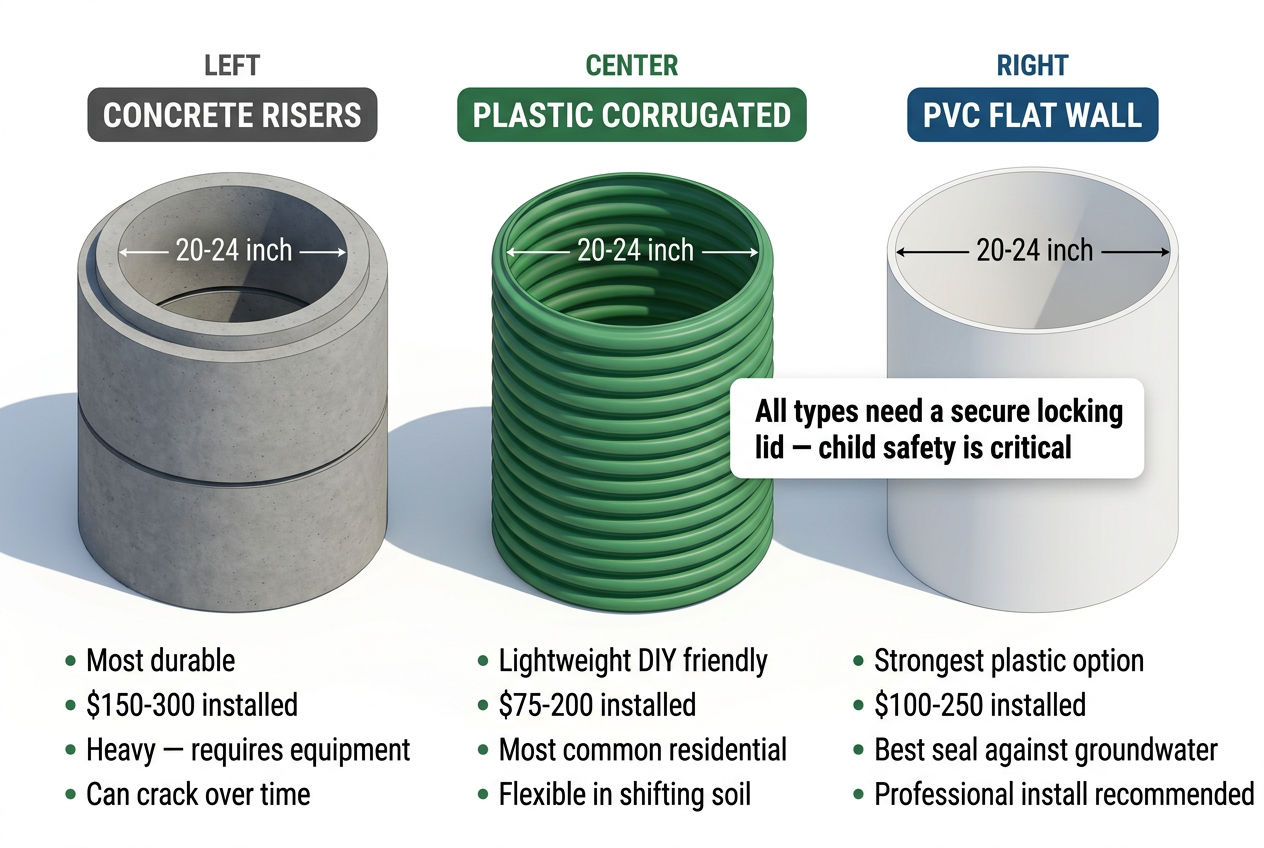
Plastic polyethylene risers dominate residential installations for good reason. Here's a direct comparison:
| Feature | Plastic (Polyethylene) | Concrete |
|---|---|---|
| Weight per section | 10–30 lbs | 75–200 lbs |
| Typical lifespan | 20–30+ years | 30–50 years |
| DIY-friendly | Yes | No (requires equipment) |
| Watertight seal | Butyl rope + screws | Mortar (prone to cracking) |
| Cost per section | $30–$80 | $40–$100 |
| UV resistance | UV-stabilized lids | N/A (below grade) |
Source: National Association of Wastewater Technicians (NAWT); manufacturer specifications from Tuf-Tite and Polylok product lines.
When Concrete Still Makes Sense
Concrete risers are still found on older systems, particularly in rural Appalachia and the South where concrete block tanks are common. If you have an older concrete tank with an irregular opening, you'll likely need an adapter ring - a flat transition plate that bridges the gap between the tank opening and a standard round riser.
⚠️ Warning: Don't skip the adapter ring. A bad seal at that joint is exactly how groundwater infiltrates your tank and overloads your drain field.
For most homeowners doing this themselves, a polyethylene riser kit - Tuf-Tite and Polylok both make solid products - is the practical choice.
What Size Septic Tank Riser Do You Need?
The most common residential riser diameter is 24 inches. That's wide enough for a pumper to insert their hose and work comfortably. Some older or smaller tanks use 20-inch or even 12-inch access ports, but if you're upgrading, 24 inches is the industry standard.
Calculating Height Requirements
For height, measure the distance from the top of your tank opening to finished grade. Risers stack in 6-inch and 12-inch sections. Buy enough to get flush with grade - or 1–2 inches above if you live somewhere with significant soil settling or frost heave.
✅ Pro Tip: You can always trim a section, but you can't add height you didn't buy.
If you're not sure how deep your tank sits, check your septic system's as-built drawing, which your county health department may have on file. No drawing? Probe the soil with a thin metal rod after locating the tank.

The Septic Owner's Handbook
Own a septic system? Get the manual nobody gave you.
How it works, the golden rules, the maintenance calendar, and a warning-signs decoder for every gurgle, smell, and wet spot — so small issues never become $15,000 ones.
Get the Handbook — $27 →Instant download · 250+ pages, 17 chapters + printable toolkit · Yours to keep foreverSeptic Tank Riser Installation: Step-by-Step
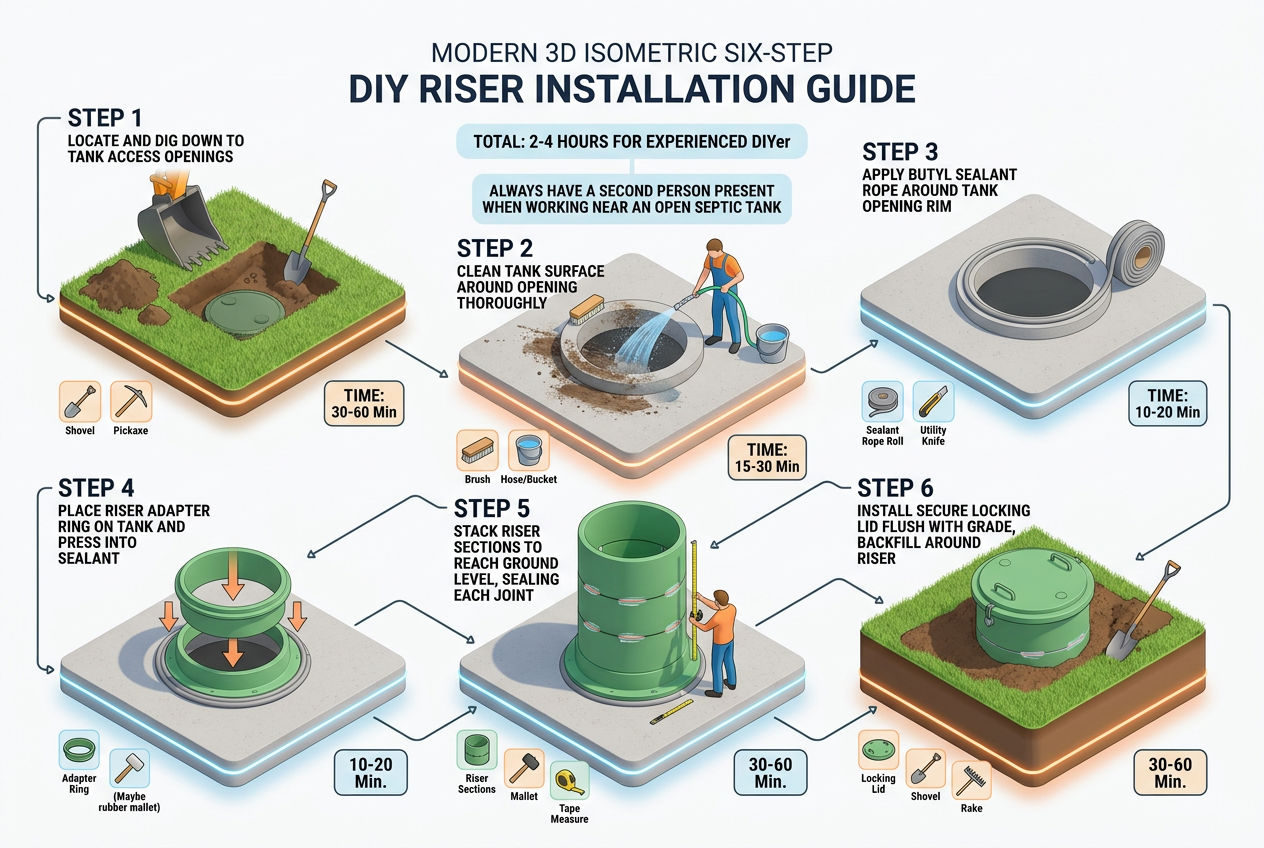
This walkthrough covers a standard concrete residential tank with a polyethylene riser kit. Your specific kit instructions take precedence - read them before you pick up a shovel.
Tools & Materials Needed
- Polyethylene riser kit (appropriate diameter and height)
- Butyl rope sealant (included in most kits, or purchase separately)
- Silicone caulk
- Cordless drill and stainless steel screws
- Angle grinder or circular saw with masonry blade (if cutting concrete lid)
- Measuring tape
- Shovel and wheelbarrow
- Work gloves, safety glasses
Step 1 - Locate and Expose the Tank Lid
If you don't know exactly where your tank is, start there. Our guide on how to find your septic tank covers the process. Once located, dig straight down.
⚠️ Warning: Be gentle near the top - you don't want a shovel through an aged concrete lid.
Expose the full perimeter of the access port, not just the center.
Step 2 - Clean the Opening
Brush away all soil, debris, and any loose concrete around the access port rim. The seal between your riser and the tank is only as good as the surface it contacts. Old concrete tanks often have crumbling edges - chip away any unstable material and let the surface dry before you proceed.
Step 3 - Measure and Assemble Your Riser Stack
Measure the depth from the tank opening to grade. Stack your riser sections dry first to confirm height before you apply sealant. Most kits include:
- Base adapter ring
- Stackable riser sections
- Lid with locking mechanism
The base adapter is what actually seats on the tank - get this joint right and everything else follows.
Step 4 - Apply Butyl Rope Sealant
Press butyl rope sealant (sometimes called butyl putty tape) around the full circumference of the base adapter where it contacts the tank opening. No gaps. This is what makes the connection watertight.
On plastic-to-concrete joints, also apply a bead of silicone caulk around the exterior once the adapter is pressed in place.
Step 5 - Set and Secure the Base Adapter
Press the adapter firmly onto the tank opening. On most polyethylene systems, you'll drive stainless steel screws through pre-drilled holes to lock it down.
✅ Pro Tip: Use stainless steel only - standard zinc screws corrode within a few years in soil contact.
On concrete tanks, some installers also apply hydraulic cement around the exterior joint for added security, especially in high-water-table areas like coastal Florida or the Gulf Coast.
Step 6 - Stack Riser Sections
Apply butyl rope sealant between each riser section joint. Press firmly and secure with stainless steel screws at each connection. If your riser kit uses a gasket-and-ring design instead of direct-screw connections, follow the kit's torque sequence - under-tightening leaves gaps.
Step 7 - Install the Lid
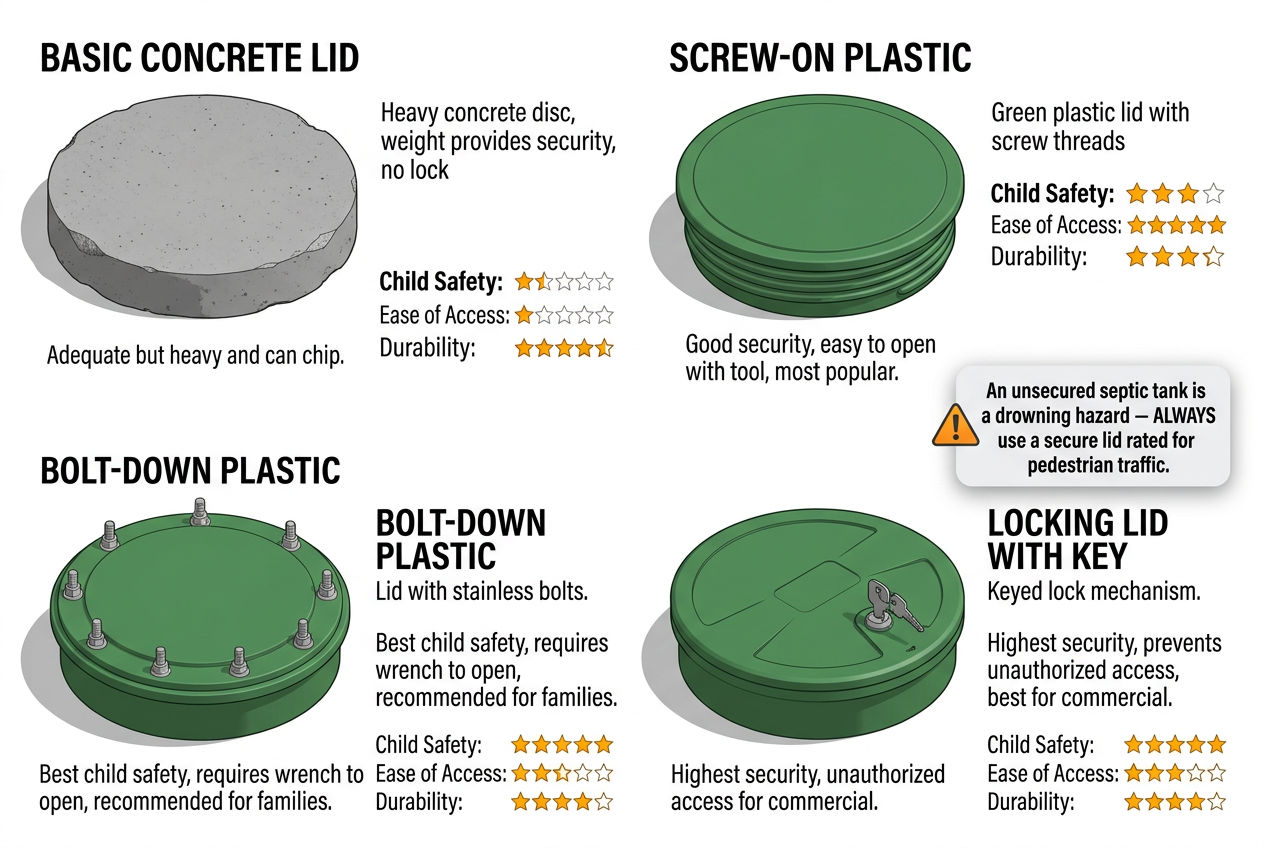
Set the riser lid and secure it. Most residential lids include a locking mechanism or provision for a padlock. Use it.
⚠️ Warning: An unsecured septic riser lid is a serious safety hazard - children and pets can fall in. The EPA's SepticSmart program specifically calls out tank access security as a homeowner responsibility.
Step 8 - Backfill Carefully
Fill the excavation around the riser with the removed soil, tamping lightly as you go. Don't ram soil against the riser aggressively - you want even support, not a force that could torque the connection joints. Grade the surface so water drains away from the riser rather than pooling around it.
📊 Quick Fact: Total time for one riser: 1–3 hours for most capable DIYers.
Can You Install a Septic Tank Riser Yourself, or Should You Hire a Pro?
Honest answer: Most physically capable homeowners can handle a plastic riser kit on a standard concrete or plastic tank. The tools are basic, the steps are logical, and the kits are designed for installation without specialized equipment.
When DIY Gets Complicated
Where it gets complicated:
- Old concrete tanks with non-standard or crumbling openings - irregular shapes require custom adapter rings and more surface prep than most DIY guides admit
- Very deep tanks (3–4 feet) - significant excavation, confined space concerns, and more riser sections to seal correctly
- High water table areas - a failed seal doesn't just mean moisture, it means groundwater flooding your tank and overloading the system
- Tanks requiring two risers - inlet and outlet access points may be in very different locations and at different depths
Making the Professional vs. DIY Decision
If any of those conditions apply, find a local septic installer who can assess the situation before you're halfway through a job that turns complicated. A pro charges $300–$600 per riser installed - more than the kit cost, but far less than fixing a bad seal or a compromised tank lid three years later.
✅ Pro Tip: If you're in a state with point-of-transfer inspection requirements, verify that a DIY installation meets local code. Minnesota's MPCA, for instance, requires installations to be inspected and documented.
Your county health department is the right call before you start.
How Much Does Septic Riser Installation Cost?
DIY vs. Professional Pricing
DIY cost: $100–$300 for a complete riser kit. A 24-inch Tuf-Tite or Polylok kit with base adapter, two 12-inch riser sections, and a locking lid typically runs $150–$200 at a septic supply house or online.
Professional installation: $300–$600 per riser, including labor and materials. Excavation beyond normal depth adds cost.
The Payback Math
Say your pumper charges $400 for a standard pump-out and adds $75 to locate and dig up your lid. With pumping every 3–4 years, you're paying that $75 surcharge roughly 5–6 times over 20 years - $375–$450 in avoidable digging fees.
💡 Key Takeaway: A $200 DIY riser kit pays for itself after the third pump-out.
For a full picture of what pumping actually costs in your area, our septic pumping cost guide breaks down regional pricing.
Do Septic Tank Risers Cause Problems?
Risers done right don't cause problems. Risers done wrong do.
The Most Common Failure Point
The most common failure is a leaky seal at the tank-to-riser joint. Surface water infiltrating through that gap enters your tank, adds hydraulic load, and pushes partially treated effluent into your drain field before it's ready.
⚠️ Warning: That's how drain fields fail prematurely - and drain field replacement runs $5,000–$20,000 depending on your system and soil.
Climate-Specific Considerations
In cold climates - Minnesota, Montana, the Upper Peninsula of Michigan - an exposed riser lid at grade level can act as a cold bridge in extreme winters. The solution is an insulated riser lid or a foam insulation board placed inside the lid. Ask your local pumper what they recommend for your specific frost depth.
In the arid Southwest (Arizona, New Mexico), UV degradation of exposed plastic lids is real. Specify UV-stabilized lids - both Tuf-Tite and Polylok offer them - and plan to inspect the lid annually. A cracked lid is a safety hazard and a pest entry point.
For pricing details, see our septic installation cost guide.
Learn more about our septic installation services.
Related reading: septic inspection process.
Sources & Methodology
- U.S. Environmental Protection Agency - SepticSmart Program: Referenced for homeowner safety requirements regarding tank access security and general system maintenance guidance.
- National Association of Wastewater Technicians (NAWT): Referenced for riser material comparisons and industry installation standards.
- Tuf-Tite and Polylok product specifications: Referenced for riser dimensions, weight ratings, and sealant requirements. Cited as manufacturer sources, not endorsements.
- State regulatory references: Minnesota Pollution Control Agency (MPCA), Washington State Department of Health, and Oregon DEQ referenced for point-of-transfer inspection requirements.
- Cost data: Compiled from contractor pricing surveys and regional service quotes gathered by SepticTankHub.com editorial research, 2024–2025.
For related installation topics, see our guides on the full septic system installation process and DIY septic system considerations.
Need help with your septic system? Browse local septic companies in Texas or Florida.
Was this article helpful?
Frequently Asked Questions
Recommended Resources
📖 Related Articles
💰 Cost Guides
Find Septic Professionals Near You
Connect with licensed, verified septic companies in your area.