
Quick Answer
A septic inspection evaluates every major component of your septic system - from the tank and baffles to the distribution box and drain field - to confirm the system is functioning safely and has enough capacity remaining to meet your needs. Most standard inspections take 1–3 hours and cost $250–$500.
Key Takeaways
- A full septic inspection covers the tank, baffles, effluent filter, distribution box, and drain field - not just a visual glance at the lid.
- The EPA recommends inspecting conventional septic systems every 3 years; alternative systems with mechanical components need annual checks.
- Standard inspections cost $250–$500. Add pumping and a camera scope and you're looking at $400–$900+.
- Many mortgage lenders - especially FHA and VA loan programs - require a septic inspection before closing.
- Always hire a certified septic inspector. Licensing requirements vary by state, but credentials from NAWT or your state health department matter.
About 1 in 5 U.S. homes relies on a septic system, according to the EPA. That's over 21 million households treating their own wastewater with buried tanks and underground drain fields. Most of those homeowners have never watched an inspector pull a lid and probe their tank - and they have no idea what's actually happening down there.
That changes today. Whether you're buying a house, selling one, or just trying to figure out if something is wrong, understanding how to inspect a septic system prepares you to ask the right questions and recognize when an inspector is doing a thorough job - or cutting corners.
What Does a Septic Inspection Include? The Full Picture
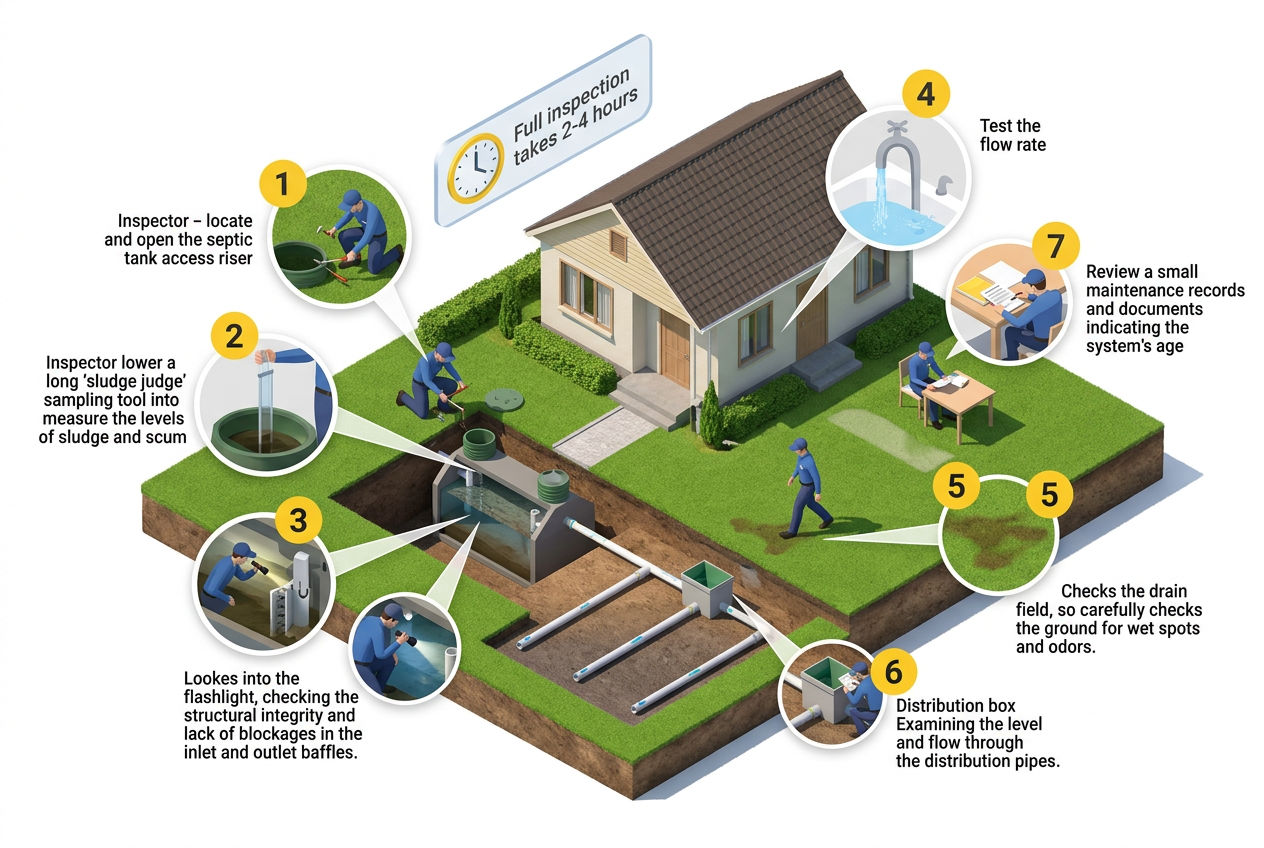
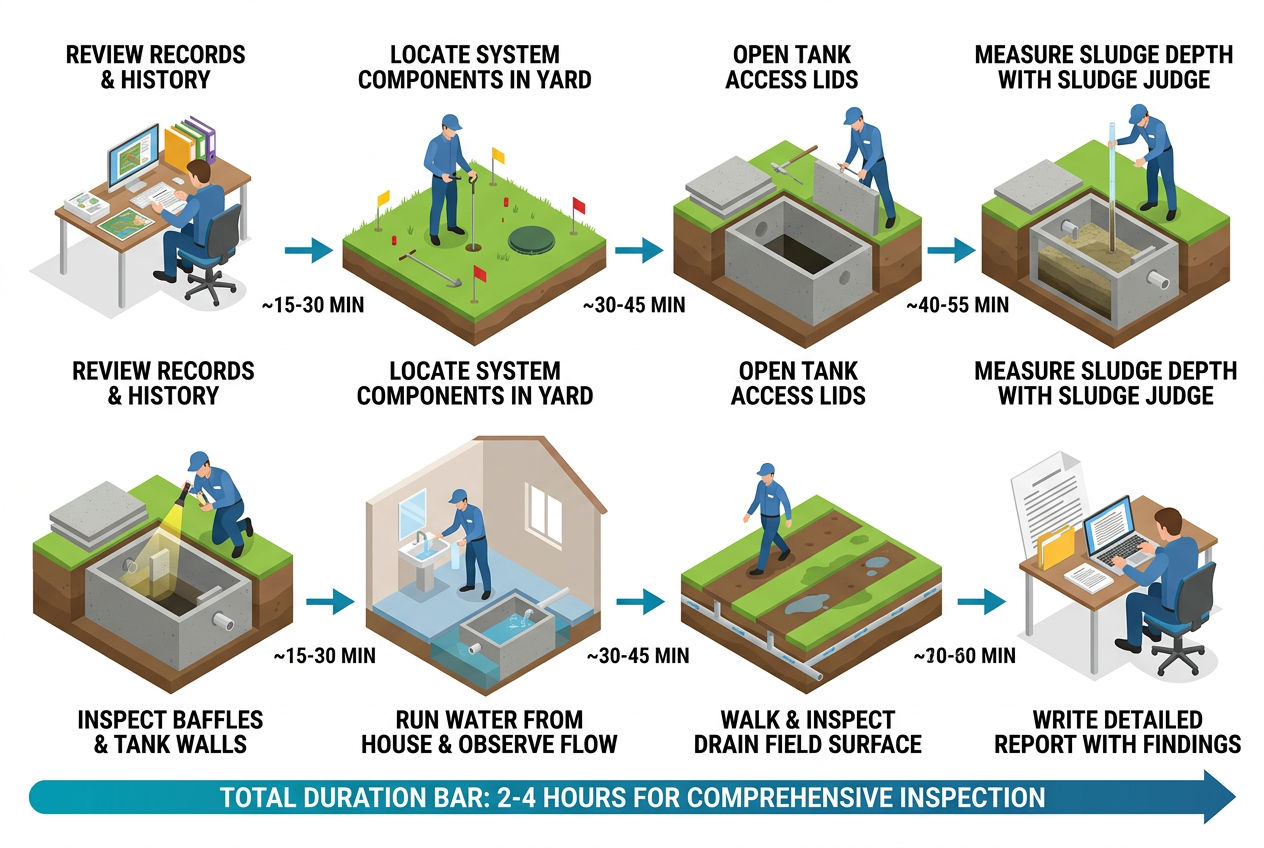
A proper septic inspection isn't a single task. It's a sequence of checks across multiple system components. A professional works from the house out to the drain field, systematically confirming that waste is flowing where it should, solids are being retained, and the soil is still absorbing treated effluent.
Here's what a certified septic inspector examines, step by step.
Step 1: Records Review and System Location
Before anyone picks up a shovel, a thorough inspector reviews any available system records - the original permit, as-built drawings, previous inspection reports, and pumping history. This tells them what kind of system is buried on your property and where the components are likely located.
If records don't exist (common on rural properties with older systems, especially pre-1980 cesspools), the inspector uses a soil probe or electronic locator to find the tank and distribution box. This adds time. On a property with no documentation, budget for a longer inspection window - sometimes 3 hours or more.
💡 Key Takeaway: This is also when the inspector confirms what type of septic system you have. A conventional gravity-fed system and an aerobic treatment unit (ATU) are inspected very differently.
Step 2: Visual Check of the Yard and Access Points
The inspector walks the property before opening anything. They're scanning for:
- Wet, spongy, or unusually green patches of grass over the drain field
- Surfacing effluent (sewage smell + soggy ground = active failure)
- Crushed or sunken soil near the tank lid or leach lines
- Trees and shrubs with roots near the system
Surface signs of septic system failure often show up before any underground symptoms. A good inspector spots them early.
They also check all access ports and riser lids. Most tanks have at least two access points - one over the inlet baffle and one over the outlet baffle. On older systems, these lids may be buried 12–24 inches underground. The inspector will dig them up. If your lids aren't at grade with risers installed, expect this to add time and possibly a fee.
Step 3: Tank Interior Inspection - Baffles, Scum, and Sludge
This is the core of how to inspect a septic system properly. Once the tank is open, the inspector evaluates the interior systematically.
Inlet and Outlet Baffles
Baffles are T-shaped or baffle-wall structures at the tank's inlet and outlet pipes. They keep floating scum from flowing directly into the drain field. The outlet baffle is especially critical - a missing or deteriorated outlet baffle is one of the most common causes of premature drain field failure. Older concrete baffles corrode from hydrogen sulfide gas; many are now replaced with sanitary tees or Polylok effluent filters during routine service.
Effluent Filter
Many modern tanks have an effluent filter (common brands include Polylok PL-122 and Zabel A1800) installed on the outlet baffle. The inspector pulls and checks it for clogging. A clogged filter is a maintenance item. A missing filter on a system designed to have one is a problem.
Scum and Sludge Layers
The inspector uses a sludge judge - a clear acrylic tube - to measure the floating scum layer on top and the settled sludge layer on the bottom. The standard rule: if the combined sludge and scum layers consume more than one-third of the tank's liquid capacity, the tank needs pumping.
📊 Quick Fact: Picture a 1,000-gallon tank serving a family of four. At the 3-year mark, that tank might show 8–10 inches of sludge. At 6 years without service, you might find 18–24 inches - at or past the pumping threshold. That excess sludge forces partially treated solids toward the drain field, where they clog the soil and eventually cause failure.
Tank Structural Integrity
The inspector looks for cracks, crumbling concrete, or signs of groundwater infiltration (water seeping in is as bad as sewage seeping out).
For a deeper look at how often your tank needs service based on household size, we cover the math in detail elsewhere.
Step 4: Distribution Box Inspection
Not every system has a distribution box (D-box), but when one exists, it's a critical inspection point. The D-box splits effluent from the tank into multiple drain field laterals. The inspector checks for:
- Level positioning (a tilted D-box sends all flow to one lateral, overloading it while starving the others)
- Cracking or deterioration
- Evidence of solids entering the box (means the baffles have failed upstream)
- Root intrusion
✅ Pro Tip: A D-box out of level is a fixable problem - sometimes just $200–$500 to reset. Left alone, it destroys a $10,000–$20,000 drain field.
Step 5: Drain Field Evaluation
The drain field inspection is where things get serious. The leach field is the most expensive component to repair or replace - drain field replacement runs $5,000–$20,000+ depending on soil conditions and system size.
The inspector looks for:
- Standing water or saturated soil over the leach lines
- Surfacing effluent (visible sewage at ground level)
- Lush, dark-green vegetation in a defined linear pattern (a telltale sign effluent is feeding plant roots)
- Compaction from vehicles or structures built over the field
In spring, when water tables are high, drain field problems are easier to spot. A system that barely passes a summer inspection might show active ponding in March. That's not a flaw in the inspection process - it's physics. Saturated soil can't accept effluent. Inspectors working in the Southeast - especially Florida, coastal South Carolina, and Georgia - deal with high water tables year-round and often adjust their drain field assessment protocols accordingly.
Some inspectors run water from multiple fixtures in the house simultaneously during the drain field check. If effluent surfaces or backs up, the field is failing.
Step 6: Additional Tests (When Required or Requested)
A standard inspection covers everything above. Some situations call for more.
| Test Type | Cost | Purpose |
|---|---|---|
| Septic dye test | $50–$250 | Flushes fluorescent dye through the system to confirm surfacing effluent or cross-connections |
| Camera inspection | $200–$500 | Snake camera run through pipes to check for cracks, root intrusion, or offset joints |
| Pump test | Included in inspection | Checks float switches, alarm function, and pump output on dosing systems |
⚠️ Warning: Dye tests help confirm surfacing effluent or cross-connections but can produce false negatives if the system is dry.
Camera inspections are especially useful on older clay or cast-iron pipe systems. Concrete pipes from the 1960s–1980s are frequent candidates.
For pump systems: If your system has a dosing pump, the inspector checks float switches, alarm function, and pump output. A failing float switch on an aerobic treatment unit (ATU) can cause the pump to run continuously or not at all - neither is good. Aerobic systems, including brands like Aerobic Advantage and Norweco Singulair, require annual inspections by a licensed O&M provider in most states.
How Much Does a Septic Inspection Cost?
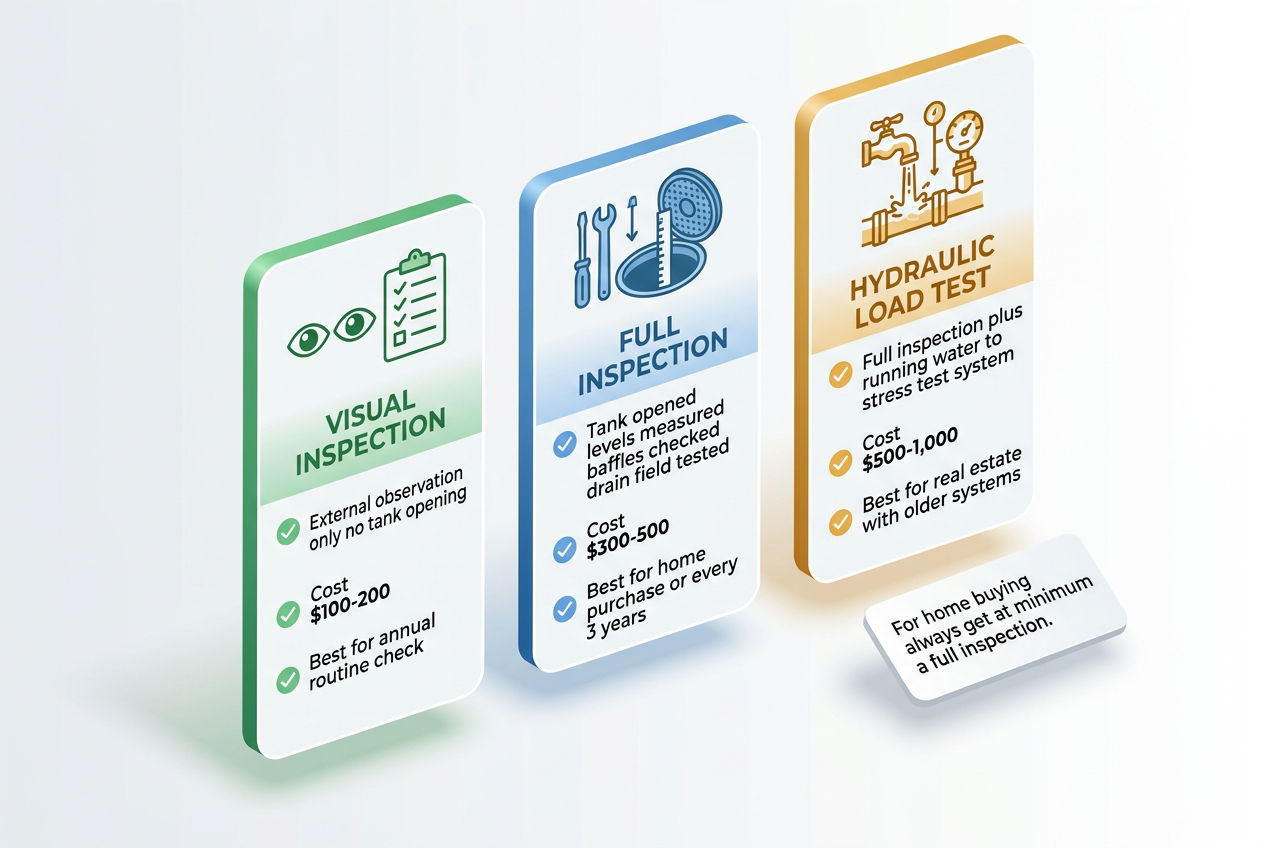
A standard visual/functional inspection costs $250–$500 for most residential systems nationally. Here's how the numbers break down:
| Inspection Type | Typical Cost | What's Included |
|---|---|---|
| Basic visual inspection | $150–$300 | Surface check, access lid opening, visual of tank interior |
| Standard functional inspection | $250–$500 | All components, sludge/scum measurement, drain field assessment |
| Inspection + pumping | $350–$650 | Full inspection plus tank pump-out |
| Camera inspection add-on | $200–$500 | Pipe camera through inlet/outlet lines |
| Dye test add-on | $50–$250 | Fluorescent dye trace through system |
| Full inspection package (all above) | $500–$1,100+ | Comprehensive evaluation |
Source: National average data compiled from NAWT member pricing surveys and state health department fee schedules. Costs vary by region, tank size, and system type.
📊 Quick Fact: Regional pricing matters. A septic inspection in rural Vermont - where the drive time alone might be 45 minutes each way and the frost line sits at 48–60 inches - typically runs $50–$100 more than the same job in suburban Georgia, where tanks are shallower and easier to access year-round.
What Does a Septic Inspection Include for a Home Purchase?
If you're buying a house, the septic inspection follows the same steps above, but the stakes are higher. The inspector's findings become part of your negotiating position - or your reason to walk away.
FHA and VA loan programs generally require a septic inspection before closing. Conventional loan lenders often require one when a system is older than 20 years or when there's any evidence of problems. A failed inspection can delay closing by 2–6 weeks while repairs are made - or kill the deal entirely.
The seller typically pays for the inspection in many markets, though this varies by state and negotiation. In Massachusetts, for example, Title 5 regulations require a septic inspection at the time of property transfer, and the seller is responsible for both the inspection and any required repairs before the sale closes. New Jersey requires a licensed septic evaluator for inspections related to real estate transactions.
If you're in the middle of a purchase, our septic inspection guide for home buyers covers what to do with the results, how to negotiate repair credits, and what constitutes a dealbreaker.
Can I Inspect My Own Septic System?
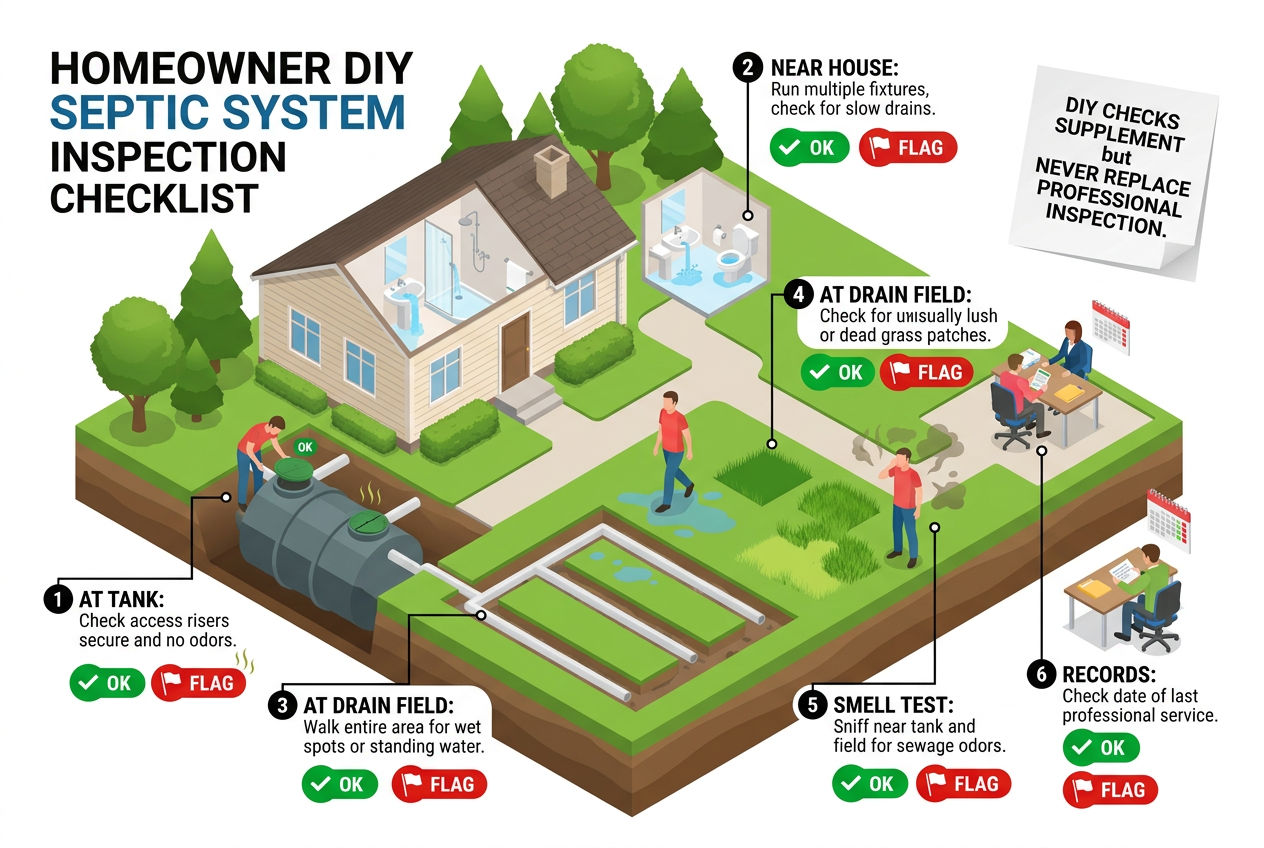
You can do a basic surface check yourself. Walk the drain field and look for wet spots, odors, or unusually green grass. Check that your tank lids are accessible and not cracked. Monitor how your drains behave - slow drains throughout the house, not just one fixture, can indicate a full or failing tank.
What you cannot do yourself:
- Measure sludge and scum layers accurately without a sludge judge
- Assess baffle integrity from inside the tank
- Evaluate the distribution box for level
- Probe the drain field soil without equipment
⚠️ Warning: More importantly, entering a septic tank is immediately life-threatening due to hydrogen sulfide gas. Never enter a tank.
For a rural property septic checklist that covers what homeowners can reasonably self-assess versus what requires a pro, that resource walks through the specifics.
Professional inspectors also carry liability. If they sign off on a system and it fails six months later, there's a paper trail and a professional license on the line. Your self-assessment has no such backing.
What Fails a Septic Inspection?
Most inspection failures fall into a few categories:
Active Drain Field Failure
Surfacing effluent, ponding water, or confirmed hydraulic overload. This is the most serious and most expensive outcome. Drain field replacement costs $5,000–$20,000 depending on soil conditions and system design. See our drain field replacement cost guide for regional breakdowns.
Missing or Deteriorated Baffles
Especially outlet baffles. A missing baffle is a code violation in most states and an immediate threat to the drain field.
Tank at or Above Pumping Capacity
Sludge and scum occupying more than one-third of tank volume. This is a maintenance finding, not a structural failure, but it can't be ignored.
Structural Tank Failure
Cracks, collapsed inlet or outlet sections, or evidence of groundwater infiltration.
Non-Code-Compliant Components
Setback violations (tank or drain field too close to a well, property line, or water body), unapproved system modifications, or systems that were installed without permits.
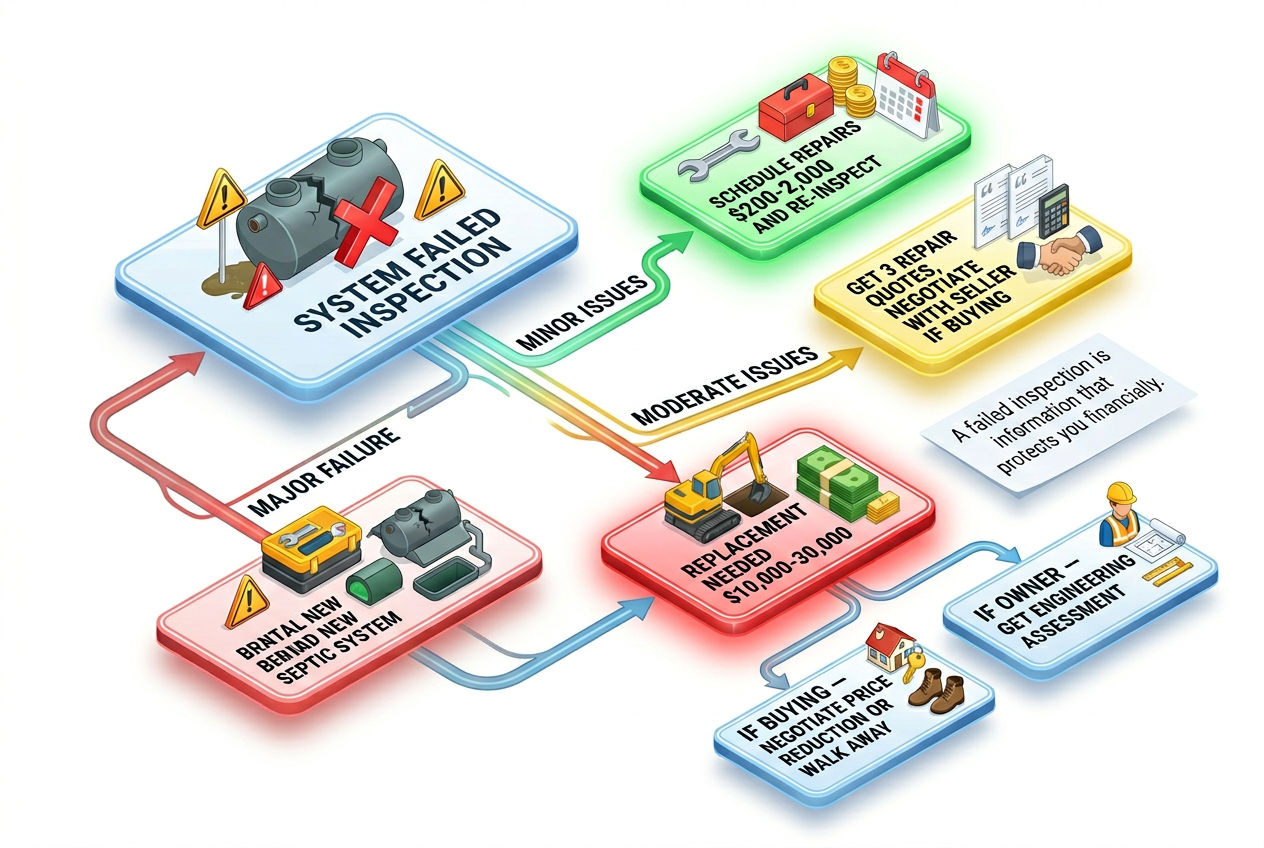
💡 Key Takeaway: Not every finding means the deal is dead or the system needs replacing. A qualified inspector will categorize findings by severity and outline repair options with estimated costs. A good septic repair cost breakdown helps you understand what you're actually facing financially.
How Often Should You Schedule a Septic Inspection?
The EPA recommends having conventional septic systems professionally inspected every 3 years. That aligns with the average pumping interval of 3–5 years for a typical household, so many homeowners schedule both at the same time.
Alternative systems - aerobic treatment units, mound systems, drip irrigation systems - have mechanical components that require annual inspection and maintenance. Many states mandate annual O&M contracts for ATU owners. In Washington State, O&M specialists must be licensed through the Department of Health and file annual reports with the county.
⚠️ Warning: If you've never had your system serviced and you don't know when the last inspection occurred, schedule one now. A 10-year-old uninspected system that's "working fine" might be two years from a $15,000 drain field replacement.
The Septic Inspection Checklist: What a Good Inspector Covers
A thorough inspection covers all of the following. Use this as a reference when evaluating any inspector's work:
- System records and permit review
- Property walkover for surface signs of failure
- Tank location and access port identification
- Riser lid and access port condition
- Inlet baffle condition
- Outlet baffle or effluent filter condition (Polylok PL-122, Zabel A1800, or equivalent)
- Scum layer measurement (sludge judge)
- Sludge layer measurement (sludge judge)
- Tank structural integrity (cracks, corrosion, infiltration)
- Distribution box level and condition (if applicable)
- Drain field surface assessment
- Flow test (water run through multiple fixtures)
- Pump, float switch, and alarm check (if pump system)
- Written inspection report with findings and recommendations
💡 Key Takeaway: That last item matters. A verbal "it looks fine" is not an inspection. You need a written septic inspection report with dated findings, photos, and specific component assessments - especially if you're in a real estate transaction.
Free download
Free: the Septic Fridge Card — what to flush, what never to.
The Do / Don’t card the whole family can see, plus the Survival Kit: emergency flowchart, warning-sign decoder and pump-schedule card. One printable PDF.
Find a Certified Septic Inspector Near You
Knowing how to inspect a septic system doesn't mean you should do it yourself. The inspection process requires specialized tools, professional judgment, and in many states, a specific license. The National Association of Wastewater Technicians (NAWT) and the National Onsite Wastewater Recycling Association (NOWRA) both maintain professional standards for inspectors.
State licensing varies significantly:
- Massachusetts and New Jersey require licensed evaluators for real estate inspections
- Florida requires inspectors to hold a Registered Septic Tank Contractor (RSTC) license through the Department of Health
- Texas delegates oversight to county-level designated representatives, creating wide variation within a single state
The safest approach: hire through a verified directory where credentials are confirmed. Search for local septic companies to connect with licensed professionals in your area. Enter your zip code and you'll see inspectors who serve your county, with verified credentials and honest reviews from homeowners who have been through exactly what you're facing.
Related reading: homeowners insurance septic.
Sources & Methodology
- U.S. Environmental Protection Agency - Septic Systems Overview: Used for inspection frequency recommendations, household statistics, and system failure rate data.
- National Association of Wastewater Technicians (NAWT): Referenced for inspector certification standards and professional inspection protocols.
- National Onsite Wastewater Recycling Association (NOWRA): Referenced for industry definitions and system component terminology.
- State Health Department Regulations: Massachusetts Title 5, New Jersey licensed septic evaluator requirements, Florida RSTC licensing, and Washington State O&M specialist licensing referenced directly from respective state health department guidance.
- Regional cost data: Compiled from contractor pricing surveys, state fee schedules, and homeowner-reported costs across SepticTankHub's national directory network. All cost ranges reflect 2024–2025 residential service pricing.
This article was reviewed for technical accuracy against current EPA guidelines and state regulatory requirements. For system-specific guidance, consult a certified septic professional licensed in your state.
Need help with your septic system? Browse local septic companies in Indiana or Alabama.
Was this article helpful?
Frequently Asked Questions
Recommended Resources
📖 Related Articles
- What Is a Septic System? How It Works (Visual Guide)
- The Complete Septic Tank Maintenance Guide
- How Often Should You Pump Your Septic Tank?
- What Is a Drain Field? (And How Does It Work?)
- Septic Inspection for Home Buyers: Complete Checklist
- Buying Rural Property? Septic System Checklist
- How Often Should You Service Your Septic System?
💰 Cost Guides
🔧 Services
Find Septic Professionals Near You
Compare licensed, verified septic companies by area — top county markets and cities below, or browse all 50 states.
County markets
Popular cities
