
Quick Answer
Installing a septic tank is not a weekend project. It involves engineering, permits, heavy equipment, and inspections — and in most states, a licensed contractor must do the actual work. But understanding the septic tank installation process gives you real power: you can oversee your contractor intelligently, ask the right questions, and avoid costly mistakes.
This guide walks you through every phase — from the first perc test to the final inspection sign-off.
Key Takeaways
- A full septic system install takes 1–6 months from permit application to final approval — physical installation is just 1–3 days of that timeline.
- National average total cost runs $7,000–$25,000, depending on system type, soil conditions, and region.
- Most states require a licensed installer and a valid septic tank permit before any excavation begins.
- Correct septic tank installation depth (top of tank 4 inches to 4 feet below grade) is code-dependent and varies by region.
- Approximately 1 in 5 U.S. households rely on septic systems — about 21 million homes, according to the EPA.
What Do You Need to Know Before Installing a Septic System?
Before anyone picks up a shovel, three things must happen: a site evaluation, a perc test, and permit approval. Skipping any of these doesn't save time — it guarantees your project gets shut down.
What Are the Septic Tank Installation Requirements?
Every county and state has its own rules, but these core requirements apply almost everywhere:
- A percolation test (perc test) to confirm the soil can absorb effluent at an acceptable rate
- A septic tank permit issued by your local health department or environmental agency
- Minimum setback distances from your house, well, property lines, and water bodies
- Approved tank sizing based on bedroom count or estimated daily flow
- A licensed installer in virtually every jurisdiction
Setback rules vary, but common minimums include: 5–10 feet from the house foundation, 50–100 feet from a private well (100 feet is standard in most states), 5–10 feet from property lines, and 50–200 feet from ponds, streams, or other water bodies.
For a full breakdown of what your state requires, see our guide to septic system permit requirements.
Can You Install a Septic Tank Yourself?
Honestly? In most states, no — not legally. The majority of jurisdictions require that a licensed contractor perform the installation. Some states allow homeowners to install their own system on their primary residence, but you still need permits and inspections. If you're seriously considering building your own septic system, understand the full scope of the work before you commit. Installing without a permit can result in fines, mandatory system removal, and serious problems when you try to sell the property.
Read our detailed breakdown of DIY septic system installation rules before you commit to any path.
How Much Does Septic Tank Installation Cost?
A fully installed conventional septic system costs $7,000–$25,000 nationally. Here's where that money goes:
| Cost Component | Typical Range | Notes |
|---|---|---|
| Tank (concrete) | $800–$3,000 | Fiberglass/poly: $1,000–$2,500 |
| Drain field installation | $2,000–$10,000+ | Depends on soil and field size |
| Excavation & labor | $1,500–$5,000 | Rocky or high-water-table soil costs more |
| Permits & fees | $200–$1,000+ | Varies widely by county |
| Perc test | $250–$1,000 | Includes soil evaluation |
| Engineering/design | $500–$2,000 | Required for complex or engineered systems |
Source: National Onsite Wastewater Recycling Association (NOWRA) installer cost data; EPA SepticSmart program.
For a full cost breakdown, see our septic system installation cost guide.
Step-by-Step Septic Tank Installation Process
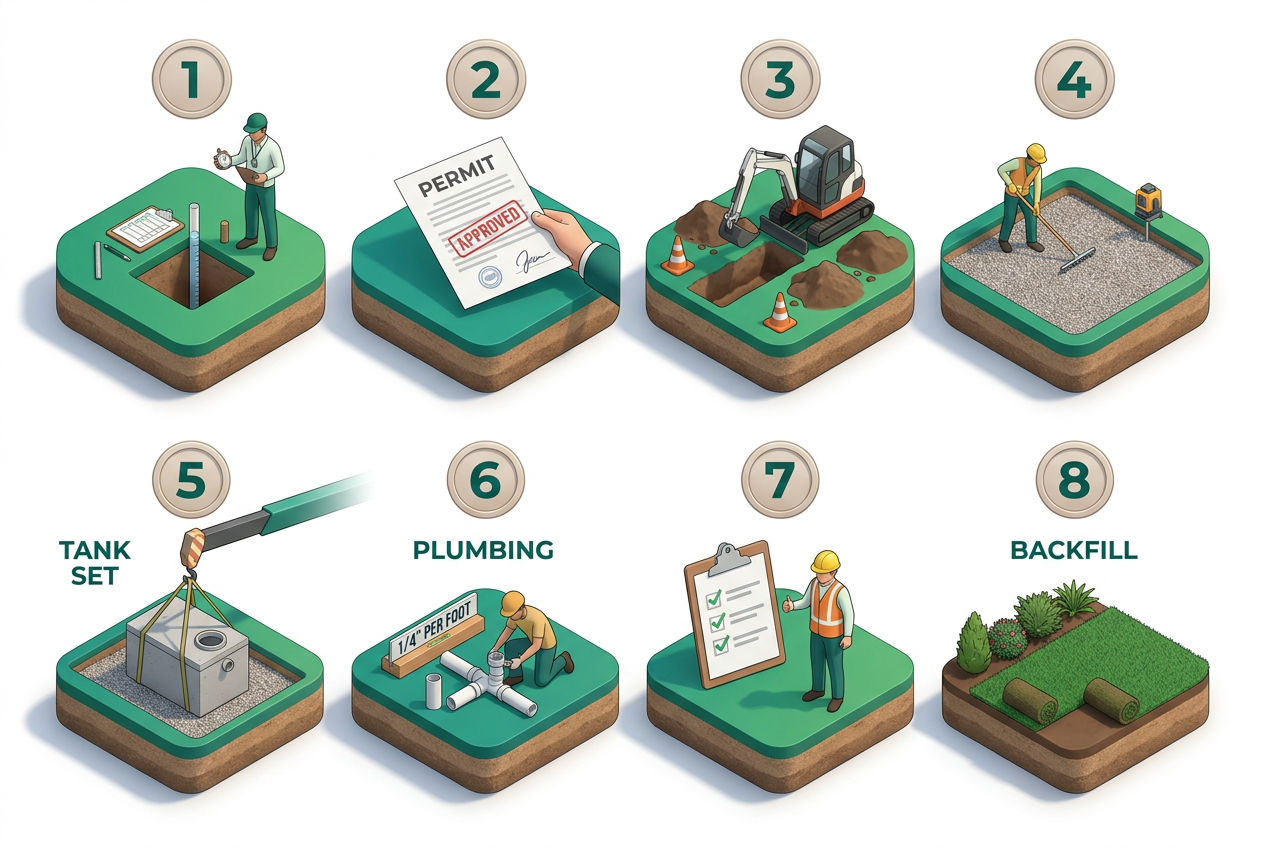
Step 1 — Get Your Permit and Schedule the Perc Test
Everything starts here. Contact your local health department — not a contractor, not a neighbor — and ask what's required for a new septic permit in your area. They'll tell you what applications to file, what a licensed engineer or designer must submit, and when perc testing is allowed.
A perc test (percolation test) measures how fast water drains through your soil. A licensed soil scientist or engineer digs test holes (typically 2–3 feet deep) and fills them with water, measuring absorption rate in minutes per inch. The results determine what type of system you need and how large your drain field must be.
Perc test cost runs $250–$1,000. Scheduling and results can take 1–4 weeks. Many jurisdictions require perc tests during the wet season — which sounds counterintuitive, but testing under saturated conditions reveals worst-case performance. A system that passes in dry summer soil might fail the first February it sees.
See our complete perc test guide for details on what to expect.
Permit approval typically takes 2 weeks to 3+ months. Budget the time — not just the money.
Step 2 — Design the Septic System
Once your perc test results are in, a licensed designer or engineer creates your septic system design. This plan specifies tank size, drain field dimensions, pipe depths, and exact placement on your lot — all subject to local code approval.
A conventional gravity-fed system is the most common choice where soil conditions allow. Where the terrain doesn't slope naturally toward the drain field, a pump system with a pump chamber and float switches becomes necessary. The designer will specify which applies to your site. Not sure which system type suits your property? Our guide to types of septic systems covers conventional, mound, aerobic, and chamber options.
Step 3 — Choose the Right Septic Tank Size and Material
Tank size is determined by bedroom count (since bedrooms predict occupancy and daily water use). Most codes use this sizing framework:
- 2-bedroom home: 750–1,000 gallon minimum
- 3-bedroom home: 1,000–1,250 gallon
- 4-bedroom home: 1,250–1,500 gallon
- 5+ bedroom home: 1,500+ gallon
Some states require a 1,000-gallon minimum regardless of bedroom count. Never go smaller than code allows — undersizing a tank is one of the most expensive mistakes you can make. You'll pump it constantly, overload the drain field, and face premature system failure.
For material, concrete tanks dominate the market for good reason: they're heavy (which prevents floating in high water table areas), durable, and widely available. Fiberglass and polyethylene tanks are lighter and easier to transport to remote sites, but they require careful backfill to prevent deformation. Our concrete vs. plastic septic tank comparison breaks down the tradeoffs.
Our septic tank size chart also has a visual guide if you want to cross-reference your household's water usage.
Step 4 — Excavate the Site
This is when the backhoe shows up. Excavation involves digging two distinct areas: the tank pit and the drain field trenches.
The tank pit must be wide enough to lower the tank safely and leave room for workers to plumb the inlet and outlet pipes. A 6-inch minimum base layer of bedding sand is placed first to ensure the tank sits level. If the tank is off by even a few degrees, wastewater won't flow correctly through the internal baffles.
Drain field trenches are typically 18–36 inches deep and 1–3 feet wide. The trench bottom must be relatively level (or sloped at a consistent grade of ¼ inch per foot for gravity-fed systems). Depth and spacing depend on soil type and your designer's specifications.
Rocky soil — common in New England and the Mountain West — dramatically increases excavation costs. A straightforward 2-day dig in Georgia clay can turn into a 5-day job in Vermont granite.
Step 5 — Set the Septic Tank (Depth, Level, Orientation)
Lowering a 1,500-gallon concrete tank — which weighs roughly 12,000 pounds — into the pit requires a crane or excavator with rigging. This is not the step to improvise.
The tank must be:
- Level — even a 2-degree tilt affects baffle function and sludge accumulation
- Oriented correctly — inlet pipe faces the house, outlet pipe faces the drain field
- Set at the correct depth — the top of the tank should sit 4 inches to 4 feet below finished grade, depending on your local code and frost line requirements
In Minnesota, where the frost line reaches 42–60 inches, tank burial depth needs careful engineering. In Florida, shallow water tables mean many tanks are set with their tops nearly at grade. See our full guide to how deep a septic tank should be buried for regional depth specifications.
Septic tank risers — precast concrete or plastic extensions that bring the access lids to or near grade — are added at this stage. They're worth every penny. Without them, your pumper has to dig up your yard every 3–5 years to find the lid. Septic tank risers pay for themselves on the first pump-out.
Step 6 — Connect Inlet and Outlet Pipes and Baffles
Standard inlet and outlet connections use 4-inch PVC pipe. The inlet baffle (or sanitary tee) slows the flow of incoming wastewater so it doesn't disturb the settled sludge layer at the bottom of the tank. The outlet baffle prevents the floating scum layer from escaping into the drain field — which would clog it rapidly.
Many modern installations use an effluent filter (such as a Polylok PL-122 or Zabel A1800) on the outlet baffle as a final barrier. These filters catch suspended solids before they reach the leach field and are far cheaper to clean than a replacement drain field. They require periodic cleaning — typically every 1–3 years — but are absolutely worth the added protection.
All pipe joints are glued and sealed. Inlet and outlet pipes must be set at the manufacturer's specified heights relative to the tank's operating level to ensure proper separation between the scum, liquid effluent, and sludge layers.
For a closer look at how the tank connects to the rest of your system, our septic distribution box guide explains how effluent gets routed from the tank to the drain field laterals.
Step 7 — Install the Drain Field (Leach Field)
The drain field — also called a leach field — is where treated effluent disperses into the soil for final filtration. It's arguably the most expensive component to repair if something goes wrong. Install it right the first time.
In a conventional system, perforated 4-inch PVC leach laterals are laid in the prepared trenches on a 6–12 inch bed of ¾-inch to 2½-inch washed gravel. Gravel also covers the pipe to 2 inches above the perforations. A geotextile fabric is placed over the gravel before backfilling to prevent soil migration into the stone bed.
Alternatively, Infiltrator chamber systems eliminate the gravel entirely, using arch-shaped plastic chambers that create a large void space for effluent storage and dispersal. Chambers are faster to install, lighter to transport, and perform well in most soil conditions.
The drain field size depends on your perc test results and daily flow estimates. A 3-bedroom home generating roughly 300 gallons per day in soil with a 30-minute perc rate needs significantly more field area than the same home in fast-draining sandy soil.
Our drain field installation guide covers trench layouts, lateral spacing, and common installation mistakes in detail.
Step 8 — Backfill and Final Grading
Once the tank is set, all pipes are connected, and the drain field is in place, backfilling begins. The contractor carefully fills the tank pit with excavated soil — no large rocks, no frozen clumps — and compacts it in layers to prevent settling.
One critical rule: never run heavy equipment over the drain field after installation. Compacted soil can collapse the trench structure and crush the leach laterals, destroying years of work in a single pass.
Final grading slopes the surface away from the tank and drain field to prevent surface runoff from pooling over the system. Seeding with grass is recommended — shallow-rooted grass protects the soil cap without sending roots into the distribution pipes.
Step 9 — Final Inspection and Approval
Before any permanent backfilling, the local health department inspector must visit the site and verify that the installation matches the approved design. Inspectors check tank depth and level, pipe connections, drain field dimensions, setback compliance, and proper baffle installation.
In some counties, inspections happen at multiple stages — after the tank is set but before backfilling, and again after final grading. Confirm the inspection schedule with your local authority before your contractor starts backfilling. A premature backfill that buries the work before inspection can result in mandatory excavation — at your expense.
Once the inspector signs off, your permit is closed and the system is legally approved for use. Some jurisdictions issue a certificate of completion that you should keep with your property records.
Learn more about what inspectors look for in our septic inspection process guide.
Step 10 — System Startup and Initial Care
Your new septic system starts working the moment you use water. The anaerobic bacteria that break down solids in the tank colonize naturally from household waste — you don't need to add anything to "seed" a new tank, despite what some products claim.
For the first 30 days, avoid excessive water use. Don't do five loads of laundry in one day. Don't invite 30 people over for a party. Give the bacterial ecosystem time to establish.
After that, treat your system well:
- Have it pumped every 3–5 years (a 1,000-gallon tank serving four people typically needs pumping every 3–4 years)
- Never flush wipes, medications, grease, or harsh chemicals
- Keep heavy vehicles and deep-rooted plants away from the drain field
For ongoing care strategies, our septic tank maintenance guide is the resource to bookmark.
How Deep Should a Septic Tank Be Buried?
The top of a septic tank should be buried 4 inches to 4 feet below ground surface. The exact depth depends on your local code, frost line depth, and site topography.
In cold-climate states like Michigan and Wisconsin, where frost lines reach 36–48 inches, tanks and connecting pipes need enough soil cover to prevent freezing. In warmer states like Florida and Texas, tanks are often installed much shallower — sometimes with the lid barely below grade — because frost is not a concern and high water tables limit how deep you can dig.
Inlet and outlet pipes must slope at ¼ inch per foot from the house to the tank and from the tank to the distribution box. That slope requirement interacts with burial depth — if your tank needs to be deep to achieve proper pipe slope, the top-of-tank depth increases accordingly.

DIY Septic Blueprint
Thinking about building it yourself?
The complete, plain-English plan to size, permit and install your own septic system — designed for homeowners, not contractors. Skip the $15,000–$25,000 quotes and do it right the first time.
Get the DIY Blueprint — $67 →Instant download · 8 modules + 3 bonus guides · 60-day money-back guaranteeCommon Septic Installation Mistakes to Avoid
Undersizing the tank. A 1,000-gallon tank might meet minimum code for a 3-bedroom home, but if you have a family of six who each shower daily and run the dishwasher twice a day, you'll stress that system constantly. When in doubt, go up one size.
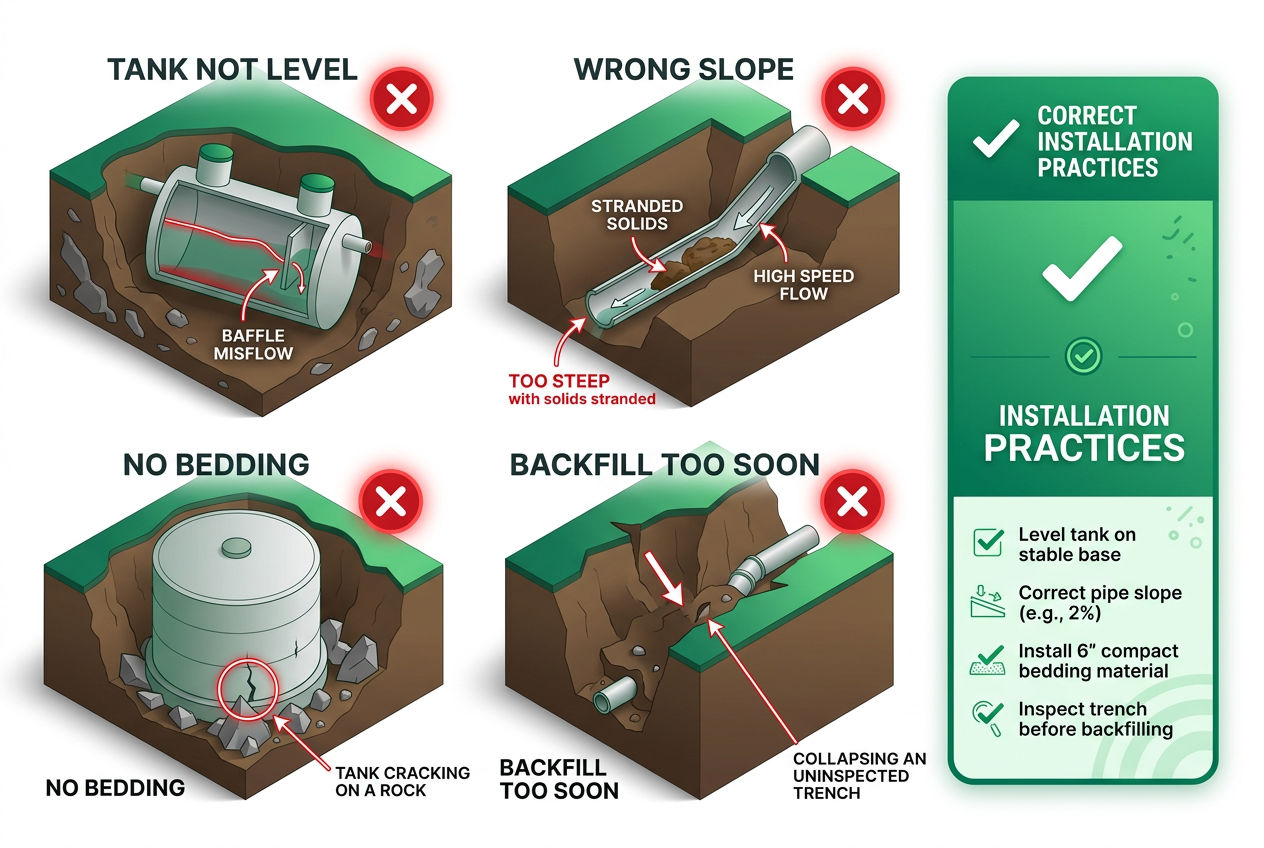
Skipping the perc test or rushing it. A failed perc test isn't the end of the world — there are options after a failed perc test — but discovering the issue after you've already purchased land is a painful surprise.
Installing during the wrong season. Spring installation in the Midwest or Northeast means working in saturated, soft soil. Excavation walls can collapse, and perc tests run in spring may show artificially poor results due to high water tables. Late summer through fall is the sweet spot in most northern regions.
Ignoring setback rules. A drain field installed 30 feet from a well when code requires 100 feet isn't just a code violation — it's a contamination risk. No inspector will sign off, and no bank will finance the property.
Leaving out risers. Every tank should have risers installed to grade. Without them, every pump-out requires digging — adding $150–$300 to every service call, indefinitely.
How Long Does Septic Tank Installation Take?
The physical installation of a conventional system takes 1–3 days. Getting to that point takes much longer.
- Permit application and approval: 2 weeks to 3+ months
- Perc test scheduling and results: 1–4 weeks
- Engineering and design review: 1–4 weeks
- Physical installation: 1–3 days
- Final inspection scheduling: 1–2 weeks
Total project timeline from first call to final approval: 1–6 months is realistic in most jurisdictions. In high-demand areas or counties with slow permitting offices, 6 months is not unusual. Plan accordingly if you're building a new home or purchasing rural property. Lining up professional septic installation early in that window keeps the project from stalling between phases.
Regional Variations That Affect Your Installation
Septic regulations are controlled at the state and county level — not federally. That means requirements can vary dramatically even between neighboring counties.
Massachusetts operates under Title 5, one of the strictest septic codes in the country. Systems must meet specific setback, sizing, and inspection requirements, and inspections are mandatory at point-of-sale.
Florida requires all septic contractors to hold a Registered Septic Tank Contractor (RSTC) license through the Department of Health. High water tables throughout much of the state make conventional systems impractical in many areas — mound systems and aerobic treatment units (ATUs) are far more common.
Texas administers On-Site Sewage Facility (OSSF) permits through county-level authorized agents, not a single statewide authority. Soil conditions vary enormously — from black expansive clay in North Texas to sandy loam in the Hill Country — and the appropriate system type changes with the soil.
Rocky Mountain states like Colorado and Montana frequently see engineered systems because thin soils over bedrock fail standard perc tests. Holding tanks are sometimes the only viable option on difficult sites.
Always verify requirements with your local health department before spending a dollar on anything else. And before you commit to a contractor, find septic companies in your area and compare at least three bids.
Related: what building a septic system involves
Sources & Methodology
- U.S. Environmental Protection Agency (EPA) — SepticSmart Program (epa.gov/septic): Household statistics, system lifespan data, and general performance guidelines.
- National Onsite Wastewater Recycling Association (NOWRA) (nowra.org): Installer cost benchmarks and industry standards.
- National Association of Wastewater Technicians (NAWT) (nawt.org): Inspection and service standards referenced for inspection requirements.
- State health department regulations: Florida DOH, Massachusetts Title 5, Texas TCEQ OSSF rules — referenced for regional variation data.
- University Extension Services: Sizing guidelines and soil assessment methodology referenced from University of Minnesota Extension and Penn State Extension septic publications.
Cost ranges reflect 2024–2025 installer data compiled from NOWRA member surveys and regional contractor pricing. All specifications should be verified against current local code before installation.
Free download
Not ready for the Blueprint? Start free.
Grab the free DIY Septic Planning Kit — the permit-first checklist, perc-test cheat sheet, and sizing tables that keep your build from getting red-tagged.
Was this article helpful?
Frequently Asked Questions
Recommended Resources
📖 Related Articles
- Septic System Permit Cost & State Requirements (2026 Guide)
- Can You Install a Septic System Yourself?
- Perc Test (Percolation Test): What It Is & How It Works
- Septic System Design: Layouts, Drawings & Requirements
- Types of Septic Systems: Complete Comparison Guide
- Concrete vs Plastic Septic Tanks: Which Is Better?
- Septic Tank Sizes & Dimensions Chart (by Bedrooms)
- How Deep Is a Septic Tank Buried? (Tank, Lines & Field Depths)
- How to Install Septic Tank Risers (and Why You Should)
- What Is a Distribution Box in a Septic System?
- Infiltrator Septic Chambers: How They Work, Cost & Installation
- How to Install a Septic Drain Field
- What Happens During a Septic Inspection?
- The Complete Septic Tank Maintenance Guide
- Land Failed the Perc Test? Here Are Your Options
🔧 Services
Find Septic Professionals Near You
Compare licensed, verified septic companies by area — top county markets and cities below, or browse all 50 states.
County markets
Popular cities
