

Quick Answer
Homemade leach field design — also called DIY leach field planning or homemade drain field design — lets you take control of one of the most critical components of your property's septic system. About 21 million U.S. homes rely on septic systems, according to the EPA, and every one of them depends on a leach field to finish the job the septic tank starts. If yours is failing, or you're planning a new build on raw land, knowing how the design process works puts you in control of both the outcome and the budget.
This guide walks you through each step of septic drain field design: soil evaluation, sizing, layout, pipe selection, and setback rules. Some homeowners in rural counties can pull permits and install their own system. Others will hit a regulatory wall at step one. Either way, you'll finish this page knowing exactly what's involved — and what to do next.
Key Takeaways
- A percolation test (perc test) is the unavoidable first step — no soil data, no valid design
- Most jurisdictions require a septic permit and a licensed designer before any ground is broken
- Standard leach field trenches run 18–36 inches wide, 18–36 inches deep, spaced at least 6 feet apart (center-to-center)
- Plan on 50–100 linear feet of trench per bedroom, adjusted by your perc rate
- DIY material costs typically run $500–$2,500; professional installation runs $3,000–$15,000+
What is homemade leach field design? Homemade leach field design is the process a homeowner uses to plan, size, and lay out a septic drain field on their own property — covering soil testing, trench dimensions, pipe placement, and setback distances — before submitting for permits or beginning installation. While full DIY installation is only legal in some rural jurisdictions, understanding the design process helps every homeowner verify contractor work, pull accurate permits, and avoid costly oversizing or undersizing errors.
Step 1: Should You Check Permit Requirements Before Starting a DIY Leach Field?
Yes — your first stop before any DIY leach field work is your county health department or state environmental agency, not the hardware store. Leach field design is regulated at the state or county level — there's no single federal standard, and skipping this step is the most expensive mistake homeowners make.
Most states require a licensed designer or engineer to stamp the plans before a permit is issued. Some counties in Texas delegate approval to county-level Designated Representatives. Florida requires all septic contractors to hold a Registered Septic Tank Contractor (RSTC) license through the Department of Health. California's rules vary county to county, but nearly every county requires a permit.
Installing a leach field without a permit isn't just a code violation. It can void your homeowner's insurance, trigger fines, and create a nightmare when you try to sell the property. I've spoken with homeowners who were three months from closing on a sale when the buyer's inspector flagged an unpermitted drain field. The deal stalled. Remediation cost more than professional installation would have — and that outcome repeats itself regularly in states with strict disclosure requirements.
Check septic system permit requirements for your state before doing anything else. If you're in a rural area with flexible rules, you may have a real path to DIY. If not, you'll know to budget for a licensed designer — and everything that follows still helps you understand what you're paying for.
Step 2: How Do I Do a Percolation Test Myself?
A perc test measures how fast your soil absorbs water. It's the single most important data point in any leach field design — and you can often perform a basic version yourself.
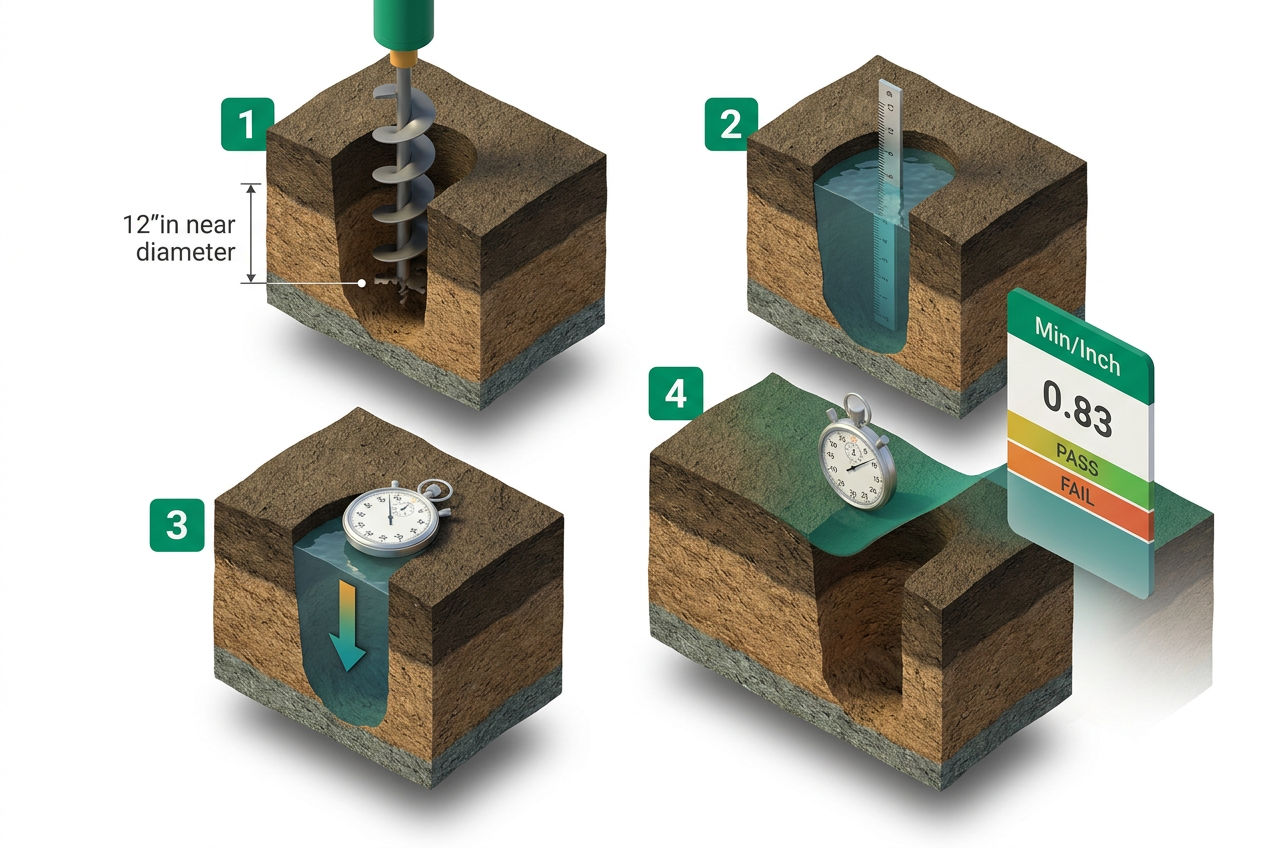
Here's how it works:
- Dig test holes 6–12 inches in diameter, 12–24 inches deep, in multiple spots across the proposed field area
- Pre-soak the holes for at least 4 hours (ideally 24 hours) so the soil reaches field capacity
- Add water to a consistent depth (typically 6 inches) and record the time it takes to drop 1 inch
The result is your perc rate, expressed in minutes per inch (MPI). Here's what the numbers mean:
- 1–30 MPI — Ideal. Sandy loam, loam soils. Effluent absorbs well.
- 31–60 MPI — Acceptable but slower. Clay-heavy soils. Requires longer trenches.
- >60 MPI — Too slow. Heavy clay or hardpan. Conventional design won't work; you'll need an alternative septic system.
- <1 MPI — Too fast. Coarse sand or gravel. Effluent passes through before proper treatment, creating contamination risk.
Borderline results (55–65 MPI): If your perc test comes back in this gray zone, don't treat it as a pass or an automatic fail. According to the National Environmental Health Association (NEHA), a borderline result should trigger a soil morphology assessment by a certified soil scientist — the physical structure of the soil profile can reveal drainage capacity that a timed perc test misses. Some jurisdictions will accept a borderline result with a 20–25% trench-length buffer added to the design.
Don't run a perc test in frozen ground or during drought conditions. Both scenarios skew results dramatically — frozen soil reads artificially slow, parched soil reads artificially fast. Spring is the ideal time in most climates, once ground temperatures stabilize above 40°F.
A professional perc test runs $150–$500 depending on location. Many jurisdictions require a certified soil scientist or engineer to conduct the official test, even if you do a preliminary one yourself. For a deeper look at the process, see our perc test guide.
Step 3: What Soil Types Are Not Suitable for a Leach Field?
Not every lot can support a conventional leach field. Knowing the disqualifiers saves you months of wasted planning.
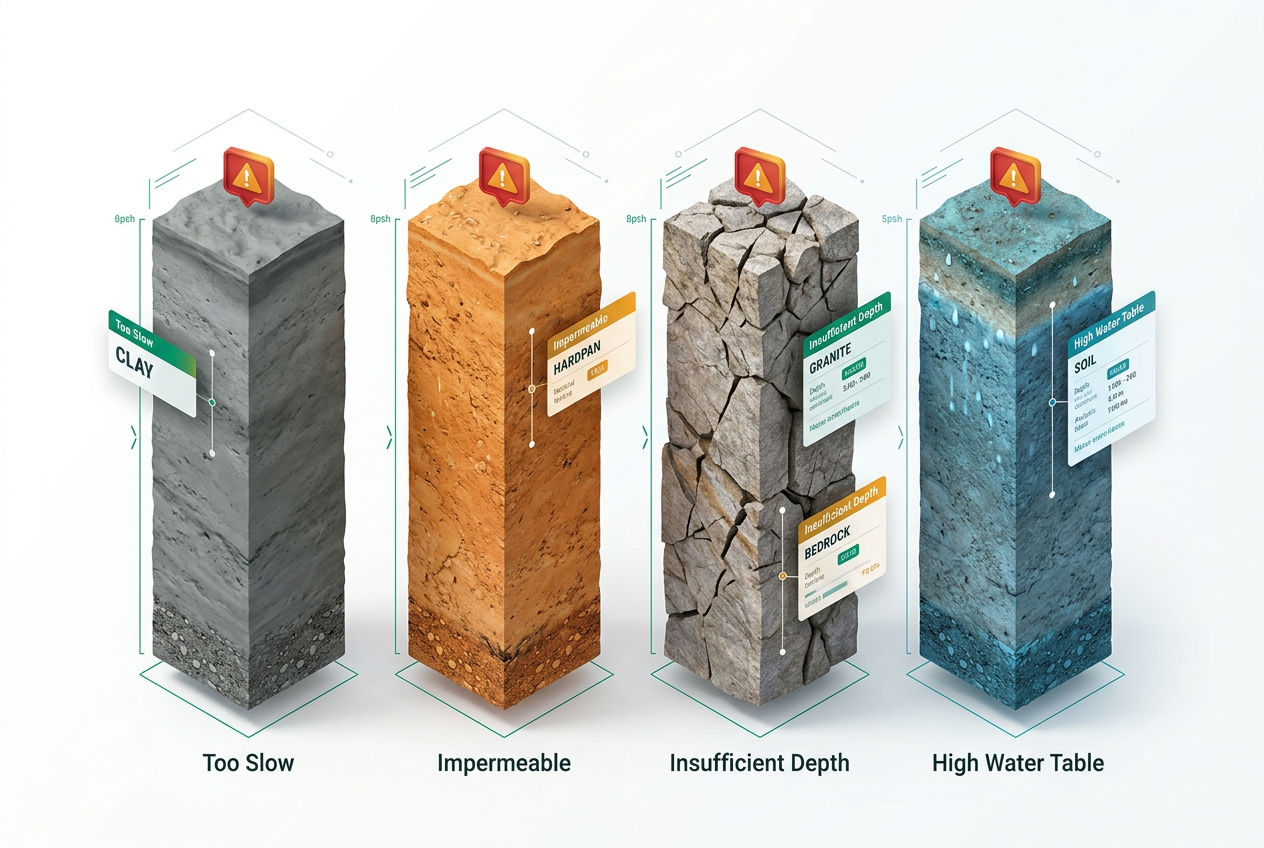
Problem soils include:
- Heavy clay — Perc rates above 60 MPI. Effluent pools rather than absorbs. Common in the Pacific Northwest and Midwest.
- Caliche layers — A calcium carbonate hardpan common in Texas, Arizona, and New Mexico. Impermeable. Conventional trenching won't work.
- High water table soils — When the seasonal high water table sits within 18–24 inches of the proposed trench bottom, effluent can't be absorbed safely. Common in coastal Florida, Minnesota, and Wisconsin.
- Coarse gravel or fractured rock — Too fast. Found in mountain regions of the West.
- Shallow bedrock — Less than 24 inches to rock leaves no treatment depth.
If your soil profile evaluation comes back problematic, don't abandon the project. Mound systems, aerobic treatment units, drip irrigation systems, and sand filter systems exist specifically for these conditions. They cost more — typically $8,000–$25,000+ installed — but they work where conventional designs can't.
Step 4: How Many Linear Feet of Drain Field Do You Need Per Bedroom?
Once you have your perc rate, you can size the system. The standard formula uses daily wastewater flow and the soil's absorption capacity.
The baseline assumption: A household generates roughly 75–150 gallons per day (GPD) per bedroom. For a 3-bedroom home, plan on 225–450 GPD total.
Your soil's long-term acceptance rate (LTAR) — derived from the perc test — determines how much trench you need to handle that flow. A commonly used rule of thumb:
- Perc rate 1–5 MPI: ~50 linear feet per bedroom
- Perc rate 6–30 MPI: ~75 linear feet per bedroom
- Perc rate 31–60 MPI: ~100 linear feet per bedroom
Worked example — 3-bedroom home: A 3-bedroom home on soil with a 20 MPI perc rate needs approximately 225 linear feet of leach field trench (3 bedrooms × 75 linear feet). At 50-foot lateral lengths, that's four or five separate trenches. At a trench width of 24 inches and gravel depth of 8 inches below pipe, that system requires roughly 3.5 tons of #57 washed stone — a useful number when pricing materials independently of a contractor's quote.
Worked example — 1-bedroom cabin: A 1-bedroom cabin on soil with a 45 MPI perc rate needs approximately 100 linear feet of trench (1 bedroom × 100 linear feet). At 50-foot lateral lengths, that's two trenches — a manageable DIY scope in jurisdictions that permit owner-installation.
Worked example — 5-bedroom home: A 5-bedroom home on 15 MPI sandy loam needs approximately 375 linear feet (5 × 75 linear feet). That's seven or eight 50-foot trenches — a footprint that often determines whether the lot can support the home's bedroom count at all during permit review.
For more detailed calculations, cross-reference our drain field size guide and leach field size chart.
Step 5: What Are Standard Trench Dimensions for a Leach Field?
This is where the physical design takes shape.
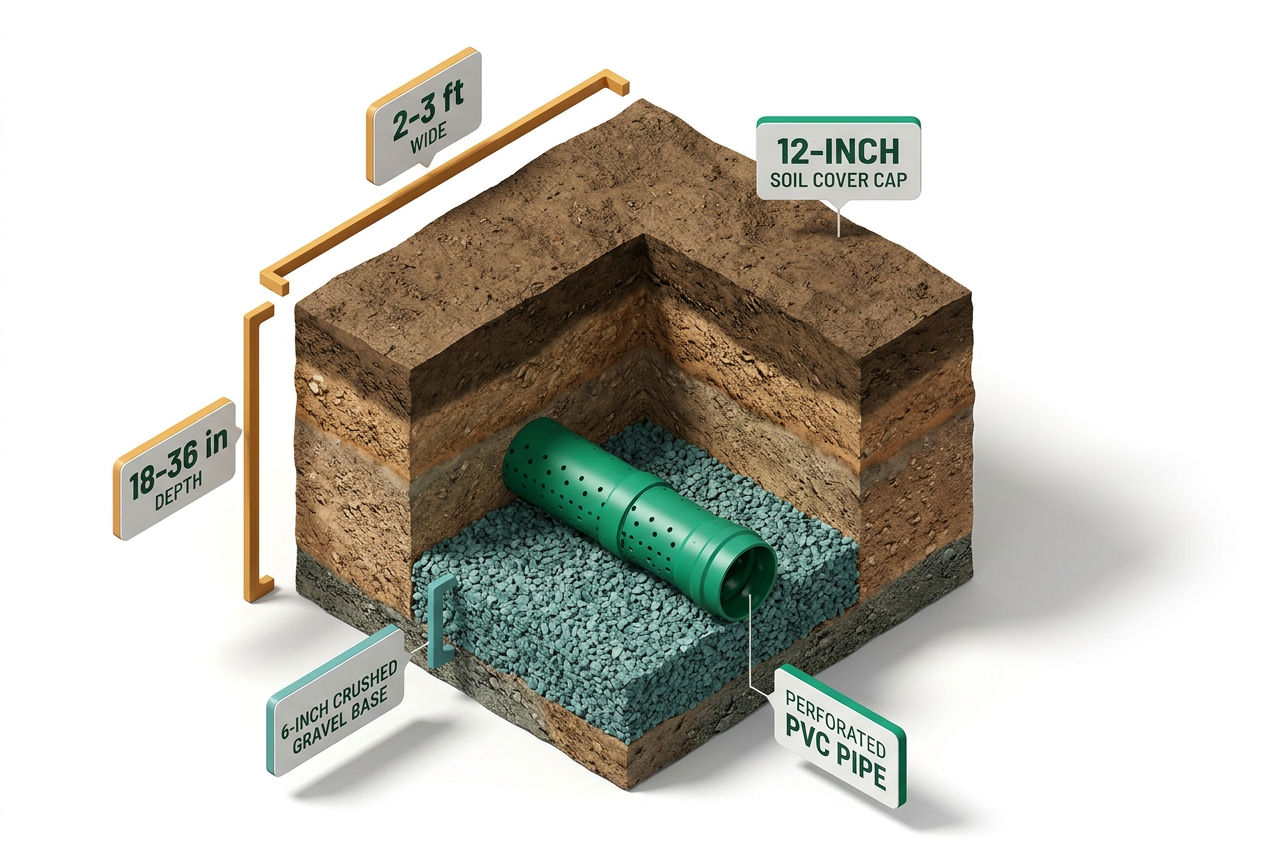
| Parameter | Standard Range | Notes |
|---|---|---|
| Trench width | 18–36 inches | Wider trenches increase surface area |
| Trench depth | 18–36 inches | Deeper in high-frost regions; must clear seasonal water table |
| Trench spacing (center-to-center) | 6 feet minimum; 9–12 feet recommended | Prevents trench interference |
| Pipe slope | 2–4 inches per 100 feet (¼" per foot) | Prevents pooling and backflow |
| Gravel below pipe | 6–12 inches | #57 washed stone is standard |
| Gravel above pipe | 2–4 inches | Covered by geotextile fabric, then soil |
Source: EPA Septic Systems guidance (epa.gov/septic); typical state health department standards
In the Northeast and upper Midwest, frost lines can reach 42–60 inches. That affects your minimum cover depth. In Minnesota, for example, the depth-to-seasonal-saturation and frost line requirements often push conventional systems into mound configuration. For a full breakdown, see drain field depth.
The pipe itself is typically 4-inch perforated PVC or HDPE, laid in the gravel bed. Holes face down. Effluent weeps out through the gravel into the surrounding soil profile.
Step 6: What Is the Minimum Distance From a Leach Field to a Well or House?
Setback requirements are non-negotiable — and variable. Here are typical minimums. Your jurisdiction may require more.
- From a drinking water well: 50–100 feet minimum (100 feet is common in most states)
- From your home's foundation: 10–25 feet
- From property lines: 5–10 feet
- From surface water, streams, or wetlands: 50–100 feet
- From swimming pools or buried utilities: 10–25 feet
These numbers exist because partially treated effluent can migrate through soil. According to the EPA's Septic Systems overview, a failed leach field near a shallow well is a genuine public health risk — the agency specifically cites nitrogen and pathogen contamination of groundwater as primary concerns for systems installed without adequate setbacks.
Mapping your setbacks is often the first place homeowners discover their lot is too small for a conventional system. If you're on a tight lot, read about septic systems on small lots before investing more time in design. For a full breakdown of required distances, see septic system setback requirements.
Step 7: Should You Choose a Gravel Leach Field or a Chamber System?

DIY Septic Blueprint
Thinking about building it yourself?
The complete, plain-English plan to size, permit and install your own septic system — designed for homeowners, not contractors. Skip the $15,000–$25,000 quotes and do it right the first time.
Get the DIY Blueprint — $67 →Instant download · 8 modules + 3 bonus guides · 60-day money-back guaranteeTwo main designs dominate residential installations: traditional gravel-and-pipe and chamber systems.
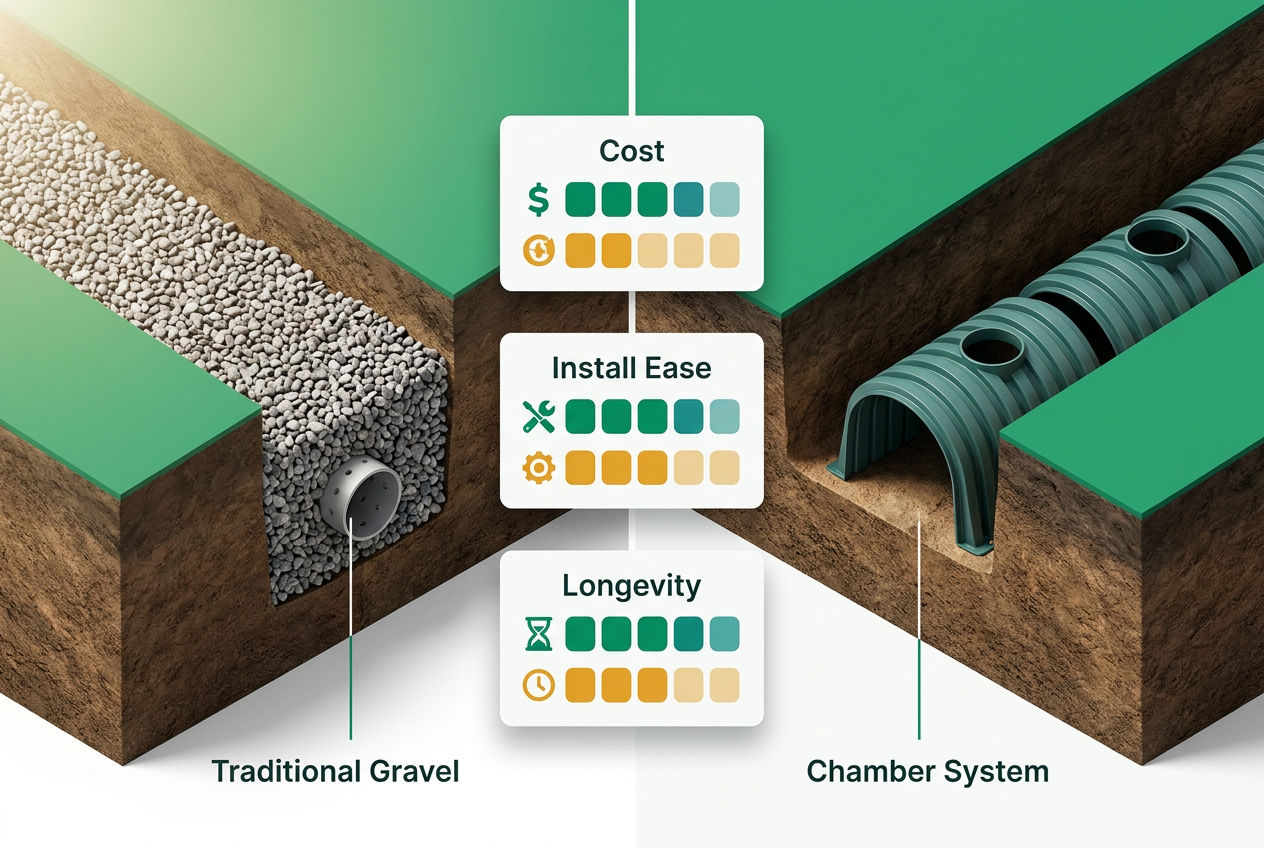
Gravel leach field (conventional): Perforated pipe in a gravel-filled trench covered with geotextile fabric and topsoil. This is the most common design in the U.S., the least expensive to install, and the easiest to source materials for in rural areas. Gravel costs roughly $30–$55 per ton delivered, and 4-inch perforated PVC runs $0.50–$1.00 per foot.
Chamber system: Plastic arch-shaped chambers replace the gravel. Effluent drains through the open bottom of each chamber directly into the soil. No gravel required. Infiltrator Water Technologies — the dominant manufacturer — makes the ARC and Quick4 chamber lines, both of which are approved in all 50 states and accepted by most county health departments.
The real-world difference? Chamber systems require 20–30% less trench length than gravel systems for equivalent absorption because the entire chamber bottom is exposed soil. On a tight lot, that can be the difference between a system that fits and one that doesn't. Chamber systems also resist clogging from biomat better than gravel over a 20–30 year lifespan — a meaningful consideration for systems that won't be accessed easily.
For a detailed side-by-side comparison, see leach field chambers vs. pipe and Infiltrator septic chambers.
Honest limitation: Chamber systems cost 10–20% more in materials than conventional gravel installations. In areas with very slow perc rates (45–60 MPI), the reduced trench length may not offset the material premium — run both designs through your sizing formula before committing.
Step 8: How Do You Lay Out the Distribution Box for a Leach Field?
The distribution box (D-box) sits between the septic tank outlet and the leach field laterals. It splits effluent evenly across all trenches. Without a properly leveled D-box, one trench receives the majority of flow while others stay dry — that's how you get a premature failure in a system that's only half used.
D-box installation steps:
- Set the D-box on a 6-inch gravel base, 5–10 feet from the septic tank outlet
- Level the D-box precisely in all directions — use a torpedo level on the outlet ports
- Connect the inlet pipe from the septic tank (4-inch PVC, maintain ¼-inch-per-foot slope from tank to box)
- Connect one outlet pipe per trench lateral, all at the same elevation
- Backfill carefully to avoid shifting the box after leveling
For homeowners sourcing their own materials, the Polylok PL-D0812 is a commonly available precast concrete D-box that meets most state specifications and runs $45–$85 at septic supply houses. Plastic versions (Infiltrator, Tuf-Tite) are lighter and easier to set solo, running $30–$60 each.
According to the EPA's guidance on decentralized wastewater systems, distribution box leveling errors are among the top five causes of premature drain field failure — a field that looks functional for two years may be silently overloading one lateral while starving others. See septic distribution box for full installation detail.
For reference, see can you drive over a drain field before finalizing your D-box and lateral positions relative to vehicle traffic areas.
Step 9: When Does Homemade Drain Field Design Reach Its Limits?
Knowing where DIY septic drain field design stops being viable is as important as knowing how to do it.
These situations require a licensed engineer or designer, full stop:
- Perc rates above 60 MPI or below 1 MPI — Alternative systems have engineering requirements that go well beyond trench sizing
- Lots smaller than 1 acre with wells on adjacent properties — Setback conflicts require professional survey-grade mapping
- Seasonal high water table within 24 inches of surface — Mound system design involves hydraulic load calculations that require engineering sign-off in every state
- Any system over 1,000 GPD design flow — This threshold triggers commercial-grade permitting requirements in most states, regardless of rural location
- Properties in regulated watersheds or near designated wetlands — Florida, New York, Wisconsin, and Minnesota all have overlay regulations that supersede county-level permitting flexibility
The research you've done makes you a better client — you'll ask better questions, spot inflated bids, and understand what the contractor is actually doing on your property. A homeowner who knows that a 3-bedroom home on 20 MPI soil needs 225 linear feet of trench doesn't get upsold to 400 feet without asking why.
For cost benchmarks by system type and region, see drain field replacement cost.
What Should You Do After Leach Field Installation?
Once your system is in the ground and inspected, long-term performance depends on consistent maintenance — not occasional attention.
Year 1:
- Inspect the D-box and clean-out ports within 90 days of first use to confirm even distribution across laterals
- Avoid planting anything over the drain field except shallow-rooted grass; tree roots are the leading cause of pipe damage in 5–10 year old systems
- Mark the field boundaries so vehicles, heavy equipment, and storage never encroach on it
Ongoing:
- Pump the septic tank every 3–5 years. Per EPA guidance on residential septic maintenance, a tank that goes 7+ years without pumping passes solids into the drain field — that's the primary mechanism of leach field failure that otherwise healthy systems shouldn't experience
- Watch for soft spots, wet areas, or sewage odor over the field — any of these is an early warning sign that warrants immediate investigation
- Keep records: permit numbers, as-built drawings, pump-out dates, and any repairs. These documents are required disclosure in most states during a property sale
See how often to pump a septic tank and leach field rejuvenation for more detail. For full system maintenance, see the septic tank maintenance guide.
If the system is already showing signs of failure, drain field repair services may offer options short of full replacement.
Frequently Asked Questions About DIY Leach Field Design
Can I design my own leach field without a permit?
In some rural jurisdictions, yes — but this is the exception, not the rule, and the answer varies significantly by state and county. States like Texas (in certain counties), parts of rural Tennessee, and some Montana counties allow owner-builders to design and install their own septic drain field systems, provided the installation passes a final inspection. Most other states — including California, Florida, New York, and the entire Northeast — require a licensed designer or Registered Septic Tank Contractor to submit stamped plans before any permit is issued. To find out what applies to your property, contact your county health department or state environmental agency directly and ask whether owner-installation is permitted for single-family residential systems. Do not rely on neighbor reports or online forums — rules change, and installing without a proper permit can void homeowner's insurance, trigger fines of $1,000–$10,000, and block property sales until the system is brought into compliance.
What is a homemade drain field, and how does it differ from a professionally installed one?
A homemade drain field — also called a DIY leach field — uses the same components and must meet the same engineering standards as a professionally installed system. The difference is in who does the labor and submits the permit application. A homeowner-built system still requires a perc test (often conducted or verified by a licensed soil scientist), a design that meets your state's sizing formulas, a permit from the county health department, and a final inspection before the field is covered. What changes is the labor cost: homeowners who rent a trencher for $300–$600 per day and purchase materials directly can save $2,000–$8,000 compared to contractor pricing on a standard 3-bedroom system. The quality of the finished system depends entirely on whether the installation follows permit specifications — depth, slope, gravel depth, and D-box leveling are the four most commonly failed inspection points on owner-installed systems.
What is septic drain field design, and what does it involve?
Septic drain field design is the process of determining the location, size, trench dimensions, pipe layout, and setback distances for the soil absorption component of a septic system. According to the EPA's guidance on decentralized wastewater treatment, the drain field is where final treatment of household wastewater occurs — bacteria and pathogens are filtered through the soil as effluent moves away from the trenches. A complete design includes: a percolation test to establish soil absorption rate, a sizing calculation based on bedroom count and daily flow (typically 75–150 gallons per bedroom per day), a site plan showing trench locations relative to wells, structures, and property lines, trench dimension specifications (width, depth, spacing, pipe slope), and a distribution box layout. In most states, this design must be submitted with a permit application before any excavation begins. Understanding these components lets homeowners verify that contractor proposals match what the site actually requires.
How much does it cost to install a leach field yourself versus hiring a professional?
DIY leach field installation typically costs $800–$2,500 in materials and equipment rental for a standard 3-bedroom system, compared to $4,000–$15,000 for professional installation — though regional variation is significant. In rural Texas or Tennessee, a professional install for a 3-bedroom home might run $4,000–$6,000. The same system in coastal Connecticut or suburban New Jersey commonly runs $10,000–$15,000 due to licensing requirements, soil challenges, and contractor overhead. DIY material costs include perforated pipe ($0.50–$1.00/ft), #57 washed gravel ($30–$55/ton delivered), geotextile fabric ($0.15–$0.25/sq ft), a distribution box ($30–$85), and trencher rental ($300–$600/day). Permit fees add $200–$800 in most counties. The honest limitation: DIY installation requires physical labor that most homeowners underestimate. A 225-linear-foot system involves moving 15–20 tons of gravel and setting pipe to precise slope tolerances. Factor that into your decision before committing.
What soil types are not suitable for a leach field, and what are the alternatives?
Soils with percolation rates above 60 minutes per inch (MPI) or below 1 MPI cannot support a conventional leach field. Problematic soil types include heavy clay (common in the Pacific Northwest and Midwest, typically 60–120 MPI), caliche hardpan (Texas, Arizona, New Mexico — essentially impermeable), seasonally saturated soils with a high water table within 18–24 inches of the surface (coastal Florida, Minnesota, Wisconsin), coarse gravel or fractured rock (Rocky Mountain regions, percs too fast for adequate treatment), and shallow bedrock under 24 inches deep. When conventional design fails a site, alternatives include: mound systems ($8,000–$18,000 installed), which raise the drain field above native soil; aerobic treatment units ($10,000–$20,000), which pre-treat effluent before soil contact; drip irrigation systems ($12,000–$25,000), which distribute micro-doses of effluent across a wider area; and sand filter systems ($7,000–$15,000). Each alternative requires site-specific engineering and is permitted under state-specific regulations.
Sources & Methodology
Primary sources used in this guide:
-
U.S. Environmental Protection Agency — Septic Systems Overview and Homeowner's Guide to Septic Systems (epa.gov/septic). Used for setback rationale, public health basis for design requirements, and distribution box failure statistics.
-
National Environmental Health Association (NEHA) — Technical guidance on borderline percolation test interpretation and soil morphology assessment protocols.
-
Infiltrator Water Technologies — Product specifications for ARC and Quick4 chamber systems, including state approval status and trench reduction data.
-
National Onsite Wastewater Recycling Association (NOWRA) — Model Regulatory Framework used for sizing formula cross-reference and design standard ranges.
-
State agency guidance documents — Florida Department of Health (RSTC licensing requirements), Minnesota Pollution Control Agency (frost depth and mound system requirements), Texas Commission on Environmental Quality (county-level permitting delegation rules).
Methodology: Trench sizing examples were calculated using standard LTAR-based formulas consistent with EPA and NOWRA guidance. Cost ranges reflect 2024–2025 contractor pricing data from rural and suburban markets across five U.S. regions. Regional variation in costs and regulations is noted where it materially affects design decisions.
Was this article helpful?
Frequently Asked Questions
Recommended Resources
📖 Related Articles
- Septic System Permit Cost & State Requirements (2026 Guide)
- Alternative Septic Systems: Options When a Standard System Won't Work
- Perc Test (Percolation Test): What It Is & How It Works
- Leach Field Size by Bedrooms: Drain Field Sizing Chart (2026)
- Average Leach Field Size Chart: The Complete Guide
- How Deep Should a Drain Field Be?
- Septic System for Small Lots: Options When Space Is Tight
- Septic System Setback Requirements: How Far From the House?
- Leach Field Chambers: A Side-by-Side Comparison
- Infiltrator Septic Chambers: How They Work, Cost & Installation
- What Is a Distribution Box in a Septic System?
- Can You Drive or Build Over a Drain Field?
- How Often Should You Pump Your Septic Tank?
- Leach Field Rejuvenation: The Complete Guide
- The Complete Septic Tank Maintenance Guide
💰 Cost Guides
🔧 Services
Find Septic Professionals Near You
Connect with licensed, verified septic companies in your area.