

A septic clean out is an access pipe between your house and tank. Learn where to find it, what it's used for, and how it helps diagnose septic problems.
Quick Answer
National ranges are a starting point. Get 3 free quotes from licensed local septic pros priced for your soil, lot size, and county requirements.
A septic clean out is a capped access pipe installed on the sewer line between your house and septic tank. Located within 5-10 feet of your foundation at ground level, this 3-4 inch diameter pipe gives plumbers and septic technicians direct access to the sewer line for clearing clogs, running camera inspections, and diagnosing whether drainage problems originate in the house plumbing or the septic system itself.
Key Takeaways
- A septic clean out is a 3-4 inch capped access pipe on the sewer line between house and tank
- Typically located 5-10 feet from the foundation, on the side facing the septic tank
- Used for snaking clogs, camera inspections, and diagnosing whether problems are house-side or tank-side
- Installing one costs $200-$500 and is required by most modern building codes
- Checking the clean out is the fastest way to diagnose slow drains and backups
When your drains slow down or sewage backs up, the first question is always: is the problem in the house plumbing, the sewer line, or the septic tank? Your septic clean out answers that question in seconds. It's one of the most useful and least understood components of a residential septic system — a simple pipe fitting that saves homeowners hundreds of dollars in unnecessary diagnostic fees.
If you've never located your clean out or aren't sure what it does, this guide covers everything you need to know.
Find a licensed septic professional in your area on SepticTankHub.com
A septic clean out (also called a sewer clean out or cleanout access) is a vertical pipe fitting connected to the main sewer line that runs from your house to the septic tank. It has a removable cap on top — usually threaded PVC or a cast iron plug — that allows direct access into the sewer pipe.
The clean out serves three primary purposes:
1. Clearing blockages. When the sewer line between the house and tank clogs, a plumber feeds a drain snake (auger) through the clean out to break up or retrieve the blockage. Without a clean out, the only options are snaking from inside the house (limited reach) or excavating the sewer line (expensive).
2. Camera inspections. A fiber-optic sewer camera pushed through the clean out reveals the interior condition of the pipe — cracks, root intrusion, bellied sections, and buildup. This is essential for diagnosing recurring problems. Camera inspections cost $200-$400 and prevent unnecessary excavation.
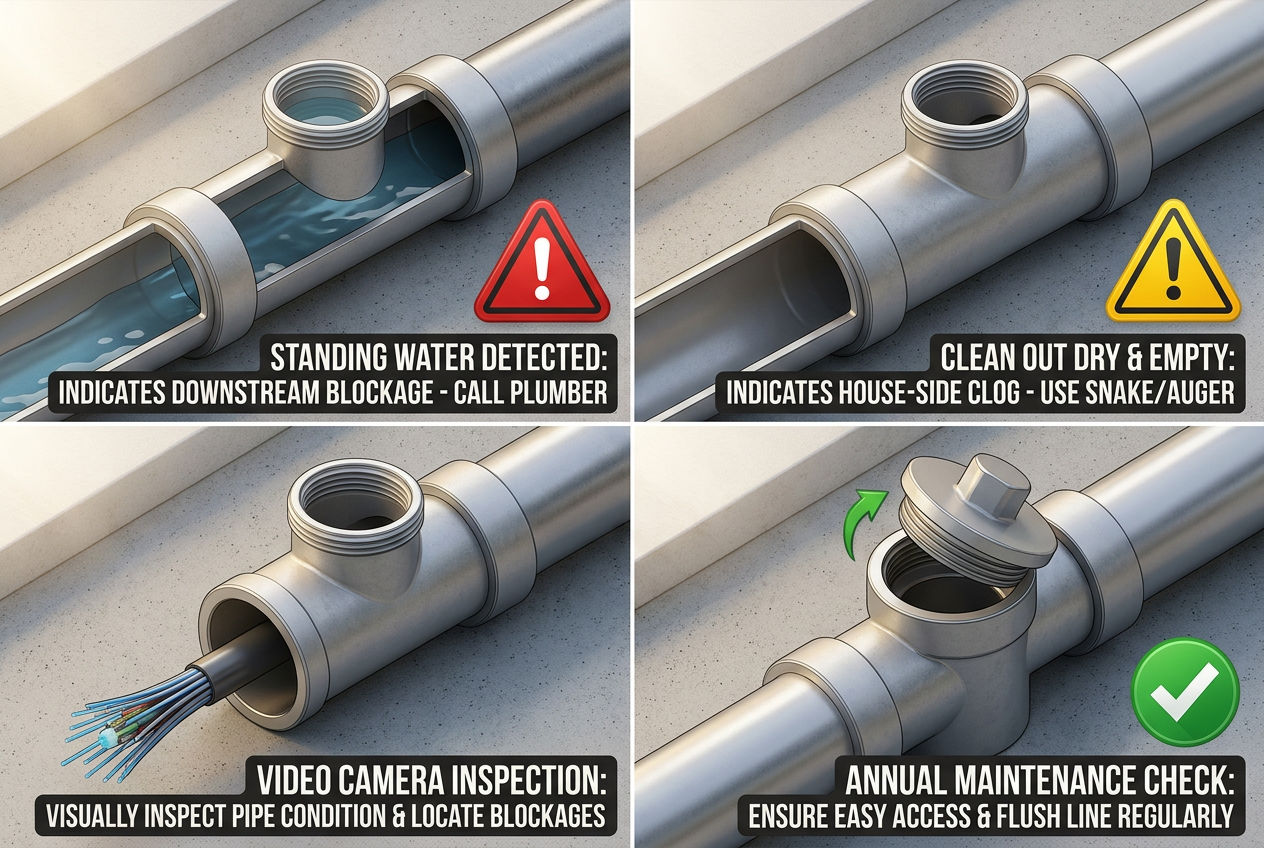
3. Diagnostic access point. When you're trying to determine if your septic tank is full or if you have a pipe clog, the clean out tells you immediately. Open it and look inside:
This simple check saves a service call to the wrong professional. A plumber handles house-side clogs ($150-$300). A septic company handles tank and sewer line issues ($300-$600).
Pro Tip: Before calling anyone for slow drains, check your clean out first. If you see standing water in it, call a septic company. If it's dry, call a plumber. This 60-second check prevents the wrong contractor from showing up and charging you a diagnostic fee for something outside their scope.

Most septic clean outs are installed within 5-10 feet of the house foundation, on the side of the house that faces the septic tank. Here's how to find yours:
Look near the foundation wall on the backyard side. The sewer line exits through the foundation and heads toward the tank, which is almost always in the backyard. The clean out is typically positioned close to where the pipe exits the house.
Search for a round cap at ground level. The clean out cap is a 3-4 inch round fitting — white PVC on newer homes, black cast iron or brass on older homes. It may be flush with the ground, slightly above it, or in some cases buried under a few inches of soil or mulch.
Check multiple locations. Newer homes often have two clean outs — one near the foundation and one midway between the house and the tank. Some also have an indoor clean out, usually in the basement or utility room where the main drain line runs.
Slab foundations. On homes without basements, the clean out is typically mounted on the exterior wall as a short pipe stub with a cap, rather than in the ground.
If you can't find it, a septic inspector or plumber can locate it during a service call. The same visit where you find your septic tank is a good time to identify and mark all access points.
| Home Type | Common Clean Out Location | What It Looks Like |
|---|---|---|
| Basement home | Ground near foundation wall (backyard side) | White PVC cap flush with ground |
| Crawl space home | Ground 3-5 feet from foundation | White PVC cap or black plug at ground level |
| Slab foundation | Mounted on exterior wall | Short pipe stub with cap on outside wall |
| Older home (pre-1990) | Ground near foundation or buried | Black cast iron plug, may be covered |
| New construction (2010+) | Two locations: foundation + midway to tank | White PVC caps, clearly visible |
Source: International Residential Code clean out access requirements and field data
Common Mistake: Assuming you don't have a clean out because you can't see one. On older homes, the clean out cap can be buried under years of soil, mulch, landscaping, or even a patio or deck addition. Before concluding you don't have one, probe the area near the foundation with a screwdriver. If your home was built after 1990, it almost certainly has one — it's just hidden.

Understanding where the clean out sits in the overall system layout helps you use it effectively for diagnostics. Here's the complete path from house to soil, with the clean out's position marked. For a full labeled diagram of every component, see our septic system diagram guide.
The flow path is: House plumbing → Main sewer line → Clean out → Sewer line continues → Septic tank inlet → Tank → Distribution box → Drain field
The clean out divides the sewer line into two diagnostic zones:
Zone A (house to clean out): This section includes all the interior plumbing — branch lines from sinks, toilets, and showers that converge into the main drain line, plus the main line from inside the house to the clean out. Problems in this zone are plumbing issues — handled by a plumber.
Zone B (clean out to tank): This section is the buried sewer line running from the clean out to the septic tank inlet. Problems here include root intrusion, pipe collapse, offset joints, or a full/blocked tank. These are septic system issues — handled by a septic company.
When the technician arrives, knowing which zone has the problem means they start solving it immediately instead of spending 30-60 minutes diagnosing.
Key Insight: The clean out is also a vent point for sewer gas pressure. If you ever smell sewer gas near the clean out location, the cap may be cracked or loose. Replacing a clean out cap costs under $10 at any hardware store — a quick fix that eliminates the odor.

The clean out is your first stop for any of these scenarios:
Slow drains throughout the house. If every fixture drains slowly at the same time, open the clean out. Standing water confirms the blockage is downstream (Zone B). An empty, dry clean out means the problem is upstream in the house plumbing.
Sewage backing up. When sewage backs into the house through the lowest drain, the clean out shows whether the main line or the tank is the culprit. Caution: if the clean out is full, wastewater may overflow when you remove the cap. Open it slowly and stand to the side.
Before scheduling a pump out. If you're not sure whether your tank actually needs pumping, check the clean out. A full clean out with the tank recently pumped suggests a line blockage, not a full tank. A free-flowing clean out with symptoms pointing to a full tank confirms it's time to schedule a pump out.
Annual maintenance check. Once a year, open the clean out and look inside. The pipe interior should be relatively clean with no standing water. Roots, grease buildup, or debris visible inside the pipe suggest developing problems before they become emergencies.
Before a home sale. When preparing your septic system for a home sale, make sure the clean out is accessible and in good condition. Inspectors will check it, and a missing or inaccessible clean out can flag a concern.
Pro Tip: Mark your clean out location with a landscape stake or decorative marker. When an emergency happens — sewage backing up at 10 PM on a weekend — you don't want to be searching for it in the dark with a flashlight. Every minute counts during a backup.
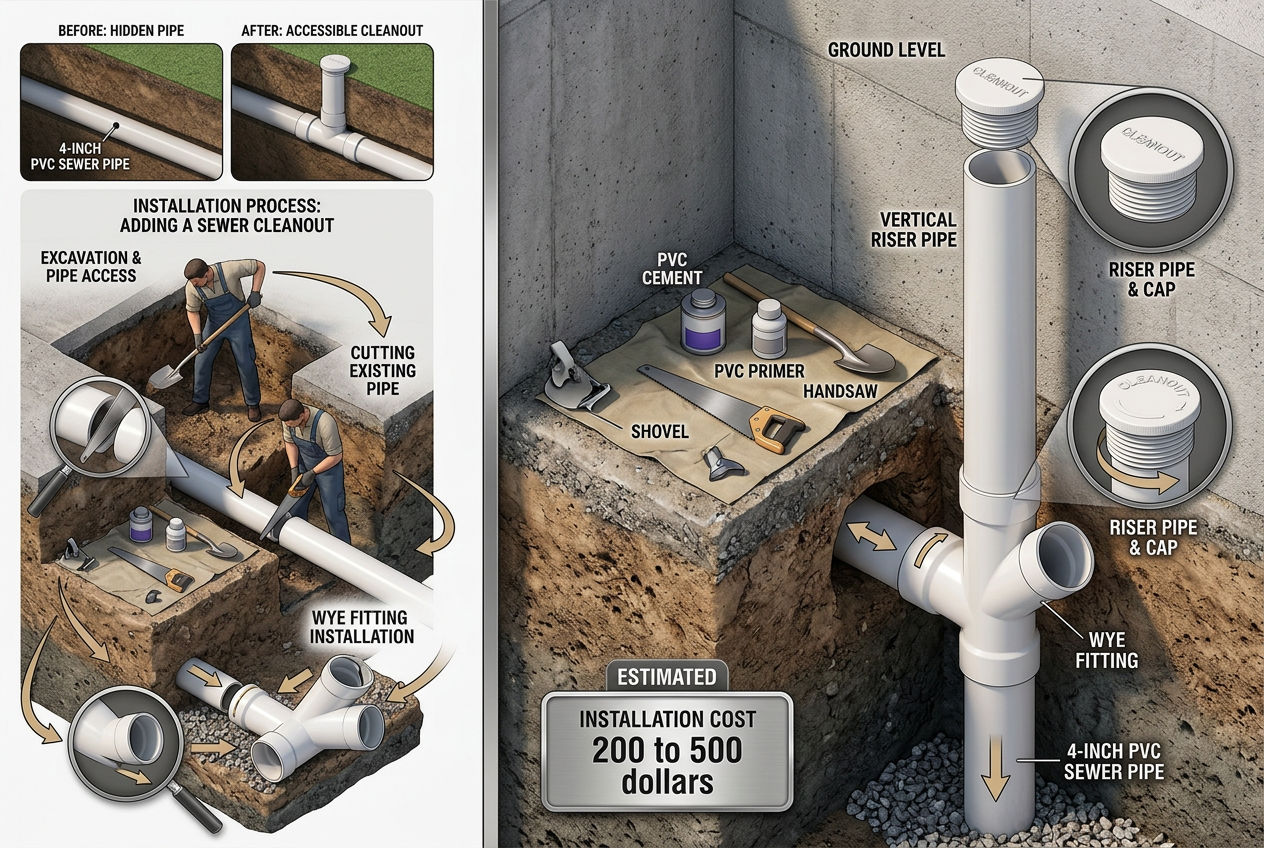
Older homes (pre-1980) may not have an exterior clean out. If yours doesn't, you have two options:
Option 1: Use an interior clean out. Many older homes have a clean out fitting in the basement where the main drain line runs. Look for a Y-shaped fitting with a removable plug on the main pipe. This provides access for snaking but doesn't help with the diagnostic zone-splitting that an exterior clean out provides.
Option 2: Install an exterior clean out. A plumber or septic contractor can add a clean out to your existing sewer line for $200-$500 (standard depth) or $500-$1,200 if the line is deeply buried. This involves exposing the sewer pipe, cutting in a tee or wye fitting, and extending a vertical pipe to the surface with a cap.
Installing a clean out is one of the best small investments you can make in your septic system. It pays for itself the first time you avoid a $400 diagnostic fee because you could pinpoint the problem zone before calling for service.
Most plumbers and septic companies will recommend adding a clean out if they discover you don't have one during a service call. If you're already paying for excavation as part of another repair, adding a clean out during that work costs only the fitting and 30 minutes of additional labor.
Quick Fact: The International Residential Code (IRC Section P3005.2) requires clean out access at the building sewer line for all new construction. If your home was built after 2000, you almost certainly have one — even if it's buried under landscaping.
Clean outs are low-maintenance, but they do need occasional attention:
Keep it accessible. Don't bury the cap under soil, pavers, or permanent landscaping. If it's currently buried, dig it up and install a PVC riser to bring it to ground level.
Replace cracked caps. UV exposure and lawn equipment damage can crack PVC caps over time. A cracked cap lets rainwater, dirt, and insects into the sewer line and allows sewer gas to escape. Replacement caps cost $3-$8 at hardware stores — buy the right size (most residential clean outs are 3" or 4").
Don't over-tighten. Hand-tight plus a quarter turn with a wrench is sufficient. Over-tightening can crack the cap or the fitting, requiring pipe repair.
Lubricate threads annually. A small amount of plumber's grease on the threads keeps the cap easy to remove when you need it. Corroded or seized caps are useless in an emergency.
Note the clean out location on your septic maintenance records. Include it on any property diagram you share with your service company.
International Code Council — International Residential Code Section P3005.2 — Clean out requirements for residential building sewers including location, spacing, and sizing
EPA — Homeowner's Guide to Septic Systems — Federal guidelines on septic system components, access points, and maintenance
University of Minnesota Extension — Septic System Maintenance — Research-based maintenance practices for all septic system access points
SepticTankHub.com Internal Data — Clean out installation pricing and diagnostic patterns from 4,200+ listed septic companies
Compare top-rated companies in your area. Get free, no-obligation quotes from verified providers.
Was this article helpful?
Connect with licensed, verified septic companies in your area.
Get estimates from licensed, verified companies in your area. No obligation.
⚡ Average response time: under 2 hours