
Quick Answer
Testing a septic system involves six methods ranging from a simple walk-around visual check to professional camera inspections and lab-analyzed effluent sampling. Basic DIY checks are free and take under an hour. A full professional septic inspection runs $300–$1,500 depending on the methods used. The EPA recommends professional inspection every three years for conventional systems.
📊 Key Takeaways
- The EPA recommends inspecting conventional septic systems every 3 years; systems with pumps or aerators need annual checks.
- A professional visual inspection costs $300–$600; a full inspection with camera and dye test runs $1,000–$1,500+.
- Healthy sludge levels should not exceed one-third of total tank capacity-above that, you need pumping.
- Septic system replacement costs $15,000–$30,000+, making proactive testing one of the best investments a homeowner can make.
- Many states require a septic inspection before a home can be sold-check your county health department's requirements.
How Do You Know Your Septic System Needs Testing?
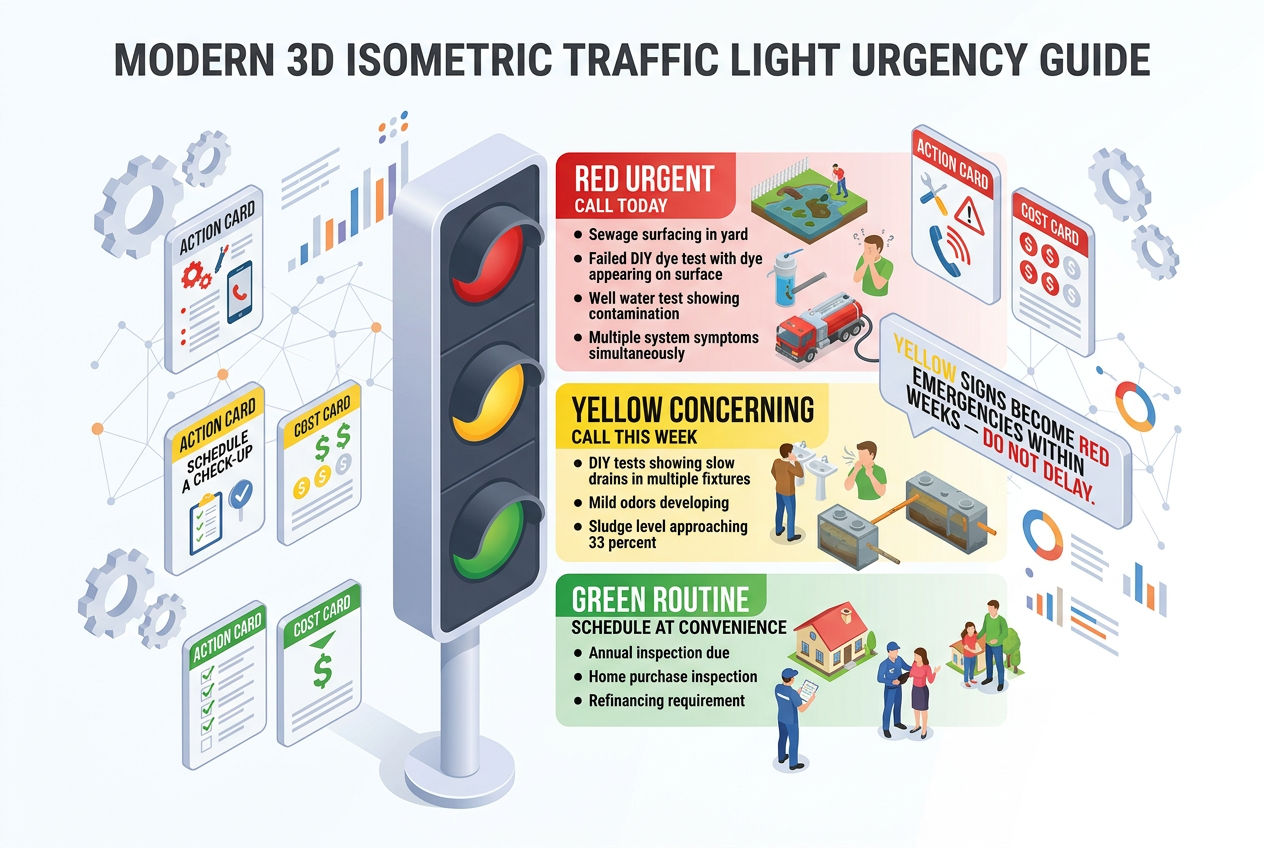
Your septic system will usually tell you something is wrong before it completely fails. The problem is most homeowners don't know what to look for-or they ignore the early signs until a $400 inspection turns into a $25,000 drain field replacement.
Warning Signs That Demand Immediate Testing
- Slow drains throughout the house - not just one fixture. One slow drain is a plumbing clog. All your drains running slow points to the septic tank or drain field.
- Sewage odors indoors or in the yard - that rotten egg or sulfur smell isn't normal. If it's coming from your septic system's drain field area or through your floor drains, something is backing up.
- Wet, spongy, or unusually green patches of grass over the drain field, especially during dry weather.
- Sewage backing up into tubs or toilets, which signals the tank is full or the outlet baffle has collapsed. Learn more about what causes septic system backups.
- Gurgling sounds from drains after water runs anywhere in the house.
💡 Pro Tip: Even without symptoms, testing makes sense if your system is more than 20 years old, you've never had it inspected, or you're buying or selling a home. About 10–20% of septic systems were malfunctioning at any given time, according to late-1990s EPA literature — and most of those failures didn't come with dramatic warning signs first.
Free download
Free: the Septic Fridge Card — what to flush, what never to.
The Do / Don’t card the whole family can see, plus the Survival Kit: emergency flowchart, warning-sign decoder and pump-schedule card. One printable PDF.
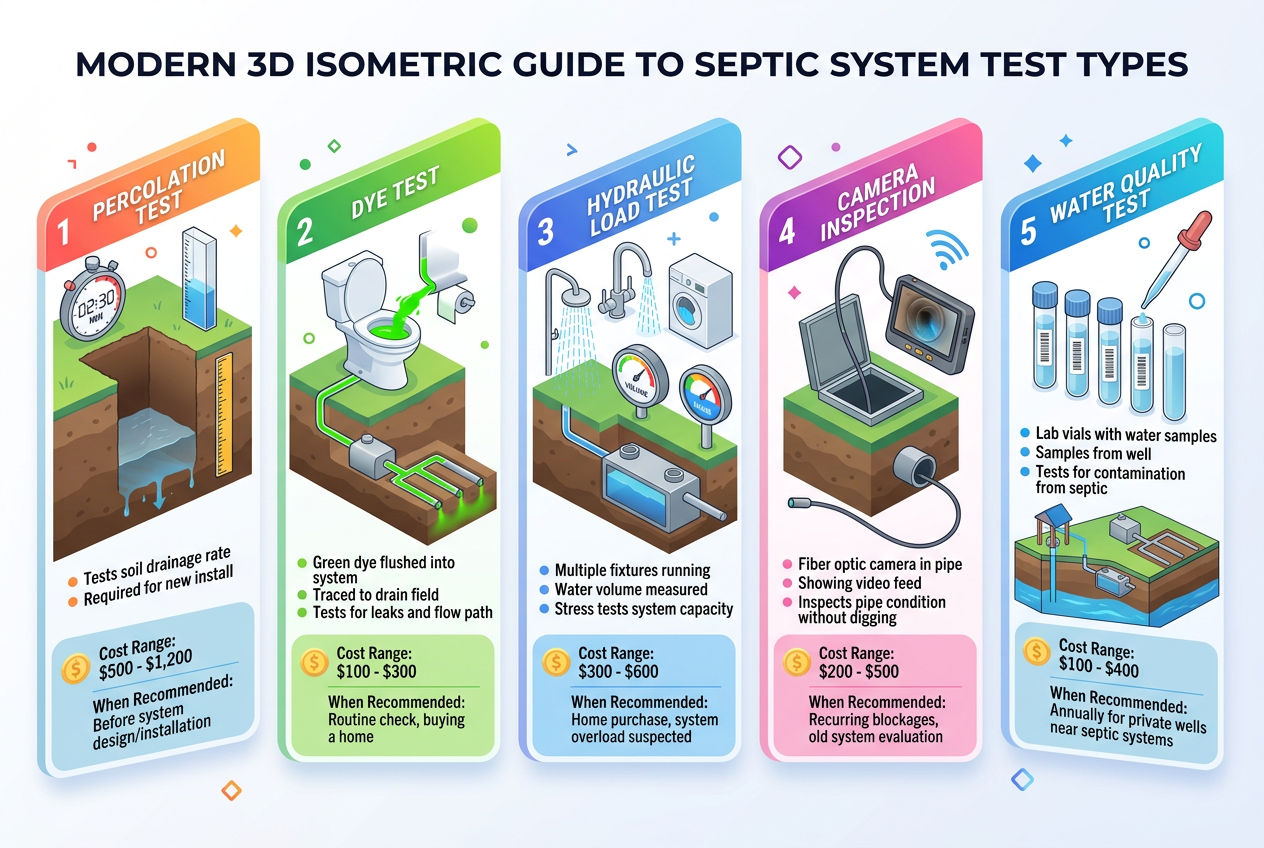
6 Proven Septic System Test Methods
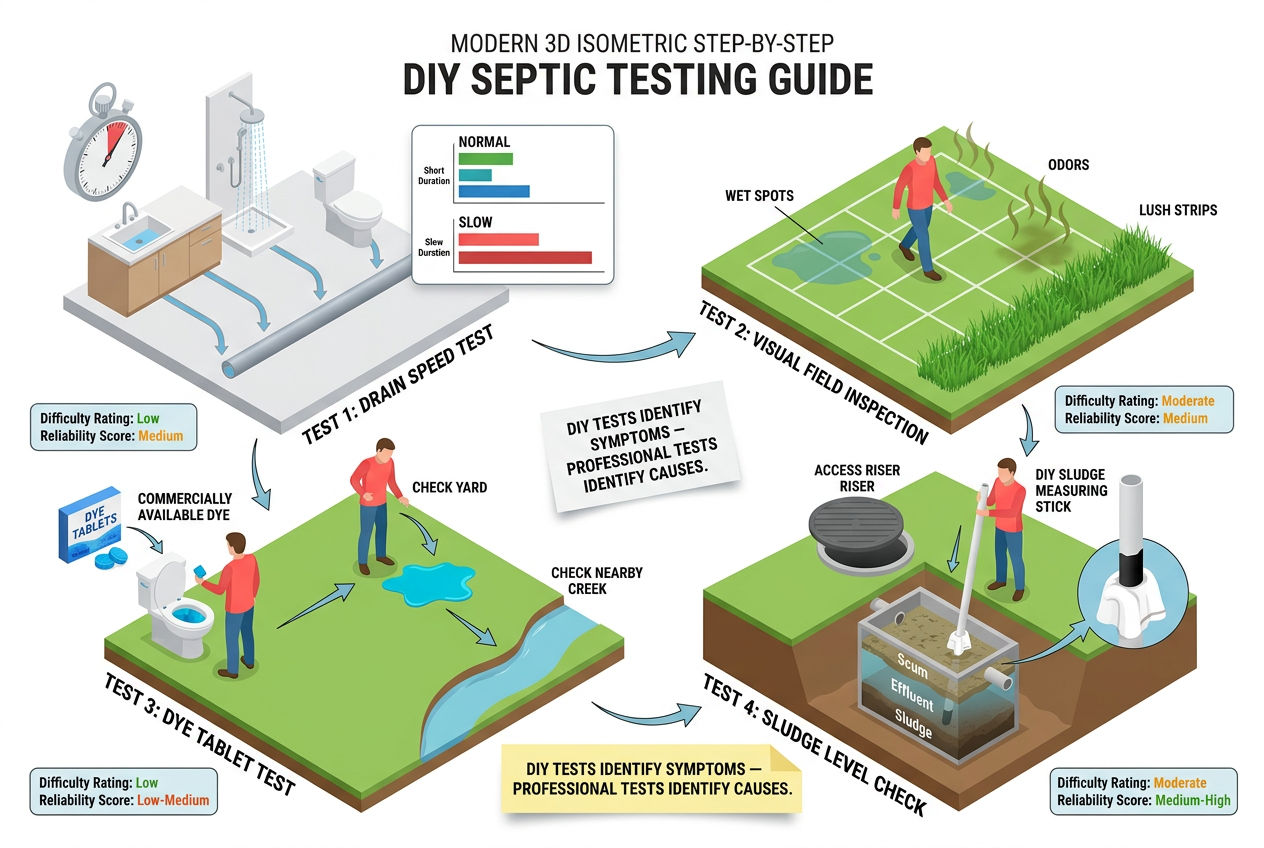
1. Visual Walk-Around Inspection (DIY)
A walk-around visual inspection is the first thing any homeowner or professional should do. It costs nothing and takes 20–30 minutes. You're looking for physical evidence of system stress above ground.
Walk the full path of your system-from where the sewer line exits the house, over the tank location, and across the entire drain field area. If you have a system diagram (check your property records or county health department), bring it with you.
What to look for:
- Wet spots, depressions, or unusually lush grass over the tank or drain field
- Exposed pipes or tank risers
- Visible sewage surfacing on the ground
- Standing water that doesn't drain after rain has stopped
✅ Pro Tip: Mark the tank lid location if you haven't already. A 1,000-gallon concrete tank lid is typically buried 6–12 inches underground. If it's deeper than 12 inches, consider installing a polyethylene riser (Polylok and Infiltrator Water Technologies both make compatible products) to make future inspections easier.
This check won't tell you what's happening inside the tank-but it's a fast screening tool that can confirm whether you need to escalate to professional testing.
2. Sludge and Scum Level Measurement
Every functioning septic tank has three layers: a floating scum layer on top (fats, oils, and paper products), a clear middle effluent zone, and a sludge layer of settled solids on the bottom.
The system fails when those layers take up too much space and effluent either can't flow out properly or carries solids into the drain field-which clogs leach laterals and kills the drain field permanently.
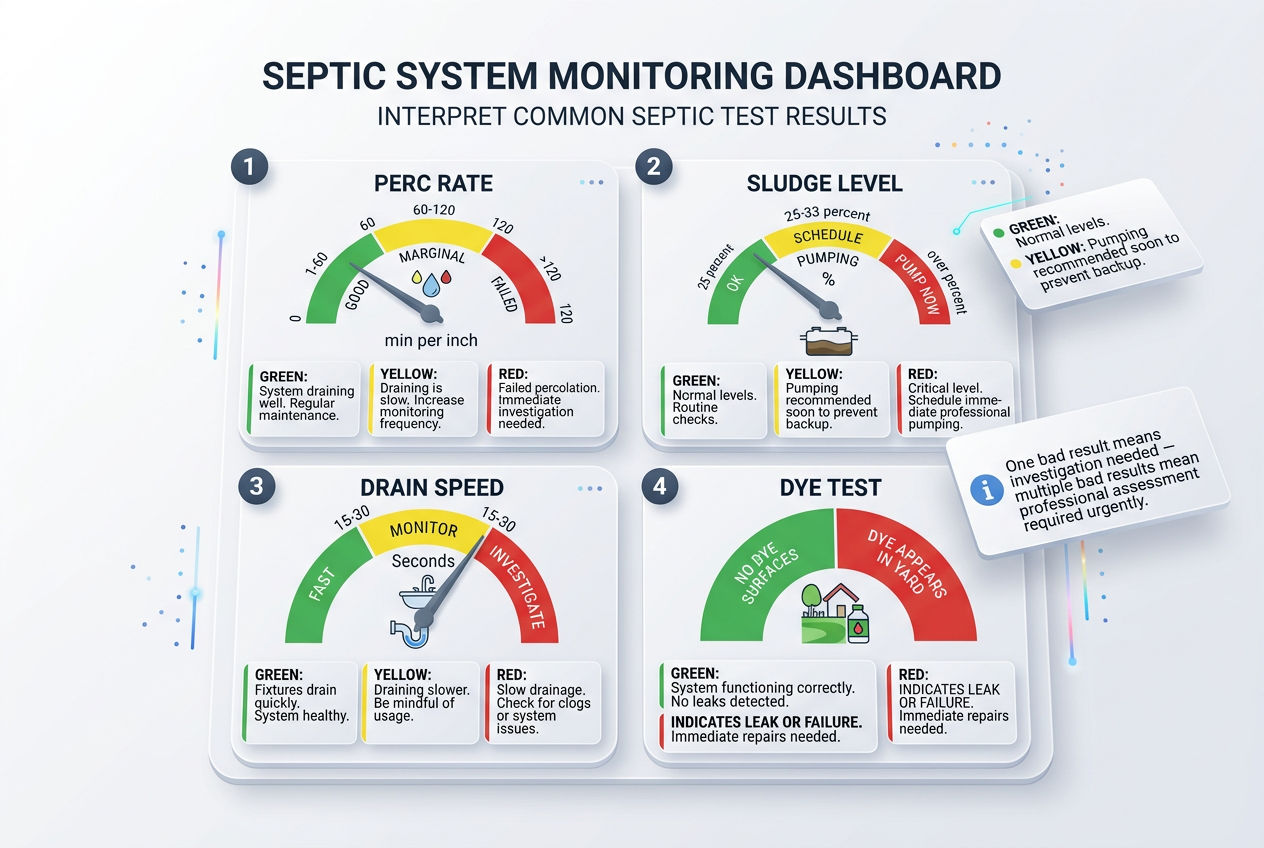
Critical Thresholds
| Layer | Maximum Safe Level | What Happens If Exceeded |
|---|---|---|
| Sludge | ≤ 1/3 of total tank capacity | Solids escape to drain field, clogging begins |
| Scum | ≤ 25% of liquid depth | Outlet baffle clogs, flow restricts |
To measure sludge, professionals use a sludge judge-a clear acrylic tube marked in inches that you lower into the tank. You can buy one for $30–$60 or rent one from a septic supply company. Lower it to the tank bottom, cap the top with your thumb, pull it up, and read the sludge line.
📊 Quick Fact: For a 1,000-gallon tank, 333 gallons (roughly 44 inches at the bottom) is your limit. Hit that number and you need septic tank pumping before your next inspection.
3. Septic Dye Test
A septic dye test checks whether wastewater from your home is reaching the surface-either over the drain field or in a ditch, stream, or neighbor's yard.
How It Works
A technician (or you, with purchased dye tablets available at hardware stores) flushes a non-toxic fluorescent dye-usually a green or orange tracer dye-down a toilet or drain. Then, everyone waits. If the dye surfaces in the yard, in a nearby waterway, or at a point it shouldn't reach, the system is passing effluent in the wrong direction.
What Dye Tests Can and Cannot Detect
| ✅ CAN Detect | ❌ CANNOT Detect |
|---|---|
| Active surfacing failures | Partial failures without surface evidence |
| Broken outlet pipes | Internal tank problems (collapsed baffles) |
| Direct hydraulic connections to surface | Slow saturation of drain field soil |
The observation window is typically 24–48 hours. If the drain field is already saturated, dye can surface in as little as an hour. A standalone dye test runs $75–$250 professionally.
⚠️ Warning: Several states-including Massachusetts under its Title 5 regulations and New Jersey under the DEP inspection rules-require an observed dye test as part of a full septic inspection for home sales.
4. Hydraulic Load (Stress) Test
A hydraulic load test pushes your system hard. A technician introduces 150–300+ gallons of water into the system over a short period-simulating the equivalent of a large family's full day of water use compressed into an hour or two.
The goal is to stress the drain field and reveal whether it can handle peak hydraulic demand. If effluent surfaces or drains back into the tank during the test, the drain field's absorption capacity is compromised.
When This Test Is Most Useful
- Older systems (20–25+ years) where drain field performance is suspect
- Systems that perform fine day-to-day but back up during heavy use (holidays, guests, laundry days)
- Home buyers who want confirmation a system can handle their household size
The hydraulic load test is usually combined with a dye test for maximum diagnostic value. It's included in most full professional inspections.
5. Camera / CCTV Pipe Inspection
A camera inspection involves running a waterproof CCTV camera through the sewer line from your house to the tank, through the tank's inlet and outlet baffles, and sometimes into the distribution box.
What Camera Inspection Reveals
- Cracked or collapsed pipes
- Root intrusion into joints (common with older clay tile pipes)
- Failed or missing inlet/outlet baffles
- Offset pipe joints causing partial blockages
- Grease accumulation in the line
💡 Key Takeaway: A camera add-on to a standard inspection runs $250–$500. It's not always necessary for a healthy, recently-pumped system-but for any home over 30 years old, or any system where you've had recurring backups, it's money well spent.
Camera inspection doesn't evaluate the drain field itself, but it catches problems in the tank and pipe network that a visual or dye test will miss entirely.
6. Effluent Sampling and Lab Analysis
Effluent sampling is the most technical of the six methods. A certified technician pulls a liquid sample from the tank's effluent zone-the clear middle layer-and sends it to a certified lab for analysis.
What the Lab Tests For
| Parameter | What It Indicates |
|---|---|
| Biological oxygen demand (BOD) | How much organic material the effluent still contains |
| Total suspended solids (TSS) | Whether the tank is settling solids properly |
| Fecal coliform bacteria | Public health indicator |
| Nitrogen and phosphorus levels | Important near wells or waterways |
This test is uncommon for routine residential inspections. It's most often required for commercial properties, systems near water bodies, or those under compliance orders from a county health department. NAWT (the National Association of Wastewater Technicians) certifies the inspectors qualified to collect and interpret these samples.
DIY Checks vs. Professional Septic Testing
| Test Method | DIY Possible? | Avg. Pro Cost | What It Finds |
|---|---|---|---|
| Visual walk-around | ✅ Yes | Included in inspection | Surface failures, wet spots |
| Sludge/scum measurement | ⚠️ With tools | Included in inspection | Pumping need |
| Dye test | ⚠️ Partial | $75–$250 | Active surfacing failures |
| Hydraulic load test | ❌ No | Included in full inspection | Drain field capacity |
| Camera/CCTV inspection | ❌ No | $250–$500 add-on | Pipe/baffle damage |
| Effluent sampling | ❌ No | $200–$400 add-on | Effluent quality, bacteria |
Source: National Association of Wastewater Technicians (NAWT); EPA Septic Systems Overview
✅ Pro Tip: You can catch surface problems and estimate when pumping is due. You cannot safely or accurately evaluate your drain field performance, baffle condition, or effluent quality without professional equipment. Think of DIY checks as a screening tool-not a diagnostic one.
How Much Does Septic System Testing Cost?
A standard professional visual inspection with sludge measurement costs $300–$600 and takes 2–4 hours. Add a dye test and the fee rises to $400–$700. A full inspection package with camera inspection, hydraulic load test, dye test, and documentation runs $1,000–$1,500+.
Regional Cost Variations
Geography matters. In rural Montana or Wyoming, inspectors may charge a travel premium on top of base rates. In Florida, high water tables mean drain field tests require additional equipment. Massachusetts Title 5 inspections-required by law for home sales-typically run $400–$800 and must be performed by a state-certified Title 5 inspector.
For a full breakdown of what affects price, see our septic inspection cost guide.
⚠️ Warning: Compare inspection costs to the alternative-a failed drain field costs $15,000–$30,000+ to replace. A septic system in complete failure typically requires a full system replacement at that range or higher. A $500 inspection every three years is, plainly, cheap insurance.
How Often Should You Test Your Septic System?
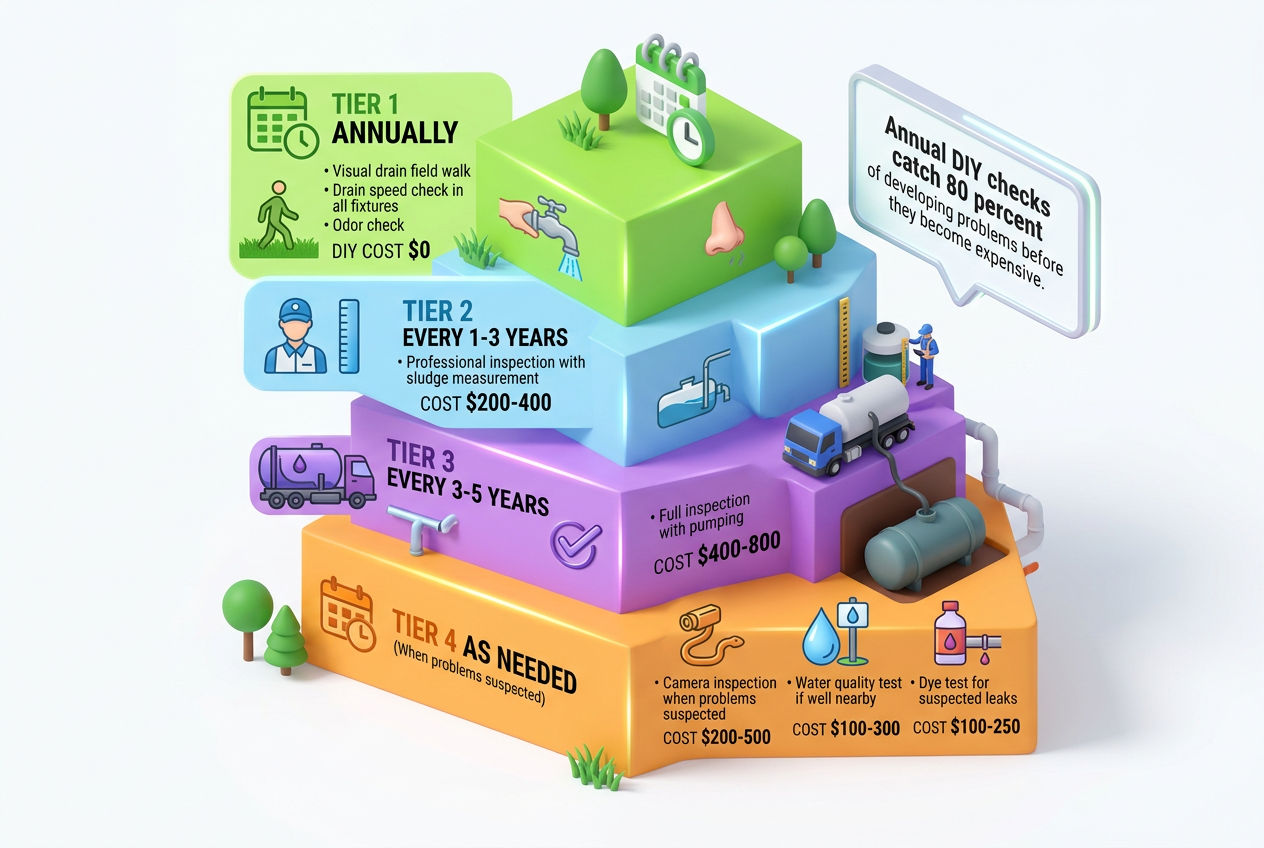
The EPA recommends inspecting conventional septic systems every 3 years. If your system has mechanical components-a pump chamber, float switch, aerator compressor (like a Hiblow HP-80), or effluent filter-annual inspection is the standard.
Pumping Frequency Guidelines
| Household Size | Tank Capacity | Pumping Interval |
|---|---|---|
| 4 people | 1,000 gallons | Every 3–5 years |
| 4 people (with garbage disposal) | 1,000 gallons | Every 2–3 years |
| Older systems (20–25+ years) | Any capacity | Inspect annually or every 2 years |
Ground food waste dramatically increases the sludge accumulation rate. See our septic pumping frequency guide for a breakdown by household size and tank capacity.
📊 Quick Fact: Systems older than 20–25 years should be inspected more frequently-annually or every two years-because component failure rates climb significantly with age.
Septic Inspection for Home Sales: What You Need to Know
Picture this: you're selling your home and the buyer's inspector says your drain field is saturated and the outlet baffle is missing. Closing is in 30 days. Now you're negotiating a $18,000 credit against the sale price-or the deal falls apart entirely.
That scenario plays out every spring in states where septic inspections are required at the point of sale.
State-Mandated Inspection Programs
- Massachusetts requires a Title 5 inspection for every residential real estate transfer
- New Jersey mandates a septic inspection under its DEP rules
- Pennsylvania, Connecticut, and several other Northeastern states have similar programs
Even where it's not required by law, buyers' agents increasingly make septic inspections a condition of sale. The buyer has every right to request one.
✅ Pro Tip: If you're selling, schedule your own inspection 3–6 months before listing. That gives you time to address any findings-whether that's a pump-out, a septic repair, or a drain field repair - before the buyer's inspector finds the same problem and uses it as leverage.
For more detail on septic inspections for home sales, including what state-mandated inspections cover and how to find a certified inspector, see our dedicated guide.
What to Do If Your Septic System Fails a Test
A failed test doesn't always mean system replacement. The right response depends entirely on what failed and why.
Response by Failure Type
If the tank needs pumping:
Schedule a pump-out. A 1,000-gallon tank typically costs $300–$600 to pump. After pumping, have the technician inspect the baffle walls and effluent filter (a Polylok PL-122 is a common retrofit option) while the tank is accessible.
If a baffle is damaged:
Inlet and outlet baffles can often be repaired or replaced for $100–$300 without major excavation.
If the drain field is failing:
This is the serious one. A saturated or clogged drain field may need resting (stopping water input for weeks), treatment with a product like Bio-Sol, or in worst cases, full drain field replacement.
⚠️ Warning: Don't ignore a failed drain field-it's a public health issue and most county health departments require remediation within a defined timeframe.
For a broader overview of your options, our guide on how to repair a septic system walks through repair scenarios and typical costs by system type.
💡 Key Takeaway: Whatever the result, document it. Keep your inspection reports, pumping receipts, and repair records. Future buyers, inspectors, and county health departments may ask for them. A well-documented septic maintenance history adds real value to your property.
Find a Certified Septic Inspector Near You
Not every pumper is a certified inspector-and not every inspector uses the same methods. Look for technicians certified through NAWT (National Association of Wastewater Technicians) or your state's equivalent licensing body.
Find a certified septic inspector in your area through the SepticTankHub directory. You can filter by state and city to find licensed professionals near you.
For pricing details, see our septic repair cost guide.
Related reading: septic system installation process.
Sources & Methodology
-
U.S. Environmental Protection Agency - Septic Systems Overview: Primary source for inspection frequency recommendations, failure rate estimates, and household statistics. Used for the 3-year inspection interval and 10–20% annual failure rate figures.
-
National Association of Wastewater Technicians (NAWT): Industry certification standards and inspection scope definitions. Referenced for effluent sampling protocols and inspector certification requirements.
-
National Onsite Wastewater Recycling Association (NOWRA): Industry data on system types, component standards, and regional regulatory variation.
-
Massachusetts Department of Environmental Protection - Title 5 Inspection Program: State-level regulatory source for mandatory septic inspection requirements at point of sale. Referenced for Massachusetts-specific cost ranges and regulatory requirements.
-
Polylok, Infiltrator Water Technologies, Hiblow: Manufacturer product specifications for effluent filters (Polylok PL-122), riser systems, and aerator compressors (Hiblow HP-80). Referenced for product-specific technical context only.
Need help with your septic system? Browse local septic companies in Wisconsin or Oregon.
Was this article helpful?
Frequently Asked Questions
Recommended Resources
📖 Related Articles
💰 Cost Guides
Find Septic Professionals Near You
Compare licensed, verified septic companies by area — top county markets and cities below, or browse all 50 states.
County markets
Popular cities
