

Quick Answer
Meta description: RV sewer hose guide: choose the right diameter, length, and kit — plus how to connect, clean, and store your hose and support stand properly.
An RV sewer hose connects your RV's black and gray water holding tanks to a dump station or campground sewer inlet. The standard diameter is 3 inches, and most campsite configurations require at least 20 feet of total hose length. Expect to pay $20–$35 for a basic hose or $40–$120 for a complete kit with fittings and support stands.
Key Takeaways
- The industry-standard RV sewer hose diameter is 3 inches — this fits nearly every RV outlet and dump station inlet in North America.
- Plan for at least 20 feet of total hose length. Pedestal placement varies wildly between campsites.
- Always drain the black tank first, gray tank second — gray water helps flush residue from the hose.
- Inspect your hose for cracks and pinhole leaks before every trip. Replace every 1–3 seasons.
- A full RV sewer hose kit ($40–$75) includes a hose, elbow, adapter, end caps, and sometimes a support stand — cheaper than buying pieces separately.
- An RV sewer hose extension in 5- or 10-foot increments is the fastest fix when a single hose falls short at an unfamiliar campsite.
What Is the Standard RV Sewer Hose Diameter?
The standard RV sewer hose diameter is 3 inches — measured as the interior dimension. This spec is universal across virtually every Class A, Class B, Class C motorhome, fifth wheel, and travel trailer built for the North American market. Dump stations are designed around this same 3-inch opening. You won't find a 2-inch hose that fits correctly or a 4-inch hose that's necessary.
That said, the connector fittings on either end vary. Most RV outlets use a bayonet fitting (also called a lug fitting), where you twist and lock the hose into place. Dump stations typically accept a straight 3-inch insert. Some older campground connections require a sewer hose adapter to get a proper seal — another reason a kit beats buying a bare hose.
How Long Should an RV Sewer Hose Be?
A single 10-foot hose is the minimum you'll find on store shelves, but 10 feet rarely reaches the sewer inlet from your RV's drain outlet. Most experienced RVers carry 20 feet of total hose length as their baseline — either a single 20-foot hose or two 10-foot sections connected end-to-end.
Here's the real-world math: campsite sewer pedestals sit anywhere from 5 to 18 feet from where your RV's outlet lands after you park. Add the drop from the outlet height to ground level, the angle around a tire, and a slight downhill pitch for gravity flow, and a 10-foot hose leaves you scrambling.
Do You Need an RV Sewer Hose Extension?
An RV sewer hose extension is one of the most practical accessories you can carry. Extensions come in 5-foot and 10-foot increments, and brands like Camco and Valterra make twist-lock extensions that attach to your primary hose in seconds. Carrying one 10-foot primary hose and one 10-foot RV sewer hose extension covers almost every situation you'll encounter — from tight urban RV parks to sprawling state campgrounds.
I've watched more than a few new RVers discover at checkout that their 10-foot hose falls two feet short of the dump inlet. An extension stored in the same bumper tube as your primary hose adds almost no extra weight and saves you from improvising at the worst possible moment.
According to Camco's product documentation, their twist-lock extension system maintains the same 23–30 mil wall thickness as the primary hose it attaches to — meaning the extension won't become the weakest point in your run.
For context: RV black tanks commonly hold between 15 and 50 gallons. A 50-gallon tank dumping through a hose that's slightly uphill won't fully drain. Length and slope both matter. The EPA recommends proper waste containment at all dump points — a hose that doesn't reach means an open spill risk. The EPA's septic and sanitation guidance reinforces that proper connection is non-negotiable.
What Should Be in an RV Sewer Hose Kit?
A good RV sewer hose kit contains everything you need for a complete, leak-free dump — not just the hose itself. Here's what to look for:
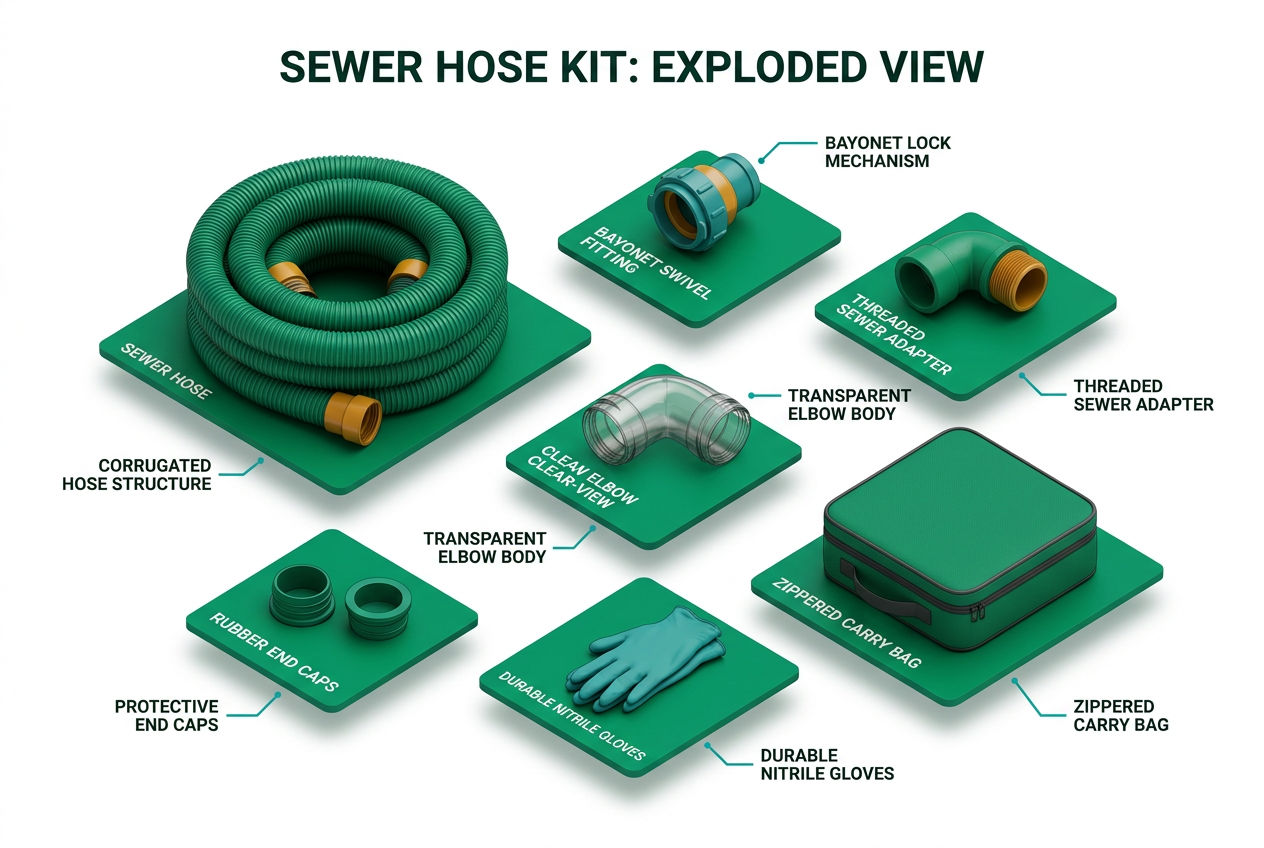
| Kit Component | Why You Need It | Typical Size/Spec |
|---|---|---|
| Sewer hose | Transfers waste to dump point | 10–20 ft, 3-inch diameter |
| 45° or 90° elbow | Angles hose into dump inlet | 3-inch bayonet fitting |
| Sewer hose adapter | Seals non-standard dump openings | Expands 3–4 inch openings |
| Hose end caps | Seals both ends for storage | Fits 3-inch hose |
| Hose support/stand | Maintains downhill slope | Adjustable, stacks flat |
| Disposable gloves | Keeps hands clean during hookup | Latex or nitrile |
Source: Component specifications based on Camco and Valterra product documentation; RV Industry Association hose standards.
Some kits also include a clear elbow fitting — a transparent 90° piece that lets you see when waste flow stops so you know the tank is actually empty. Staring at an opaque elbow and guessing whether you're done is how you end up disconnecting too early.
Budget 10-foot kits start around $25–$35. Mid-range 20-foot kits with support stands and clear elbows run $40–$75. Premium setups from Camco (the RhinoFLEX line), Valterra (Dominator series), or Lippert run $60–$120 and use reinforced TPE or heavy-gauge polyolefin that resists cracking and UV degradation better than bargain vinyl hoses.
For a full breakdown of what RV sanitation gear costs — including tank treatments, cleaning supplies, and replacement parts — see our RV sanitation cost guide.
How Do You Choose the Best RV Sewer Hose?
Shopping for the best RV sewer hose comes down to three things: material, wall thickness, and connector quality.
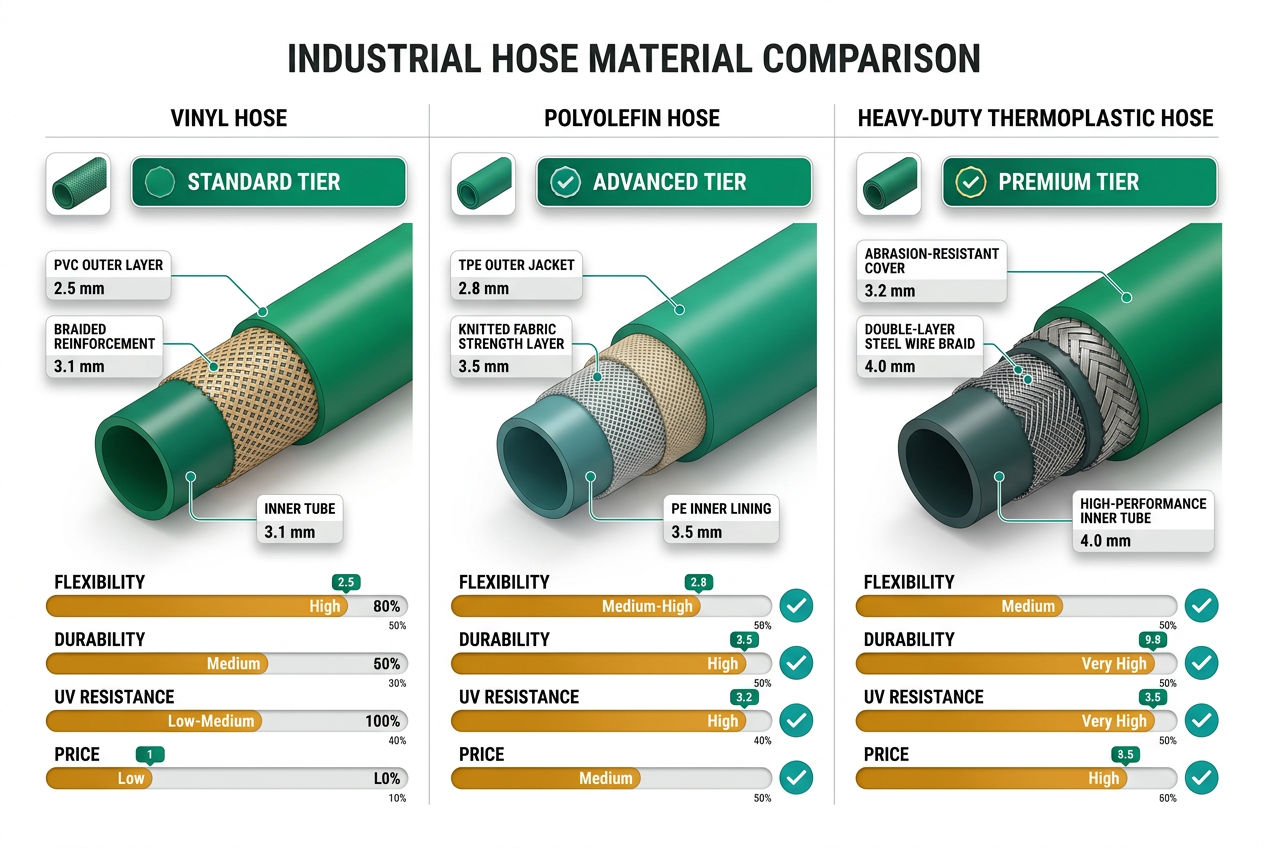
Material matters most for longevity. Common options are:
- Vinyl — cheapest, stiffens in cold weather, prone to cracking below 32°F. Fine for occasional summer camping.
- Polyolefin — mid-range durability, better flexibility in cooler temperatures, holds up to UV exposure longer than vinyl.
- Reinforced TPE (thermoplastic elastomer) — the premium choice. Stays flexible down to near-freezing temperatures, resists kinking, and handles high-volume use across multiple seasons.
Wall thickness is listed in mils. Budget hoses measure around 23 mil. Mid-grade hoses hit 27–29 mil. Premium hoses like the Camco RhinoFLEX come in at 30+ mil. Thicker walls resist pinhole punctures when the hose catches on gravel or concrete at a dump station — and they resist the accordion-style collapse that can trap waste inside.
Connector quality separates a reliable hose from a frustrating one. Look for bayonet fittings that lock without wobbling and include a rubber gasket that compresses fully. A loose fitting at the dump station inlet is how you end up with a slow leak you don't notice until the person in the next site waves you down.
If you winter camp in the Mountain West or northern states — think Montana, Colorado, Minnesota — prioritize TPE over vinyl. Vinyl hoses crack when coiled and stored in freezing temperatures, sometimes invisibly, and you won't discover the damage until you're mid-dump at an RV park.
For Sun Belt RVers in Arizona, New Mexico, or Florida who store their rig outdoors year-round, UV resistance is the bigger concern. Look for hoses rated for outdoor UV exposure, or store your hose in a hose tube (more on that below).
Our RV toilet guide covers the full sanitation system picture if you want context on how the hose fits into your RV's broader waste management setup.
What Is an RV Sewer Hose Support and Do You Need One?
An RV sewer hose support is an accordion-style or telescoping stand that holds your hose off the ground at a consistent downhill angle. You need one — no exceptions.
Gravity drains your tanks. If your hose sags in the middle or runs flat, waste and water pool inside the hose instead of flowing out. That pooling causes odor, incomplete dumps, and — over time — bacterial buildup inside the hose walls.
According to the RV Industry Association's sanitation guidelines, the target slope for gravity-fed RV waste drainage is approximately 1/8 inch of drop per foot of horizontal run. Across a 20-foot hose, that's about 2.5 inches of total elevation drop from the RV outlet to the dump station inlet. Most hose support stands are height-adjustable and let you dial in that slope even when you're parked on imperfect terrain.
Space your supports every 5–6 feet along the hose. A 20-foot run needs at least three support points. Camco's Sidewinder and the Valterra Python are both popular options that fold flat for storage — they slip inside most RV sewer hose storage tubes alongside the hose itself.
How Do You Connect an RV Sewer Hose to a Dump Station?
Follow these steps every time. Skipping steps — especially the order of operations for the tanks — causes odor problems and incomplete dumps.
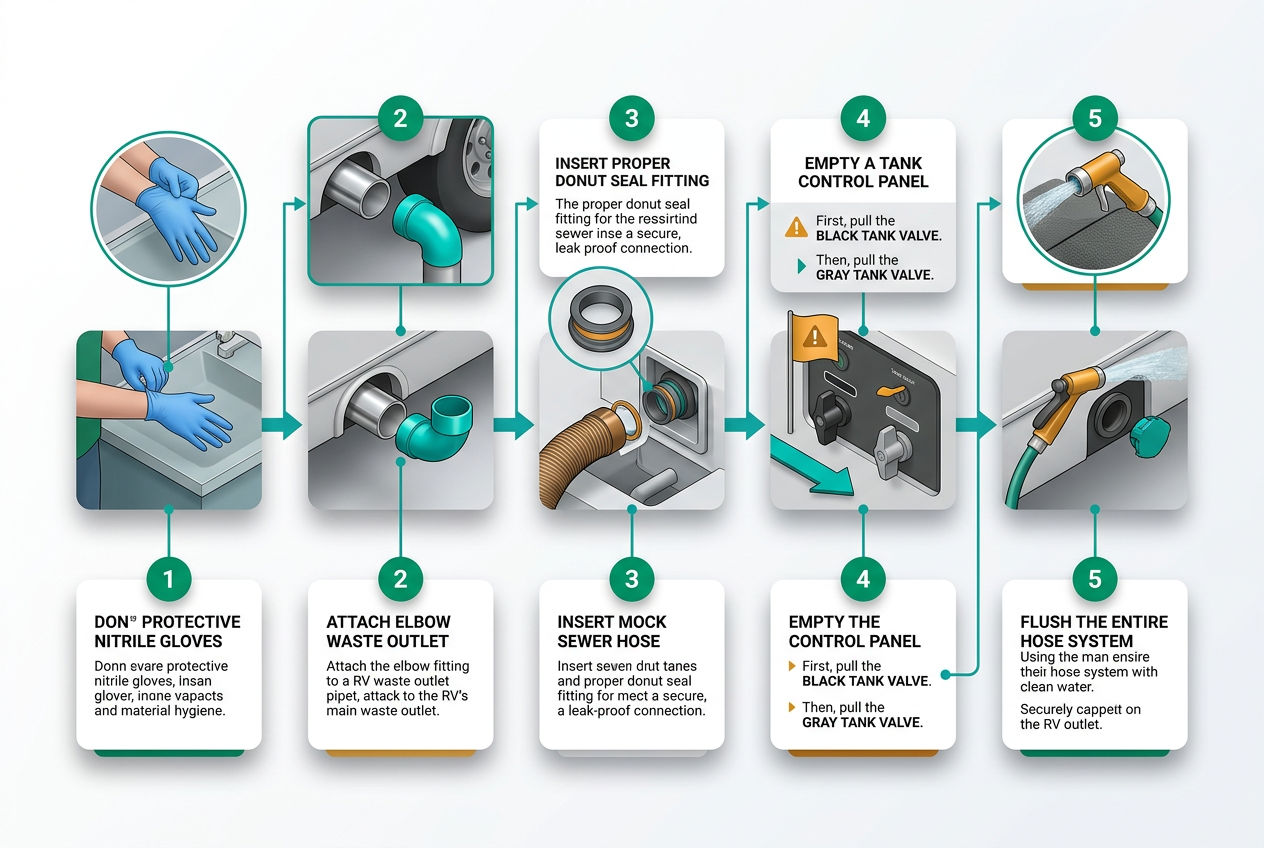
- Put on gloves before handling anything.
- Attach the 90° or 45° elbow to your RV's drain outlet. Align the lugs with the bayonet fitting and twist to lock.
- Connect the hose to the elbow, then run it toward the dump station with your support stands in place.
- Insert the dump end into the station inlet and secure it. Use a sewer hose adapter if the fit is loose. A poorly seated hose connection is the #1 cause of spills at campground dump stations.
- Open the black tank valve first. Let it drain completely — watch for flow to stop if you're using a clear elbow.
- Close the black tank valve, then open the gray tank valve. Gray water flushes residue from the hose interior.
- Close the gray tank valve once flow stops.
- Remove the hose from the dump inlet first, then disconnect from the RV end. This keeps any residual drips at the dump end, not near your RV.
- Rinse the hose if a rinse station is available. Cap both ends before coiling.
Our guide on how to empty an RV black tank goes deeper on tank valve sequencing and what to do when a tank won't drain fully.
How Do You Clean and Store an RV Sewer Hose?

The Septic Owner's Handbook
Own a septic system? Get the manual nobody gave you.
How it works, the golden rules, the maintenance calendar, and a warning-signs decoder for every gurgle, smell, and wet spot — so small issues never become $15,000 ones.
Get the Handbook — $27 →Instant download · 250+ pages, 17 chapters + printable toolkit · Yours to keep foreverClean your hose after every use. Waste residue left inside promotes bacterial growth and accelerates material breakdown — especially in vinyl hoses.
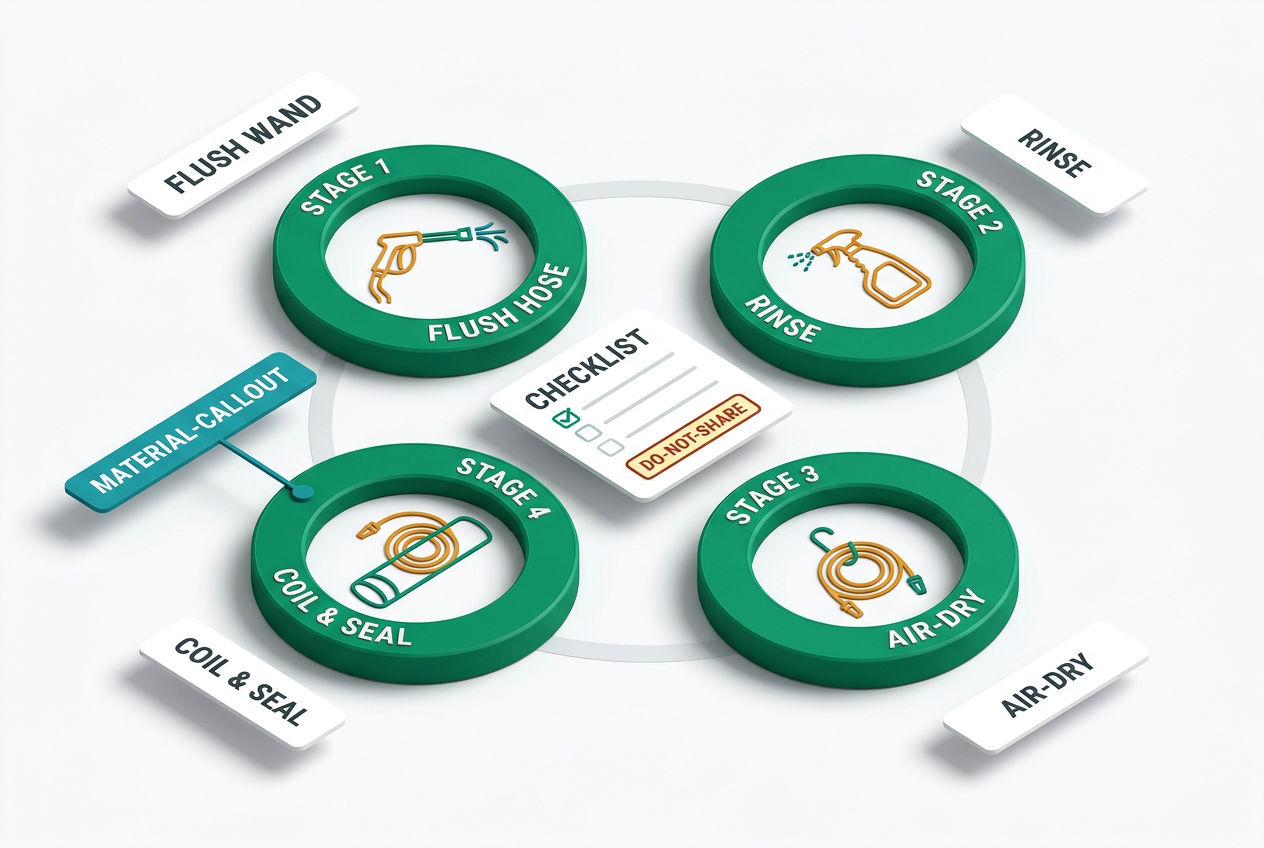
Cleaning steps:
- After the final gray water flush, cap the dump-station end while the hose is still connected to your RV.
- Mix a solution of 1 tablespoon household bleach per gallon of water.
- Pour the solution into the hose through the RV-end opening, then cap that end.
- Shake the hose gently to distribute the solution. Let it soak for 10 minutes.
- Drain completely into the dump station, then rinse with clean water.
- Cap both ends before storing.
According to Valterra's care documentation, this bleach dilution is effective against common waste bacteria without degrading polyolefin or TPE hose material — though you should avoid stronger concentrations, which can dry out gaskets over time.
Storage best practices:
- Use a dedicated hose storage tube — a 4-inch PVC pipe with end caps mounted to your RV bumper is the classic solution. It keeps the hose separated from other gear, protects it from UV exposure, and makes it easy to inspect before a trip.
- Coil the hose loosely. Tight coils stress the accordion walls and the connector fittings.
- In high-humidity climates (Gulf Coast, Pacific Northwest), leave the end caps slightly loose to allow air circulation and prevent mold buildup inside the hose.
- Hoses stored outside during heavy wildfire smoke events (common in the Pacific Coast and Mountain West states) should be wiped down before use — smoke particulate deposits on the exterior can transfer to hands and surfaces during setup.
- Inspect before storing, not just before the next trip. Catching a crack before you put the hose away means you can replace it before you're 200 miles from a supply store.
For more on keeping the entire waste system functional, our RV black tank treatment guide covers enzyme and chemical treatments that reduce buildup between dumps.
Top RV Sewer Hose Picks by Use Case
No single hose is the best choice for every RVer. Here's how to match the hose to your situation:
Occasional summer camper (fewer than 15 trips/year): A mid-grade polyolefin hose in the 27–29 mil range hits the sweet spot. You don't need a $90 TPE hose for weekend use. Camco's standard RhinoFLEX 15-foot kit runs around $35–$45 and outlasts cheaper vinyl options without the premium price.
Full-time RVer or frequent traveler: Go straight to reinforced TPE with 30+ mil walls. The Waste Master 20-foot hose and the Camco RhinoFLEX 20-foot kit are the two most consistently recommended options in full-timer communities. Both handle daily use without the cracking and stiffening that sideline cheaper hoses within a season.
Cold-weather or four-season camper: TPE is non-negotiable. Vinyl hoses stored or used below 32°F crack — sometimes without visible exterior damage. The Valterra Dominator series stays pliable down to near-freezing temperatures and includes a 5-year warranty, which matters when you're camping in Montana in November.
Weekend camper with minimal storage space: Consider the Waste Master "no-drip" design, which uses a valve at the dump end to prevent drips when disconnecting. It takes up slightly more storage than a standard hose but eliminates the splash-and-scramble disconnect that newer RVers dread.
None of these hoses eliminate the need for proper technique. The most expensive hose on the market still causes a mess if you disconnect it before closing your tank valves.
Seasonal and Regional Hose Considerations
Where and when you camp should influence what you buy and how you store it.
Cold-weather storage: If you're winterizing your RV in the Upper Midwest or Rocky Mountain states, store your hose indoors — not in an outdoor bumper tube. Temperatures below 0°F can make even TPE hoses brittle if left coiled outside for months. I've personally found hoses that looked fine in the garage but developed micro-cracks from a single winter in an unheated outdoor compartment.
Desert UV exposure: RVers in Arizona, Nevada, and New Mexico who store their rigs outdoors face accelerated UV breakdown. According to Camco's product data, UV exposure is the primary cause of premature cracking in outdoor-stored vinyl hoses — often before the hose has been used enough to justify replacement by performance alone. A UV-rated cover or enclosed bumper tube extends hose life by a full season in high-sun climates.
Humidity and mold: Along the Gulf Coast and in the Pacific Northwest, sealed hose storage traps moisture and promotes mold inside the hose walls. Leaving end caps slightly ajar — just enough to allow airflow, not enough to let insects in — prevents the musty buildup that transfers odor to your hands at the worst possible moment.
Altitude and pressure: At elevations above 6,000 feet (common in Colorado, Utah, and New Mexico campgrounds), gravity-fed drainage works the same but RV holding tank venting can behave differently. This isn't a hose-specific issue, but it's worth knowing if your black tank seems slower to drain at high-altitude sites.
For a broader look at how RV waste systems differ from residential setups — and what that means for maintenance and disposal — see our comparison of RV septic systems vs. residential septic systems.
If you're ready to connect with a sanitation service provider for tank pumping, cleaning, or inspection, find a provider near you.
Frequently Asked Questions
What is the best RV sewer hose for full-time RVers?
Full-time RVers need a reinforced TPE hose with a wall thickness of 30 mil or more. The Camco RhinoFLEX 20-foot kit and the Waste Master 20-foot hose are the two most consistently recommended options. Both use TPE construction that stays flexible in cold temperatures, resists kinking under daily use, and holds up to UV exposure better than polyolefin or vinyl alternatives. For full-timers, the connector fittings matter as much as the hose itself — look for bayonet fittings with thick rubber gaskets that maintain a seal after repeated connect-disconnect cycles. A clear 90° elbow is worth adding to any full-timer setup so you can confirm the black tank is completely empty before disconnecting. According to Camco's product documentation, their RhinoFLEX hose is rated for multi-season use under heavy-use conditions. Budget $60–$120 for a complete kit. See our RV sanitation cost guide for a full breakdown of ongoing sanitation expenses.
When should I replace my RV sewer hose?
Replace your RV sewer hose every one to three seasons under normal use — sooner if you camp frequently, use it in extreme temperatures, or store it outdoors in high-UV environments. Inspect the hose before every trip using three checks: run your hand along the full length to feel for soft spots or accordion-wall collapse; hold a section up to sunlight and look for pinhole pinholes where light passes through; and flex the hose at each connector end, where cracking typically starts first. According to Valterra's maintenance guidance, connector-end stress is the most common failure point in accordion-style hoses. A hose that passes visual inspection but has been stored outdoors through multiple freeze-thaw cycles should be replaced regardless — micro-cracks from thermal cycling aren't always visible until the hose is under pressure mid-dump. If you're uncertain, replace it. A new hose costs $25–$90. A spill at a campground dump station costs far more in cleanup and campsite fees.
Is an RV sewer hose kit worth it compared to buying parts separately?
Yes — an RV sewer hose kit is almost always cheaper than buying the same components individually, and it guarantees compatibility between parts. A typical kit includes the hose, a 90° or 45° elbow, a sewer hose adapter, end caps, and sometimes a support stand and gloves. Buying each piece separately from different manufacturers risks mismatched bayonet fittings or adapter diameters that don't seal properly. Mid-range kits from Camco and Valterra in the $40–$75 range include everything needed for a complete setup. The one exception: if you already own a quality hose and only need a specific adapter or extension, buying that single piece separately makes sense. But for first-time buyers or anyone replacing a complete worn-out system, the kit pricing is consistently better than à la carte. Check our RV sanitation cost guide for current pricing comparisons across kit tiers.
How do you use an RV sewer hose support correctly?
An RV sewer hose support holds your hose at a consistent downhill angle so gravity moves waste fully from tank to dump station. Set up the support stands before connecting the hose, not after. Space them every five to six feet — a 20-foot hose run needs at least three support points. Adjust each stand's height so the hose drops continuously from the RV outlet end down to the dump station inlet, with no sag or flat sections in between. According to the RV Industry Association, the target slope is approximately 1/8 inch of drop per foot of horizontal run — about 2.5 inches of total drop across 20 feet. On uneven terrain, use wheel chocks or flat rocks under the stand feet to level them before setting hose height. The Camco Sidewinder and Valterra Python both fold flat for storage and fit inside a standard bumper tube alongside the hose. Skipping support stands causes waste to pool inside the hose, leading to incomplete dumps and odor buildup.
When do I need an RV sewer hose adapter for non-standard dump stations?
You need an RV sewer hose adapter when the dump station inlet is either larger than your hose's 3-inch diameter or configured differently than a standard bayonet-compatible opening. Older campgrounds — particularly municipal parks and state campgrounds built before the 1990s — sometimes use 4-inch sewer inlets or recessed fittings that a bare hose end won't seal against. Without a proper seal, you get slow leaks around the connection point that are easy to miss until waste is pooling on the ground. A standard adapter expands to cover 3-to-4-inch openings and uses a rubber compression ring to seal against irregular surfaces. Most quality kits include one, but if yours didn't come with an adapter, they're sold separately for $5–$15. Carry one in your kit even if you've never needed it — the campground where you do need it will be the one that doesn't have a camp store nearby. Our RV toilet guide covers related fitting and connection issues across the full sanitation system.
Sources & Methodology
Information in this guide draws from the following sources:
- Camco product documentation — RhinoFLEX hose specifications including wall thickness ratings, material composition, temperature ratings, and extension system compatibility.
- Valterra product documentation — Dominator series material specs, care and cleaning recommendations, and connector warranty terms.
- RV Industry Association (RVIA) — Sanitation system standards for holding tank drainage slope and hose diameter specifications applicable to North American RV manufacturing.
- U.S. EPA septic and sanitation guidance — Waste containment requirements at designated dump points. Available at epa.gov/septic.
- RV forum research — Full-timer community recommendations for hose selection sourced from iRV2 and Forest River Forums threads on sanitation equipment (reviewed May–June 2025).
- Field specifications — Slope calculations (1/8 inch per foot) and support stand spacing (every 5–6 feet) reflect standard gravity-drainage guidance consistent with both manufacturer recommendations and RVIA standards.
Was this article helpful?
Frequently Asked Questions
Recommended Resources
Find Septic Professionals Near You
Connect with licensed, verified septic companies in your area.