

Quick Answer
Meta description: Learn how to do an RV black tank flush the right way — step-by-step instructions for how to empty your RV black tank, what to add after, and how to avoid the most common mistakes at the dump station.
An RV black tank flush is the process of draining your RV's black water holding tank at a designated dump station, then rinsing and treating it to control odor and protect tank sensors. Most RV black tanks hold 15–50 gallons and should be emptied when roughly two-thirds full — waiting longer reduces flow pressure and makes complete draining harder.
Key Takeaways
- Empty your black tank when it reaches two-thirds full (roughly 66%) for best drainage flow
- Always dump the black tank first, then the gray tank — gray water rinses your sewer hose automatically
- The full dump process takes 10–20 minutes at a dump station
- Add 1–2 gallons of water plus a treatment product immediately after every dump
- Dumping into a home septic system is possible but requires knowing your system's capacity — see if your septic can handle RV waste
What Equipment Do You Need for an RV Black Tank Dump?
You want every piece of gear already in your bay before you pull up to a dump station. Here's what you need:
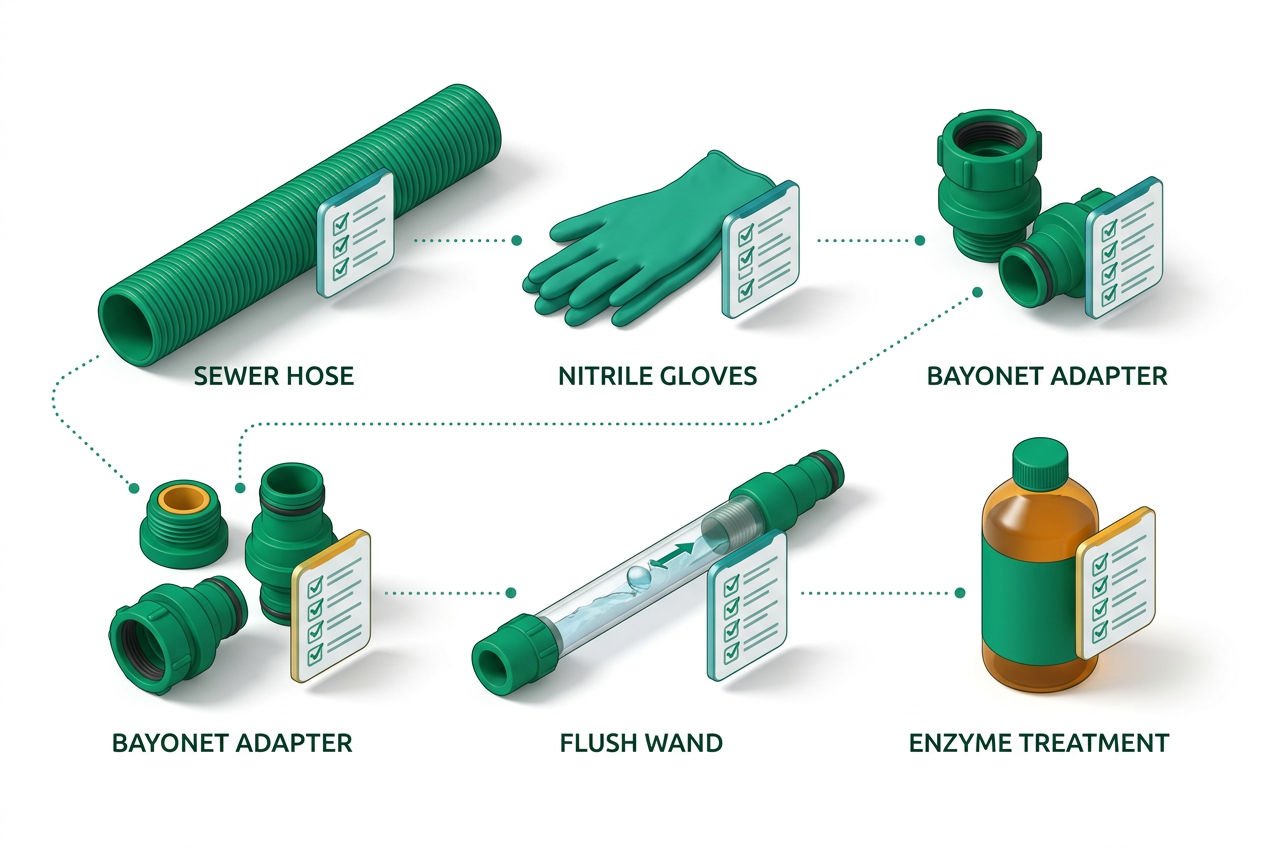
- Sewer hose — Standard RV sewer hoses are 3 inches in diameter. Most rigs come with a basic 10-foot section. If you find yourself at a dump station where the inlet is farther away than expected, a slinky sewer hose with 20-foot extension capability saves the day. Look for a heavy-duty option with crush-resistant coils, like the Camco RhinoFLEX.
- Hose fittings and bayonet adapters — Your RV's drain outlet and the dump station inlet need to connect securely. A universal adapter kit (around $8–$15) handles most station configurations.
- Sewer hose support — Keeps the hose angled downward so gravity does the work. Not required, but makes a clean dump significantly easier.
- Rubber gloves — Non-negotiable. Nitrile disposable gloves work fine.
- Disposable wipes or a small spray bottle with water — For wiping the hose fittings clean before you pack them away.
- Black tank treatment — More on this below, but have it ready before you leave the dump station.
For a deeper look at hose options and connection types, check out our RV sewer hose guide. Planning a trip and wondering what the dump station will cost you? Our RV dump station cost guide breaks down fees by location type so you're not caught off guard.
How Do You Empty Your RV Black Tank Step by Step?
Follow these steps in order. Skipping even one — especially the gray tank rinse — is what separates a clean dump from a smelly sewer hose by August. Whether you call it a black water tank flush, an RV holding tank flush, or just emptying the black tank, the process is the same.
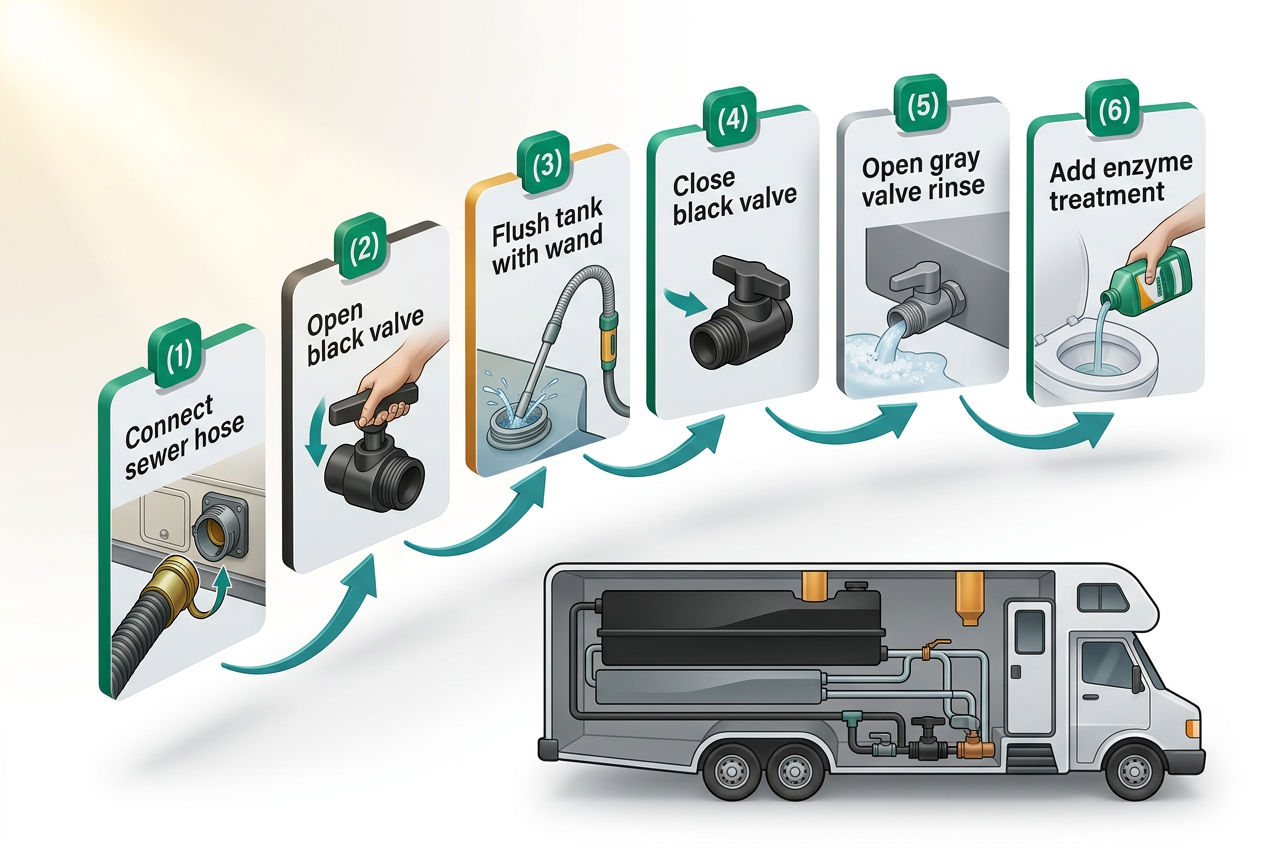
Step 1: Confirm the tank is ready to dump. Your tank monitor should read at or above two-thirds full. Here's the honest truth about those sensors: after one or two seasons of use, the majority of RV owners find their tank sensors misread — showing full when the tank is half-empty, or showing empty when there's residue stuck to the probes. If you've been using the toilet regularly on a 3–5 day trip, you're probably ready. Don't rely on a blinking light alone.
Step 2: Drive or position your RV at the dump station inlet. The dump station port is usually a 4-inch opening in the ground, capped with a hinged lid. Pull up close enough that your 10-foot hose reaches it without stretching.
Step 3: Put on your gloves. No exceptions.
Step 4: Connect the sewer hose. Attach one end to your RV's 3-inch outlet fitting (usually labeled "black" or "sewer"). Secure the other end into the dump station inlet. Make sure the inlet end is seated firmly — a loose connection at a dump station is exactly as bad as you're imagining.
Step 5: Open the black tank valve first. Pull the black tank valve handle fully open. You'll hear and feel the rush. Keep the hose angled downward toward the station inlet. Let it drain completely — typically 2–5 minutes depending on tank size and fullness.
Step 6: Close the black tank valve.
Step 7: Open the gray tank valve. Your RV gray tank holds water from sinks and the shower. Opening it now sends relatively clean water through the hose, flushing out residue from the sewer line. This is the step most beginners skip — and it's the direct reason their hose smells terrible by mid-summer.
Step 8: Perform an RV black tank flush (if your RV has a built-in tank rinser). Many mid-range and higher-end RVs include a built-in tank flush valve — a separate fresh-water inlet on the exterior of the RV that connects to a spray nozzle inside the black tank. Connect your fresh water hose to this port, open the black tank valve again, and let it run for 3–5 minutes until the water flowing out runs clear. If your rig doesn't have a built-in tank rinser, you can use a wand-style tank rinser through the toilet (products like the Camco Swivel Stik thread onto a standard hose). Either method gets you meaningfully cleaner sensors and less residue buildup long-term.
Step 9: Close all valves, disconnect the hose. Close the black tank valve, then the gray tank valve. Disconnect the hose from the RV end first, then cap the dump station inlet before pulling the hose free. Rinse the hose ends with the fresh-water rinse station if one is available — most campground dump stations have one.
Step 10: Stow your hose, remove gloves, wash your hands. The full process runs 10–20 minutes start to finish.
Gray Tank vs. Black Tank: What's the Difference and Why Does Order Matter?
Your RV has two separate holding tanks. The black water tank collects toilet waste. The gray tank collects water from sinks and the shower. They're distinct systems — never connected — and each has its own dump valve.
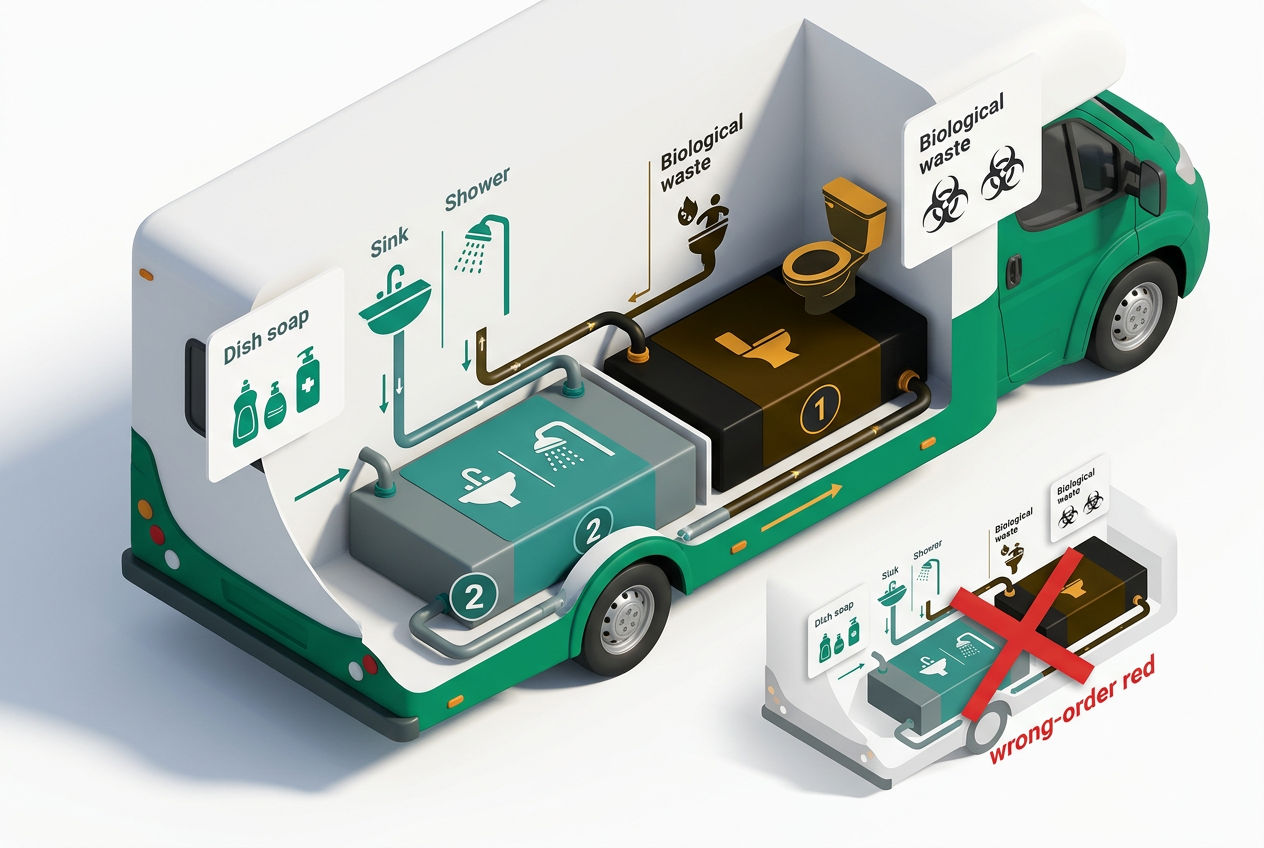
Always dump the black tank first, then the gray tank. The gray water acts as a natural hose rinse. Reverse the order and you're leaving black tank residue sitting in a dry hose. Black tanks are almost always smaller than gray tanks on the same rig. A mid-size travel trailer might have a 20-gallon black tank and a 35-gallon gray tank. This is intentional — you use far more water washing dishes than flushing.
For a full breakdown of your RV's plumbing and toilet system, the RV toilet guide covers everything from tank sizing to valve maintenance.
How Often Should You Empty Your RV Black Tank?
Empty it when it reaches two-thirds full — not before, not (much) after.
Dumping too early is a real problem. A tank that's only one-quarter full doesn't have enough liquid volume to carry solids through the 3-inch drain efficiently. This is how you get what RVers call a "pyramid plug" — a solid mass of waste that builds up under the toilet opening and eventually blocks drainage entirely. Clearing one involves a tank wand, a lot of patience, and an afternoon you'd rather have back.
On a practical trip-length basis: a solo traveler using the RV toilet as their primary bathroom will typically fill a 20-gallon black tank in 4–6 days. A couple fills the same tank in 2–4 days. A family of four can hit that two-thirds mark in under 48 hours. That means on a week-long trip, a family of four needs to plan for at least two dump station stops — something worth mapping before you leave, not after the monitor starts flashing.
If you're boondocking in the western U.S. without hookups, knowing your tank capacity and usage rate is critical trip planning. Running out of black tank capacity with no dump station nearby is a serious problem.
If you're managing your RV holding tank alongside a home system, our overview of how RV waste interacts with residential septic systems explains the capacity math in detail.
Where Can You Dump an RV Black Tank?
Campgrounds with full hookups are the easiest — you connect directly to a sewer line at your site and dump when you need to.
Dedicated dump stations at campgrounds, RV parks, and some rest areas charge $5–$20 per use. Pilot Flying J truck stops, Love's Travel Stops, and some Camping World locations offer dump station access, often for a fee of $10–$15. Sanidumps.com and the iOverlander app are both solid tools for locating the nearest dump station.
Home septic systems are an option if you're parked at home or a family property. However, this isn't as simple as just opening a valve. Your home septic system has a fixed capacity — most residential tanks are 750 to 1,500 gallons — and adding regular RV waste accelerates the pumping schedule. If your tank is already close to needing service, one RV dump could push it over. Read our full breakdown of RV dumping into a home septic system before going this route.
And make sure any treatment products you use in your black tank are septic-safe — non-septic-safe formaldehyde-based deodorizers will damage the bacterial balance your home system depends on. Our guide to septic-safe cleaning and treatment products covers which formulas to use and which to avoid entirely.
Never dump anywhere that isn't a designated dump station or a connected sewer/septic system. The Clean Water Act prohibits discharge of untreated sewage into waterways or onto the ground. Fines for illegal dumping start at $250 and can reach thousands of dollars per violation depending on jurisdiction.
For a broader look at how RV ownership intersects with water and waste regulations, our RV ownership cost breakdown covers the fees, fines, and recurring expenses most buyers don't account for upfront.
What Do You Put in an RV Black Tank After Emptying It?
Add 1–2 gallons of fresh water and a treatment product immediately after every dump — before you leave the dump station, not when you get back to your site.
Why water first? The 1–2 gallons of water you add creates a liquid base in the tank that keeps waste from sitting dry against the sensors and tank walls. Dry waste is how sensor fouling starts and how pyramid plugs develop.
Treatment product options:
- Enzyme/bacterial treatments — Break down waste biologically and control odor without harsh chemicals. The RV Industry Association (RVIA) identifies these as the current industry standard. Happy Campers Organic RV Holding Tank Treatment (1 scoop per 40 gallons) and Walex Bio-Pak are both widely used and septic-safe.
- Chemical treatments — Faster-acting odor control, often formaldehyde-based. Effective in warm weather but not septic-safe and banned in some states and campgrounds.
According to EPA guidance on septic system maintenance, biological treatments preserve the bacterial balance that both RV holding tanks and home septic systems depend on — which is why they're the better default choice for most RVers.
For a full product-by-product breakdown, see our RV black tank treatment guide.
Dump Station Etiquette: What Are the Unwritten Rules?

The Septic Owner's Handbook
Own a septic system? Get the manual nobody gave you.
How it works, the golden rules, the maintenance calendar, and a warning-signs decoder for every gurgle, smell, and wet spot — so small issues never become $15,000 ones.
Get the Handbook — $27 →Instant download · 250+ pages, 17 chapters + printable toolkit · Yours to keep foreverEvery dump station has a few conventions that experienced RVers follow without thinking about them. If you're new, knowing these upfront saves you from being that person in the campground rumor mill.
Leave the station cleaner than you found it. Rinse the station pad, the hose connection port, and your own hose ends before you pack up. Most stations have a fresh-water rinse hose specifically for this. A dump pad covered in residue because the previous user didn't rinse is a campground social violation that people remember.
Don't take longer than necessary. If there's a line, move through efficiently. The full process — connect, drain, gray flush, tank rinse, pack up — should take 10–20 minutes. Don't set up camp at the dump station.
Keep the lid on the dump port when not in use. The cap goes back on as soon as your hose comes out. This contains odor for the next person.
Don't dump greywater-only loads ahead of someone waiting to dump black. It's technically allowed, but if someone is waiting with a full black tank, running your gray tank alone when you don't need to is inconsiderate.
Never leave your hose behind. It sounds obvious, but sewer hose abandonment at dump stations is common enough that it's a named phenomenon among campground hosts. Pack what you brought.
What About Cold Weather and Frozen Black Tanks?
If you're camping in temperatures below freezing, your black tank system faces a different set of problems. This section exists because the standard dump process breaks down when temperatures drop below 32°F, and "just dump it faster" is not the fix.
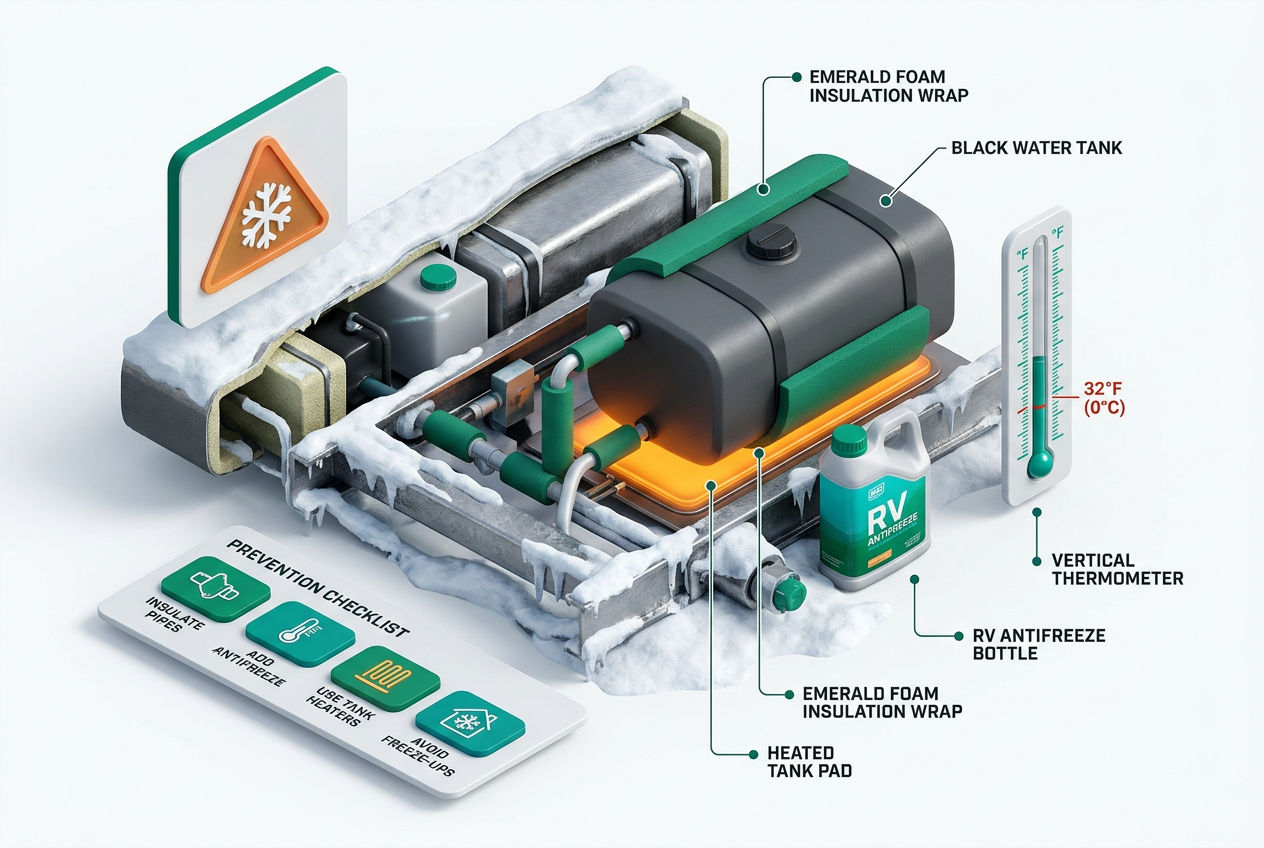
The core problem: Your black tank itself is inside the RV's underbelly and usually insulated, but the dump valve and the section of sewer pipe between the tank and the exterior drain fitting are exposed. When those freeze, the valve won't open, or it will open partway and then jam with ice in the line.
Prevention: The Facon Electric RV Tank Heater Pad ($25–$45) attaches directly to the underside of the tank and keeps the valve assembly above freezing with minimal power draw. Most four-season RVs include similar heating elements from the factory — check your spec sheet before winter camping.
Treatment in cold weather: Standard enzyme-based treatments perform poorly below 40°F — bacterial activity slows significantly, which means less biological breakdown and more odor. In cold weather, switch to a chemical treatment rated for low temperatures, or use a higher dose of enzyme treatment and add warm water (not boiling) when charging the tank after a dump.
Dump timing: Don't let your black tank sit more than 60–70% full in freezing temps. A fuller tank means more liquid sitting near the valve, which accelerates freeze risk at the connection point.
Ice is not theoretical at a dump station in January in the Rocky Mountains — it's a real mechanical problem. Budget extra time and have a heat gun or hairdryer accessible if you're camping in sustained sub-freezing conditions.
For more on protecting your RV systems in winter, our guide to winterizing an RV water system covers the full cold-weather prep sequence.
Equipment Comparison: What Are Your RV Black Tank Dump Options?
| Method | Best For | Cost | Notes |
|---|---|---|---|
| Gravity dump (standard) | Most dump stations | $0 equipment cost | Requires dump station access; 2–5 min drain time |
| Built-in tank flush valve | Mid-range/high-end RVs | Factory-installed | Add-on flush for cleaner sensors |
| Camco Swivel Stik wand | Rigs without built-in flush | $15–$40 | Threads onto hose; manual wand through toilet |
| Macerator pump (Flojet) | Remote sites, small hose | $150–$300 | Grinds waste; pumps uphill; 10–15 min for 20 gal |
| Portable waste tank (Thetford Porta Tote) | Short trips, no sewer hookup nearby | $50–$120 | Haul waste separately to dump station |
When does a macerator pump actually make sense? If you're parked at a site with no sewer hookup and the dump station is more than 50 feet away — or uphill — a gravity dump won't work reliably. A macerator like the Flojet 18555-000A grinds solids and pumps waste through a standard 3/4-inch garden hose. The tradeoff: it takes 10–15 minutes to empty a 20-gallon tank where gravity would take 2–3. Use it when geography requires it, not as a default upgrade.
Sources & Methodology
- RV Industry Association (RVIA) — Industry guidance on black tank treatment standards and sensor reliability rates. rvia.org
- U.S. Environmental Protection Agency (EPA) — Guidance on septic system maintenance and biological treatment compatibility. epa.gov/septic
- Camco Manufacturing — Product specifications for RhinoFLEX sewer hose and Swivel Stik tank rinser. camco.net
- Walex Products — Bio-Pak formulation and septic-safe certification documentation. walex.com
- Sanidumps.com — Dump station location database used for distance and fee range verification. sanidumps.com
Frequently Asked Questions
How do I know when my RV black tank is full and needs to be emptied?
Empty your black tank when the monitor reads two-thirds full — that's the threshold that balances drainage efficiency against sensor accuracy. A tank at two-thirds capacity has enough liquid volume to carry solids out cleanly through a 3-inch drain. Below that, solids can sit dry and build up; above it, flow pressure drops and complete draining gets harder.
Here's the limitation you need to know: according to the RV Industry Association (RVIA), most RV owners experience black tank sensor misreading within one to two seasons of use. Waste residue coats the probe tips and triggers false "full" readings. Because of this, most experienced RVers stop trusting sensors entirely and switch to tracking dump frequency by usage days — solo travelers typically fill a 20-gallon black tank in 4–6 days, couples in 2–4 days, families of four in under 48 hours. Use the sensor as a rough backup, not your primary decision trigger.
What is the correct order to dump RV black and gray tanks?
Always dump the black tank first, then the gray tank — every single time, without exception. The reason is mechanical, not just procedural. Your gray tank holds relatively clean water from sinks and the shower. When you open the gray valve after the black tank has drained, that cleaner gray water flows through your sewer hose and flushes out residual black tank material clinging to the hose walls.
Reverse the order and you accomplish the opposite: your sewer hose is coated in gray water residue first, then black tank waste flows through it and sits. By mid-summer, a hose that's been dumped in the wrong order repeatedly develops an odor that no amount of rinsing fully removes.
The only exception is if your gray tank is nearly empty — in that case, the rinse effect is minimal. Fill a sink with a few gallons of water before dumping if your gray level is low, so you still get an adequate flush through the hose.
What should I put in my RV black tank after emptying it?
Add 1–2 gallons of fresh water plus a treatment product immediately after every black water tank flush — before you leave the dump station. The water creates a liquid base that keeps waste from sitting dry against sensors and tank walls, which is the primary cause of both sensor fouling and pyramid plug formation.
For treatment, enzyme-based biological products are the current standard recommended by the RV Industry Association. Happy Campers Organic RV Holding Tank Treatment (one scoop per 40 gallons) and Walex Bio-Pak are both effective, septic-safe, and legal at campgrounds that ban formaldehyde-based products. According to EPA guidance on septic system maintenance, biological treatments preserve bacterial balance — important if you ever dump into a home septic system.
One honest limitation: enzyme treatments work poorly below 40°F. In cold weather, switch to a low-temperature-rated chemical treatment or increase your enzyme dose and add warm water to the tank after charging.
Can I dump my RV black tank into my home septic system?
Yes, but only with some preparation. Your home septic tank has a fixed capacity — typically 750 to 1,500 gallons for a residential system — and adding RV waste accelerates how quickly it fills and needs pumping. If your tank is already due for service, one full RV dump could push it into overflow territory.
The more critical factor is treatment product compatibility. Formaldehyde-based RV tank treatments will kill the beneficial bacteria your septic system relies on to break down waste. Only use enzyme-based or septic-safe certified treatments in your RV black tank if you plan to dump at home. Products like Happy Campers and Walex Bio-Pak are explicitly septic-safe. Check the label before you use anything else.
For the full capacity math and a step-by-step guide to home septic dumping, see our detailed guide on RV waste and residential septic systems.
How long does it take to empty an RV black tank at a dump station?
The full RV black tank dump process takes 10–20 minutes from pulling up to the station to pulling away — broken down as follows: setup and hose connection takes 2–3 minutes; black tank drain runs 2–5 minutes depending on tank size and how full it is; gray tank flush adds another 2–3 minutes; built-in black water tank flush (if equipped) runs 3–5 minutes until water runs clear; and hose disconnect, rinse, and stow takes another 2–3 minutes.
First-timers run closer to 20 minutes because connection and disconnection take longer before the steps become muscle memory. Experienced RVers with a well-organized bay can complete the process in 10–12 minutes. If you're using a macerator pump instead of gravity drainage, add 5–8 minutes to the drain phase — macerators are slower but work where gravity can't. A line at the dump station is the biggest variable; peak summer weekends at popular campgrounds can mean a 10–15 minute wait before you even start.
What is a macerator pump and when do I need one for RV holding tank flush situations?
A macerator pump is a device that attaches to your RV's black tank outlet and grinds solid waste before pumping it through a standard 3/4-inch garden hose — versus the 3-inch sewer hose gravity dumping requires. The Flojet 18555-000A is the most widely used model, retailing for $150–$300.
You need a macerator when gravity dumping isn't physically possible: if the dump station inlet is uphill from your RV, if the connection point is more than 50 feet away, or if you're pumping into a raised cleanout. Macerators also allow you to do an RV holding tank flush using a smaller, easier-to-store hose.
The honest tradeoff: a macerator takes 10–15 minutes to empty a 20-gallon tank where a gravity dump takes 2–3 minutes. It also adds a pump motor to your maintenance list. Use one when site geometry requires it, not as a default upgrade over a standard sewer hose setup. For most campground and dump station situations, gravity dumping with a quality sewer hose is faster and simpler.
Was this article helpful?
Frequently Asked Questions
Recommended Resources
📖 Related Articles
Find Septic Professionals Near You
Connect with licensed, verified septic companies in your area.